

The Art of the Sighted Guide: Leading with Respect
A doorway can become complicated fast: one heavy door, one impatient line, and one well-meaning helper who suddenly freezes. The hard part isn’t kindness—it’s timing, consent, and clear language.
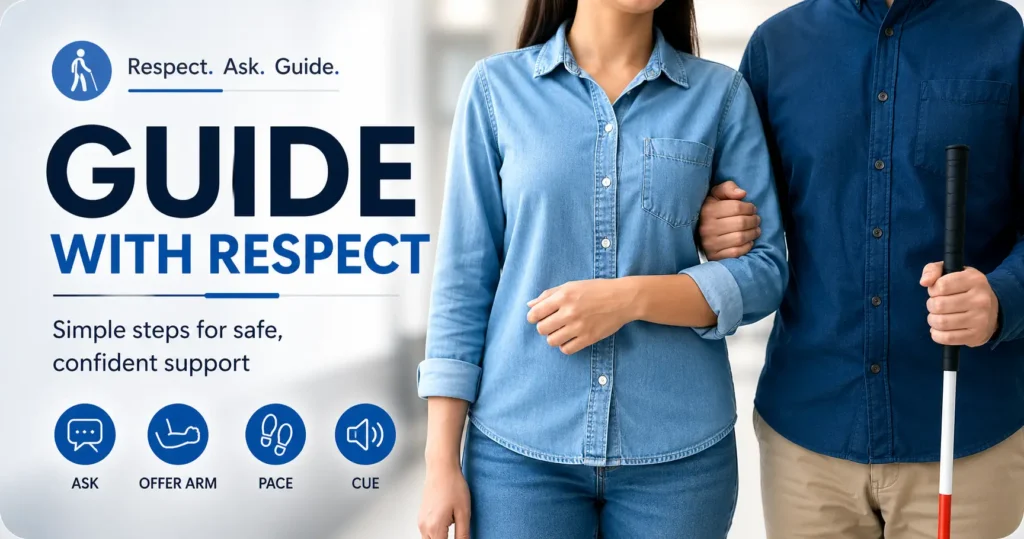
1. The First Sentence
Start with a simple question: “Would you like a sighted guide?” Never grab first. Wait for consent to ensure balance and control.
2. The Elbow
Offer your arm. Let them grip your elbow. This positioning allows them to follow your body’s movements naturally and safely.
3. The Pace
Walk slightly ahead at a steady, predictable pace. Your movement acts as a physical cue for turns and stops.
4. Essential Cues
Provide brief, timely cues for curbs, stairs, and narrow spaces. Avoid overexplaining; let the physical connection do the work.
Moving together without the guesswork. Simple. Respectful. Effective.
Table of Contents
Start Here: The Elbow Is Offered, Not Taken
The most important part of a low vision sighted guide script happens before anyone moves. Not at the curb. Not at the stairs. Not while the automatic doors are opening with the suspense of a tiny theater curtain.
It happens when you decide whether to offer help or take control. Those are very different things.
Why “Take My Arm” Works Better Than “Let Me Grab You”
When you offer your arm, the person with low vision keeps agency. They can accept, refuse, choose a side, choose a grip, or ask for verbal directions instead. When you grab their arm, even with good intentions, you turn their body into the passenger and yours into the steering wheel. Nobody enjoys being treated like luggage with opinions.
I once watched a well-meaning volunteer at a community breakfast reach for someone’s shoulder from behind. The person startled, stepped sideways, and nearly bumped a chair. The volunteer looked mortified. The fix would have taken one sentence: “Hi, I’m on your right. Would you like my arm?”
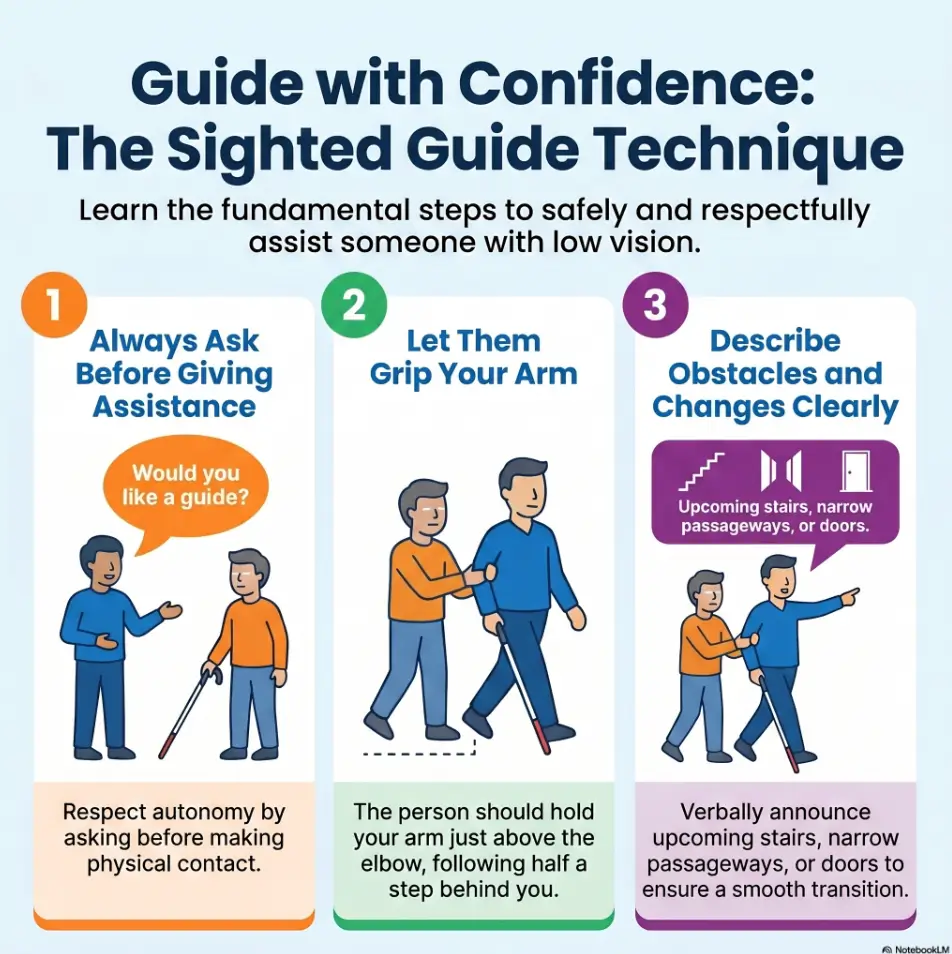
The Basic Position: You Lead by Half a Step, They Choose the Grip
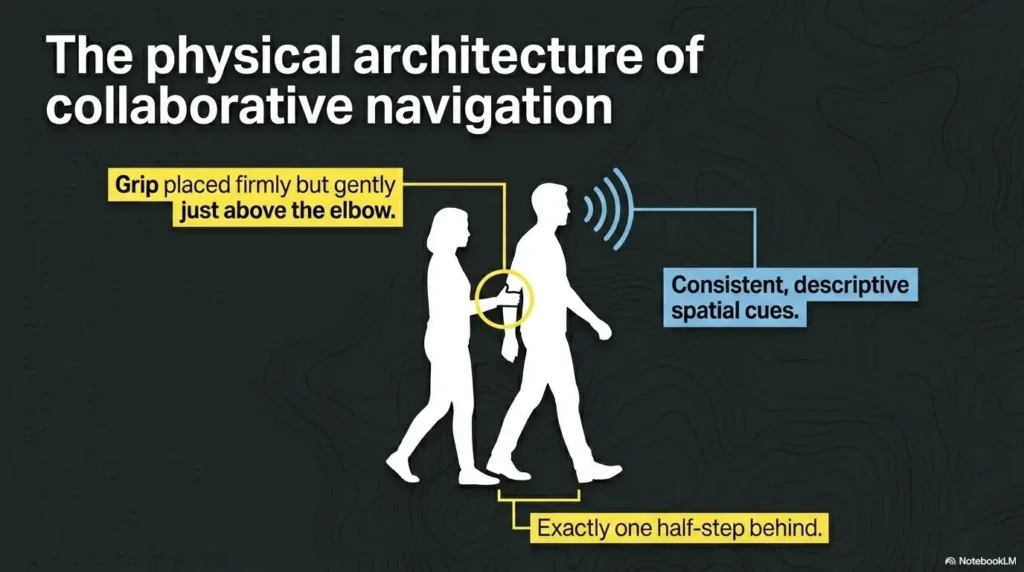
In many common sighted guide techniques, the guide walks slightly ahead, often about a half-step. The person being guided usually holds the guide’s arm just above the elbow. This position helps them sense your movement, pace, turns, stops, and small changes in direction.
But do not treat that as a rigid law carved into marble. People have preferences. Someone may prefer your right arm, your left arm, a lighter touch, verbal cues only, or a different method because of pain, height, balance, cane use, or past training.
The Small Script That Prevents a Big Awkward Moment
Use this simple sequence:
- Identify yourself: “Hi, I’m nearby.”
- Offer specific help: “Would you like sighted guide assistance?”
- Offer your arm: “You can take my left arm just above the elbow.”
- Wait: Do not move until they accept and settle their grip.
- Speak before touching.
- Offer your arm instead of taking theirs.
- Wait for the person to choose how they want to proceed.
Apply in 60 seconds: Practice saying, “Hi, I’m nearby. Would you like my arm?” out loud once.
Who This Is For, and Who This Is Not For
This guide is for ordinary people in ordinary places. Grocery aisles. Church lobbies. office hallways. Airports. Hotel entrances. Waiting rooms. Those small public spaces where everyone is trying to be decent while also juggling keys, coffee, children, receipts, and one rebellious tote bag.
It is also for anyone who has ever frozen because they wanted to help but feared saying the wrong thing. That hesitation is understandable. Respectful help has a rhythm, and most of us were never taught the steps.
This Is For Sighted Helpers Who Want to Be Useful Without Taking Over
You may be a friend, caregiver, coworker, usher, volunteer, receptionist, retail worker, neighbor, rideshare driver, or family member. Your goal is not to become a mobility instructor in one article. Your goal is smaller and more useful: make a safe offer, guide only if accepted, and communicate clearly.
That small goal matters. A clumsy offer can create embarrassment. A respectful offer can reduce friction in the exact moment someone needs information, not a rescue parade.
This Is For Everyday Places: Stores, Sidewalks, Lobbies, Churches, Airports
The script works best in common transitions: entering a building, crossing a lobby, navigating a crowded aisle, finding a seat, approaching stairs, or moving through a narrow hallway. These are the “ordinary hard parts.” They do not look dramatic from a distance, but they can be full of tiny variables.
Think of a busy café: chair legs scraping, espresso machine hissing, someone saying “behind you,” and a menu board glowing like a small sun. Low vision navigation can involve sound, contrast, glare, memory, texture, and timing all at once. Similar practical barriers show up when someone needs to read restaurant menus with low vision in dim lighting or under glossy glare.
This Is Not a Replacement for Orientation and Mobility Training
Orientation and mobility specialists teach structured travel skills for people who are blind or have low vision. That training is its own profession, and it exists for a reason. This article is not a substitute for individualized instruction, fall-risk assessment, cane training, rehabilitation, or medical guidance.
What this article can do is help you avoid the big social and safety mistakes: grabbing, pushing, rushing, vague warnings, and continuing to help after someone has declined.
Eligibility Checklist: Should You Offer Sighted Guide Help Right Now?
Use this yes/no check before you step in:
- Yes / No: Is there a specific obstacle, transition, or destination involved?
- Yes / No: Can you speak calmly before making contact?
- Yes / No: Is there enough space to walk slightly ahead without pulling?
- Yes / No: Are you willing to stop helping if they say no?
Neutral next step: If most answers are yes, offer help with one clear sentence. If not, give space and remain available.
The Respect-First Script: What to Say Before You Move
A good script is not fancy. It is short enough to use when a shopping cart is squeaking nearby and someone’s toddler is narrating the entire cereal aisle.
The best script has three parts: who you are, what help you are offering, and what the person can do if they accept.
“Hi, I’m Nearby. Would You Like Sighted Guide Assistance?”
Start with location and choice. “Hi, I’m nearby on your left. Would you like sighted guide assistance to the entrance?” That sentence does several things quietly. It identifies you, gives orientation, names the help, and asks permission.
Notice what it does not do. It does not shout “Careful!” It does not announce the person’s disability to the room. It does not begin with a hand on their back. It does not turn the moment into a small civic emergency.
“You Can Take My Left Arm Just Above the Elbow If That Works for You”
Once the person accepts, offer your arm. You might say, “You can take my left arm just above the elbow if that works for you.” If your right side is safer because of the layout, say that. If the person says, “Other side, please,” switch without commentary.
This is where many helpers accidentally over-explain. You do not need to deliver a TED Talk on elbows. Offer the arm, let the person find it, and move only when they are ready.
Wait. Yes, Actually Wait.
Waiting is not dead air. Waiting is part of the technique. Give the person a second to locate your arm, adjust their grip, manage a cane, shift a bag, or ask a question.
I learned this the awkward way in a theater lobby. I offered help, got a yes, then immediately stepped forward like a wind-up toy with shoes. The person laughed and said, “I’m still attaching myself to the transportation system.” Fair. Very fair.
Quote-Prep List: What to Gather Before Training Staff or Volunteers
If your organization wants training, gather these before comparing options:
- Number of staff or volunteers who interact with visitors.
- Common spaces: stairs, ramps, elevators, aisles, outdoor walkways.
- Incident concerns: near-falls, crowding, poor lighting, confusing entrances.
- Audience needs: older adults, event guests, patients, students, worship attendees.
- Training format needed: quick briefing, live workshop, written script, or refresher card.
Neutral next step: Ask for training that includes consent language, hands-on practice, and emergency boundaries.
The Elbow Setup: How to Position Your Arm Safely
The elbow setup should feel boring in the best possible way. No tugging. No twisting. No dramatic arm extension, as though you are presenting a sword to a medieval court.
Your arm should be relaxed and easy to find. The person with low vision should be able to hold above your elbow without being forced into an awkward reach.
Keep Your Arm Relaxed, Close to Your Side, and Easy to Find
Stand beside the person, usually slightly in front. Keep your arm naturally bent or relaxed at your side. You can say, “My left arm is available,” and let them locate it. If they ask, you may lightly tap the back of their hand with your arm or hand, but do not assume touch is welcome.
The goal is a stable connection, not a clamp. A good guide position gives information through movement. A bad one feels like an enthusiastic uncle dragging someone toward a buffet.
Let the Person With Low Vision Decide Which Side Feels Better
Side preference may depend on vision field, cane hand, hearing, balance, pain, shoulder mobility, or simple habit. One person may prefer your right arm because their cane is in the other hand. Another may prefer the side with less glare. Someone else may say, “Just tell me where the door is.”
Respect the answer. There is no prize for being technically correct while ignoring the person in front of you.
When Wrist, Hand, or Linked-Arm Guidance May Be Preferred
Some people may use a different guide method because of height differences, arthritis, fatigue, cultural comfort, age, or personal training. A child may need a different setup than an adult. A person with shoulder pain may not want to hold above the elbow. An older adult may need more support than basic sighted guide technique provides.
Ask, “What works best for you?” That one sentence saves everyone from pretending.
Mini Infographic: The 4-Part Elbow Guide Flow
1
Ask
“Hi, I’m nearby. Would you like my arm?”
2
Offer
Let them take your arm just above the elbow.
3
Lead
Walk about a half-step ahead at their pace.
4
Cue
Name curbs, stairs, doors, stops, and narrow spaces early.
Walking Together: The Half-Step Rule That Keeps Both People Oriented
The half-step rule is simple: the guide usually walks slightly ahead so the person being guided can feel changes through the guide’s body movement before reaching the change themselves.
It is not about power. It is about preview. Your body becomes an early-warning system, not a bulldozer.
Why the Guide Usually Walks Slightly Ahead
When you slow down, the person feels the change. When you turn, they feel the turn. When you pause, they pause with you. That tiny lead creates useful information without requiring a constant stream of words.
If you walk side by side, the person may not get enough warning before a doorway, chair, curb, or crowd. If you walk too far ahead, you may start pulling. Half a step is the quiet middle path.
Match Their Pace Instead of Setting a “Helpful” Pace
Do not assume faster is better. Many sighted helpers speed up because they feel nervous. The body says, “Let’s finish this quickly.” The better instinct is to slow down by 10 percent and let the person’s pace lead the pace.
At a hospital entrance once, I saw a staff member guide someone beautifully by doing almost nothing dramatic. She walked steadily, paused at the mat, named the automatic door, and never once used the phrase “watch out.” It was competence with soft shoes.
Here’s What No One Tells You: Speed Can Feel Like Noise
For someone with low vision, too much speed can turn a hallway into static. Footsteps, echoes, glare, voices, carts, and shifting light can all compete for attention. When you rush, you add one more input.
Slow is not patronizing when it is responsive. Slow is only patronizing when you ignore the person’s actual pace and perform slowness like theater.
- Walk about a half-step ahead.
- Do not pull forward.
- Pause before transitions that need explanation.
Apply in 60 seconds: Walk 10 steps with a friend holding your arm, then repeat at a slower pace and notice the difference.
Verbal Cues That Actually Help: Short, Specific, and Timed
The best verbal cues are small tools. They are not speeches. They do not narrate every floor tile. They appear when information matters.
Bad cue: “Careful!” Useful cue: “Curb down in two steps.” The first creates alarm. The second gives a map.
Say “Curb Up in Two Steps,” Not “Careful!”
“Careful” is emotionally loud but informationally thin. Careful of what? A curb? A dog? A wet floor? A decorative fern with delusions of grandeur?
Try cues like:
- “Curb down in two steps.”
- “Door pulls toward us.”
- “Narrow space ahead. I’ll move slightly in front.”
- “Stairs up. Handrail on your right.”
- “We’re stopping before the counter.”
Name the Direction, Surface, and Timing When It Matters
Useful cues often include one or two of these: direction, surface, timing, and action. “Ramp down starting now.” “Wet mat underfoot.” “Chair on your left.” “We turn right after the next step.”
Do not overload the person. If you give six details at once, the cue becomes a junk drawer. Keep it clean.
Stop Before Explaining Something Complicated
If the path gets confusing, stop. Explain while stationary. “Let’s pause. There’s a line of chairs on the right and a narrow gap ahead. We’ll go through single file.”
Stopping before explaining is underrated. It reduces the “listen while moving through chaos” problem. It also makes you sound less like a GPS that has developed anxiety.
Show me the nerdy details
Good verbal cues reduce cognitive load by converting visual information into short, action-ready language. In practice, the strongest cues usually answer three questions: what is changing, where is it, and when will it happen? This is why “curb down in two steps” is stronger than “be careful.” It gives the person a specific upcoming change, timing, and expected body adjustment.
Doors, Curbs, and Narrow Spaces: The Places Where Guiding Gets Tricky
Most guiding errors happen during transitions. Flat hallway? Usually fine. Doorway with a crowd, a threshold, a handle direction, and someone holding a latte? Suddenly everyone’s nervous system has joined a committee.
Transitions need two things: a slight slowdown and a useful cue.
Doorways: Say Push or Pull, Then Slow Down
Before a door, say whether it pushes or pulls if that affects movement. “Door pulls toward us.” “Automatic door ahead.” “Door opens to the right.” Then slow down enough for the person to adjust.
If you are holding the door, avoid stretching the person across your body. That creates a tangled ribbon situation. Instead, pause, explain, and move through in a way that keeps the guide connection natural.
Curbs: Pause, Name Up or Down, Then Move Together
Curbs deserve respect. They are small cliffs in formal clothing. Before stepping up or down, pause or slow clearly. Say, “Curb down,” or “Curb up,” ideally with timing: “Curb down in one step.”
Do not yank someone off a curb. Do not use surprise momentum as a safety strategy. Gravity is already committed enough.
Narrow Spaces: Signal Before You Go Single File
For narrow spaces, many guides move their guiding arm slightly behind them so the person can step behind in single file. But do not just change shape and hope they decode it. Say, “Narrow space ahead. I’m moving my arm back so you can step behind me.”
After passing through, return to the usual position and say, “We’re clear.” That little closure helps orientation.
Decision Card: Verbal Directions vs. Elbow Guidance
| Choose this | When it fits | Trade-off |
|---|---|---|
| Verbal directions | The route is simple, quiet, and the person prefers independence. | Requires clear landmarks and good timing. |
| Elbow guidance | The area is crowded, unfamiliar, narrow, or transition-heavy. | Requires consent, steady pace, and careful transitions. |
Neutral next step: Ask, “Would verbal directions be enough, or would you like my arm?”
Stairs and Ramps: Don’t Rush the Transition
Stairs and ramps are not the moment to improvise with confidence you found in the parking lot. Slow down. Pause. Name what is ahead. Offer the handrail side when possible.
The principle is simple: the person should know the transition before their foot meets it.
Stop at the First Step Before Continuing
Approach the stairs and stop before the first step. Say, “Stairs up,” or “Stairs down.” Let the person locate the edge, handrail, or your position before moving.
Some people may prefer to find the first step with a cane or foot. Others may want your arm and the handrail. Your job is to provide information, not choreograph a staircase performance with jazz hands.
Say Whether the Stairs Go Up or Down
Always name direction. “Stairs up” and “stairs down” are short, clear, and useful. If there is a landing, say that too: “Five steps down, then a landing.” Only give numbers if you are sure. Guessing stair counts is a bold little way to lose trust.
If the staircase is busy, pause longer. Crowds create pressure, but pressure is not a safety plan.
Offer the Handrail Side When Possible
If there is a handrail, say where it is: “Handrail on your right.” Do not force the person toward it. Offer the information. They may use it, decline it, or switch sides.
If the person seems unsteady, stop and ask what they need. Basic elbow guiding is not the same as physical support for balance or weight-bearing. That distinction matters, especially when aging vision and fall prevention at home are already part of the bigger safety picture.
- Stop before the first step.
- Say up or down.
- Name the handrail side when available.
Apply in 60 seconds: Memorize this cue: “Stairs down. Handrail on your right. We’ll start when you’re ready.”
Common Mistakes: Don’t Do These Even If You Mean Well
Most bad guiding comes from good intentions moving too fast. Someone sees a possible problem, panic puts on a tiny safety vest, and suddenly there is grabbing, pushing, or loud warning.
The better approach is slower, clearer, and less theatrical.
Don’t Grab Their Arm Unless There Is Immediate Danger
Grabbing can startle someone and disrupt their balance. It can also feel deeply disrespectful. Even if your goal is help, surprise contact says, “I am in charge of your body now.” That is a heavy message to send in a grocery aisle.
In ordinary situations, speak first. “Hi, there’s a cart in the walkway. Would you like help around it?”
Don’t Push From Behind, Pull Forward, or Steer by the Shoulders
Pushing from behind gives very little useful information and can feel alarming. Pulling forward can cause trips. Steering by the shoulders treats the person like a rolling office chair, which is not a category of human dignity anyone asked to join.
Offer the arm. Walk slightly ahead. Cue transitions. That is the whole elegant machine.
Don’t Say “Over There” and Expect That to Be Useful
“Over there” depends on shared visual reference. Try replacing it with orientation language: “The counter is about six feet ahead,” “The chair is to your left,” or “The door is at 2 o’clock.”
Use clock directions only if the person finds them helpful. Some people love them. Some people do not. The secret ingredient is still asking.
Don’t Keep Guiding After They Say They’re Fine
If someone declines help, believe them. You can say, “No problem,” and step back. Do not hover like a nervous weather system.
If you are staff or a volunteer, you can add, “I’ll be nearby if you need anything.” Then actually let them move independently.
Coverage Tier Map: What Better Public-Space Support Looks Like
For churches, clinics, shops, and community spaces:
- Tier 1: Staff know not to grab, push, or shout vague warnings.
- Tier 2: Staff can use a consent-based offer script.
- Tier 3: Staff can guide through doors, seating, and narrow spaces.
- Tier 4: Staff can pause and cue stairs, ramps, elevators, and crowded transitions.
- Tier 5: The space also improves lighting, contrast, signage, clutter control, and visitor communication.
Neutral next step: Start with Tier 2 training, then audit the 3 most confusing transitions in the building.
Emergency Exception: When Touching Without Permission May Be Necessary
Consent is the rule. Immediate danger is the narrow exception. The word “narrow” is doing important work here.
If someone is about to step into traffic, fall into a hazard, or collide with a sudden danger, brief protective contact may be necessary. But that does not turn the whole situation into a rescue mission.
Immediate Danger Changes the Rule, But Only Briefly
Immediate danger means something urgent is happening now. Not “they might be confused.” Not “I feel uncomfortable watching them navigate.” Not “they are moving slower than I prefer.”
Examples may include a vehicle entering the path, an open construction hole, a sudden spill at the top of stairs, or a person about to trip over an obstacle they cannot reasonably detect in time.
Say What Happened as Soon as the Person Is Safe
After brief emergency contact, explain immediately: “I’m sorry I grabbed your arm. A cart was rolling toward you from the right.” Or, “I touched your shoulder because the curb edge was directly under your foot.”
That explanation restores information. It also tells the person you understand the contact was unusual, not your default setting.
Return Control Quickly Instead of “Rescuing” the Whole Situation
Once the immediate danger has passed, return control. Ask, “Are you okay? Would you like my arm, or would you prefer directions?”
Do not keep holding on because adrenaline is now driving the bus. Emergency help should end when the emergency ends.
- Use it only for immediate danger.
- Explain what happened right away.
- Ask how the person wants to continue.
Apply in 60 seconds: Practice saying, “I touched your arm because there was immediate danger. How would you like to continue?”
Different Bodies, Different Needs: Adjust Without Making It Weird
One of the easiest ways to become a better helper is to stop treating “low vision” as one uniform experience. People differ. Bodies differ. Training differs. Preferences differ. Tuesday differs from Thursday. Humans are inconveniently specific, which is also what makes them worth listening to.
The best guiding is flexible without becoming fussy.
If the Person Is Taller, Shorter, or Uses a Cane
Height changes the feel of the elbow grip. A much shorter person may prefer a lower hold. A taller person may prefer a different arm position. Someone using a white cane may want your arm on the side opposite the cane, or they may want verbal directions while continuing to use the cane independently.
Ask, “Which side works better for you?” That question is practical, respectful, and mercifully short.
If They Need More Physical Support Than Basic Elbow Guiding
Basic sighted guide assistance is not the same as lifting, bracing, catching, or supporting someone’s weight. If the person needs balance support, transfer assistance, or help because of pain, dizziness, recent surgery, neurological symptoms, or fatigue, the situation may require a caregiver, clinician, mobility device, or trained support person.
Do not fake expertise. Faking expertise around fall risk is not charming. It is a banana peel wearing a name tag.
If Balance, Pain, or Fatigue Changes the Plan
A person may start with elbow guidance and then need to stop. They may need a chair, a quieter route, an elevator instead of stairs, or more time. Fatigue can change mobility quickly, especially in long buildings, airports, medical centers, and crowded events.
Use gentle check-ins: “Would you like to pause?” “Do you want the elevator instead?” “Is this pace still okay?”
Mini Calculator: How Much Time Should You Allow?
Simple planning calculator for staff, volunteers, or caregivers:
Plan for about 7 minutes so you can pause, cue transitions, and avoid rushing.
Neutral next step: Build in a small time buffer instead of trying to guide faster.
Safety / Disclaimer
This article is general educational guidance, not medical, mobility, rehabilitation, or orientation and mobility training. Sighted guide techniques vary by person, environment, and training background.
If someone has balance problems, recent surgery, pain, dizziness, weakness, neurological symptoms, a history of falls, or needs physical support, encourage help from a qualified clinician, orientation and mobility specialist, vision rehabilitation professional, or appropriately trained caregiver.
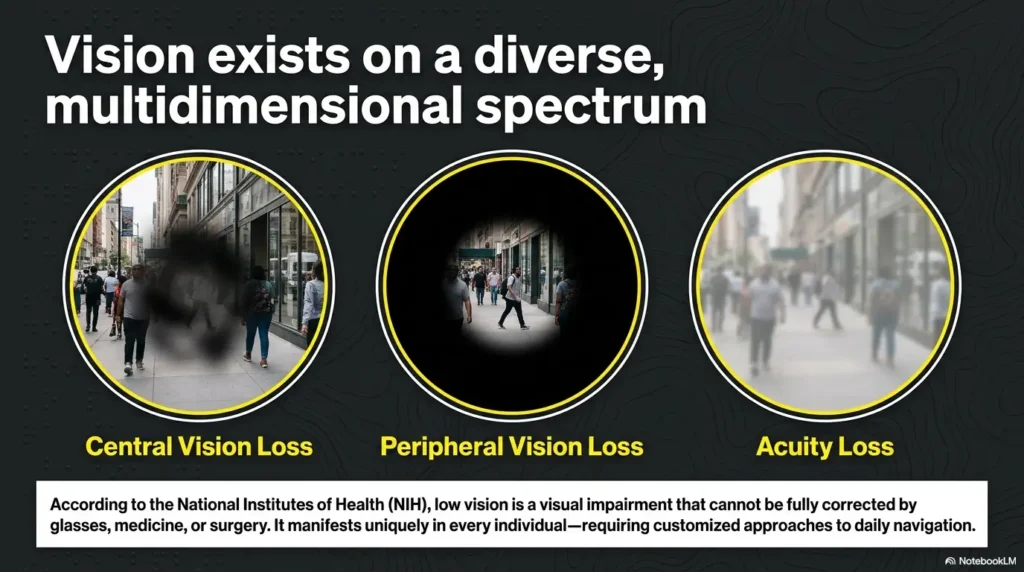
Vision organizations such as Perkins School for the Blind emphasize consent, clear communication, and avoiding grabbing or pushing during human guide assistance. The National Eye Institute explains that low vision is vision loss that cannot be fully corrected with ordinary glasses, contacts, medication, or surgery, which means support needs can vary widely from person to person. The American Printing House for the Blind also provides resources that help families, educators, and communities understand blindness and low vision in practical settings.
Use the script in this article as a respectful starting point, not a universal commandment. The person being guided is always the best source for what works in that moment.
FAQ
Should I offer my elbow or wait for the person to ask?
You can offer, but make it specific and optional. Try, “Hi, I’m nearby on your left. Would you like my arm to get to the entrance?” Then wait. The offer is respectful because it gives the person control.
Which arm should I offer to someone with low vision?
Offer the arm that makes sense for the environment, then let the person choose. You might say, “My left arm is available,” but switch if they prefer the other side. Cane use, hearing, glare, pain, or habit may affect the choice.
Where exactly should the person hold my arm?
Many people hold just above the guide’s elbow. That position helps them sense the guide’s movement. But preferences vary, so let the person decide what grip is comfortable and safe.
Is it okay to touch someone’s hand to show them my elbow?
Ask or cue first. You can say, “My arm is just in front of your right hand,” or “Would you like me to show you where my elbow is?” Avoid surprise touch unless there is immediate danger.
What should I say before guiding someone through a doorway?
Use a short cue: “Door pulls toward us,” “Automatic door ahead,” or “Door opens to the right.” Slow down before the doorway and avoid pulling the person through.
How do I guide someone with low vision on stairs?
Stop before the first step. Say whether the stairs go up or down. Name the handrail side if there is one. Start only when the person is ready. If they need balance support, basic elbow guiding may not be enough.
What should I do if the person refuses help?
Accept the refusal calmly. Say, “No problem,” or “I’ll be nearby if you need anything.” Do not follow, hover, or keep offering repeatedly unless a new immediate safety issue appears.
Can I guide someone who is using a white cane?
Yes, if they accept your help. Ask which side they prefer and whether they want elbow guidance or verbal directions. Many cane users may still choose sighted guide assistance in crowded, unfamiliar, or transition-heavy spaces.
What if I accidentally say the wrong thing?
Repair quickly and plainly. “Sorry, that was vague. The counter is about six feet ahead on your left.” Most people do not need perfect phrasing. They need useful information and respect.
Is sighted guide assistance only for people who are blind?
No. People with low vision may also use sighted guide assistance, depending on lighting, crowding, glare, fatigue, unfamiliar spaces, or personal preference. Low vision needs are not always visible from the outside.
Next Step: Practice the 10-Second Offer Before You Need It
The open secret is that safe elbow guiding is not mainly about elbows. It is about the first 10 seconds: identify yourself, offer help, wait for consent, and let the person choose the connection.
That is the loop we opened at the beginning. In the doorway, lobby, aisle, airport, church hall, or clinic entrance, the respectful helper is not the person who moves fastest. It is the person who makes the moment legible.
Memorize One Sentence: “Hi, I’m Nearby. Would You Like My Arm?”
This sentence works because it is short, specific, and humble. It does not assume helplessness. It does not over-explain. It simply opens a door.
If the person says yes, add: “You can take my left arm just above the elbow.” If they say no, answer: “No problem.” That is not failure. That is respect doing its job.
Practice Walking Half a Step Ahead With a Friend
Practice once in a quiet hallway. Walk 10 steps. Stop. Turn. Approach a door. Try a narrow space. Switch sides. Laugh when you make it weird, because you probably will the first time. Better to be awkward in practice than grabby in public.
Then practice cueing: “Curb up,” “door pulls,” “stairs down,” “narrow space,” “we’re stopping.” The words should feel plain in your mouth.
Keep the Goal Small: Consent, Position, Pace, Cue
You do not need to become a perfect guide today. Start with four words in your head:
- Consent: Ask before helping.
- Position: Offer your arm, usually just above the elbow.
- Pace: Walk about a half-step ahead without pulling.
- Cue: Name transitions before they happen.
- Offer, do not grab.
- Slow down at transitions.
- Stop when help is declined or no longer needed.
Apply in 60 seconds: Put the 4-word checklist in your phone: Consent, Position, Pace, Cue.
Your 15-minute next step: Practice the script with one friend, coworker, usher team, or family member. Walk through one doorway, one narrow space, and one pretend curb. Keep it small. The point is not performance. The point is to make your help feel calm, useful, and human. For family members who are still learning how to offer support without taking over, helping a spouse with vision loss can also mean practicing small scripts before stressful moments arrive.
Last reviewed: 2026-04.