

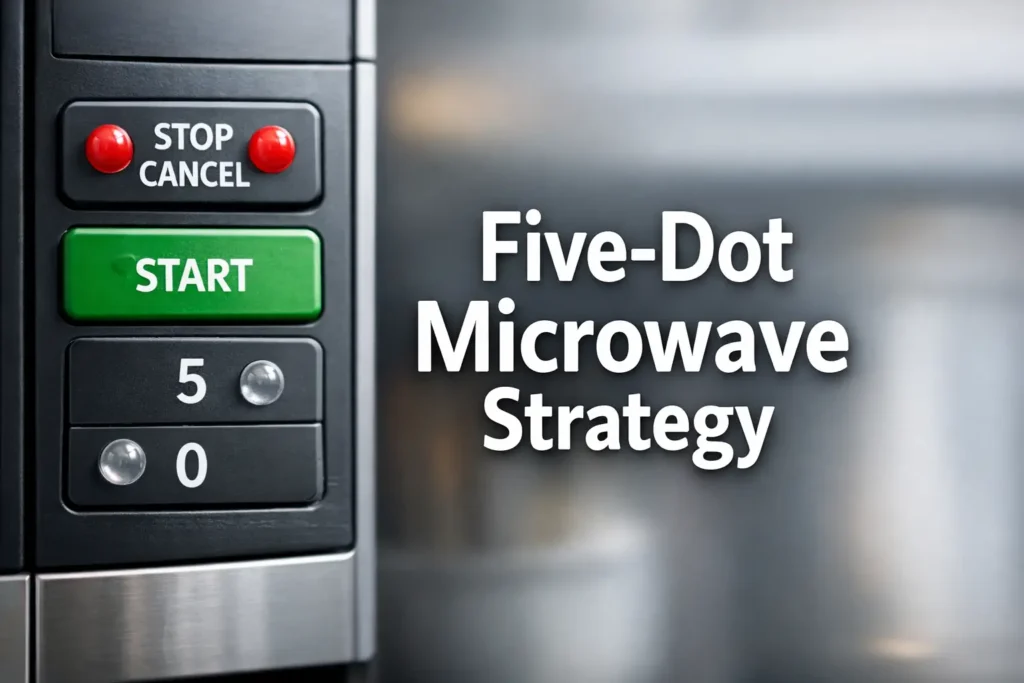
The Five-Dot Strategy: Master Your Microwave by Touch
The fastest way to make a microwave accessible isn’t “label everything.” It’s choosing five dots that prevent the worst mistake on the worst day, then teaching your hand a route it can follow half-asleep.
If your panel feels like smooth glass with identical squares, you’re not alone. For low vision and blind users, glare, steam, and tiny labels turn “quick heat” into guesswork and mis-presses. Without clear tactile markers, you risk runaway heating, scorched food, and the frantic struggle to find the stop button in an emergency.
The Goal: A safety-first marking order using a simple “dot grammar” that stays readable without turning your keypad into tactile confetti.
- No over-labeling.
- No wandering presets.
- Just a panel that finally behaves.
Quick Definition: Raised dots (bump dots) are small adhesive tactile markers placed consistently on key controls to create reliable anchors, even on tricky membrane or capacitive touch panels.
Start by marking the most safety-critical, most frequently used buttons: Stop/Cancel, Start, Add 30 Seconds, and Power Level (or Time Cook if Power Level is buried). Next mark time/number pad anchors (5 and 0) so you can set time reliably. Only after that, mark presets like Popcorn. This order reduces mis-press risk, prevents runaway heating, and makes the panel navigable by touch.
Table of Contents
Who this is for / not for
For: daily microwave users who need “touch navigation” (low vision, blind, glare-sensitive)
If your eyes go on strike under overhead LEDs, or your vision changes with fatigue, or you simply prefer tactile certainty, this guide is for you. The goal is not “perfect labeling.” The goal is predictable control when the kitchen is loud, busy, and slightly chaotic.
For: caregivers setting up a safer kitchen for a parent/partner
I’ve watched well-meaning families do the opposite of helpful: they “label everything” on day one, then wonder why the panel becomes confusing. We’ll set this up so it’s teachable, repeatable, and calm. If you’re building a full home routine around vision changes, you may also want a companion guide on helping a spouse with vision loss so the whole household shares the same “safe-by-default” habits.
For: OTs/rehab pros teaching simple home adaptations
This follows a risk-first logic that works well in training: “panic brake” first, then the shortest reliable cooking path, then convenience.
Not for: commercial kitchens with compliance requirements (use certified adaptive controls)
If you’re responsible for a workplace environment with strict compliance rules, adhesives and DIY dots can be the wrong tool. Use certified adaptive controls, documented accommodation plans, or dedicated accessible appliances.
Not for: microwaves with flat, fully-capacitive panels that won’t tolerate stickers (use alternative strategies)
If your microwave has a completely flat touch panel (no physical travel, no click), raised dots may not register presses or may peel quickly. You can still build a tactile “map,” but you’ll use different cues and routines (we’ll cover those).
- Start with safety controls, not convenience presets.
- Build touch anchors so your hand never “drifts.”
- Teach one shared routine so everyone stays consistent.
Apply in 60 seconds: Stand at the microwave and locate Stop/Cancel and Start with your eyes closed. If you can’t find both within 2 tries, those are your first two dots.
Button triage order: mark these first
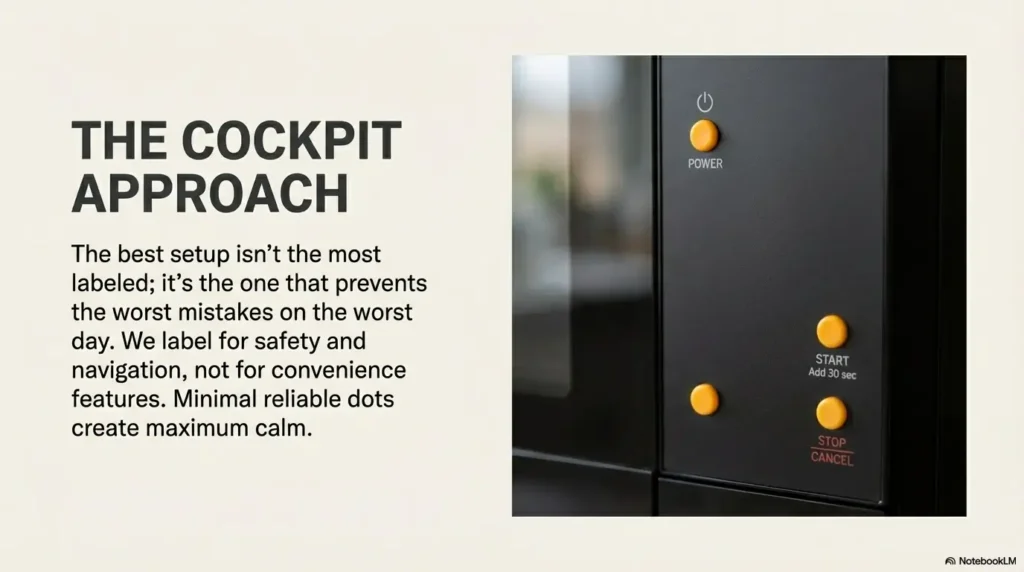
Think of a microwave panel like a cockpit. You don’t label every switch first. You label the ones that stop problems fast, then the ones that let you fly the plane without surprises. This section is your “what to mark first” list, in order, with the “why” attached.
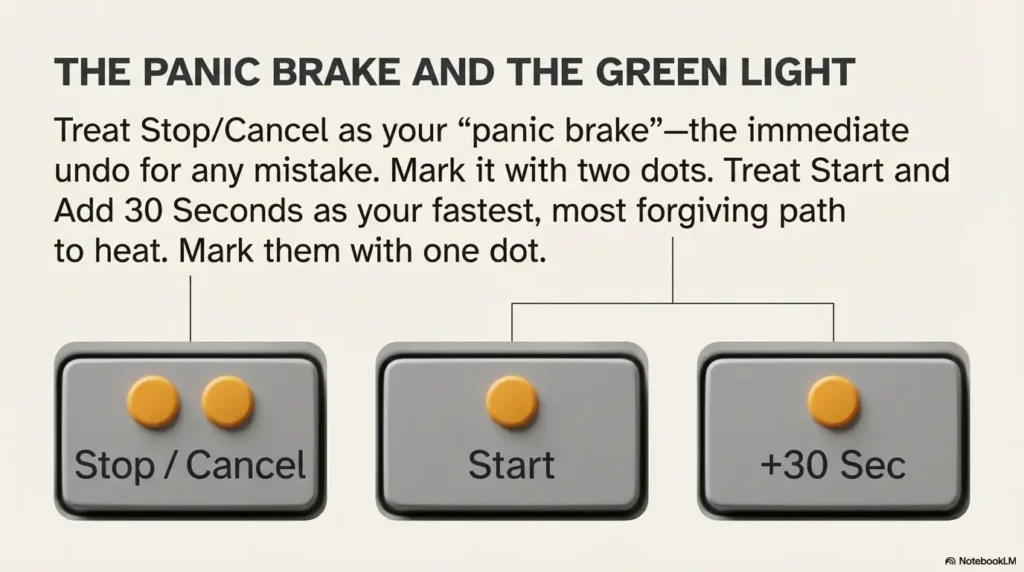
Stop/Cancel first: the “panic brake” button
This is your immediate undo. If you press the wrong mode, if the time is wrong, if the food starts doing that suspicious bubbling thing, Stop/Cancel is the button you need in under one second. In my own kitchen, Stop/Cancel is the difference between “tiny inconvenience” and “why does it smell like caramelized soup?”
- Mark it with a strong cue (a larger dot, two small dots, or a different texture).
- Place it consistently (more on “edge bias” later).
- If there are two candidates (Stop vs Cancel), pick the one that resets the panel and stops cooking.
Start next: the “green light” you need instantly
Start is deceptively important because it’s the button you press most often, and it’s the one that triggers action. A mis-press here can start a mode you didn’t intend. Make Start easy to find, but not easy to confuse with Stop.
Personal note: I once watched a family member “start” a microwave in the wrong mode, then keep pressing random buttons to fix it. They didn’t need more labels. They needed Stop to be unmistakable.
Add 30 Seconds: fastest reliable heat without hunting presets
If your microwave has Add 30 Sec, +30, or Quick Start, you have a gift. It’s the most forgiving way to heat something without entering a mode labyrinth. It also reduces the need to label lots of presets.
- Mark it if you use it weekly.
- If it’s shared with “Start,” treat it like Start for marking purposes.
Time Cook or Cook Time: the doorway into manual control
Manual time entry is the most stable method across models. Presets change. Manual time is eternal. If your microwave requires pressing Time Cook (or Cook Time) before entering numbers, mark it. If it allows typing numbers directly, you may not need a dot here.
Power Level: the “don’t scorch my soup” control (mark if you use it weekly)
Power level is where accessibility meets food science. If you reheat leftovers, melt butter, soften ice cream, or warm milk, power control prevents the classic microwave tragedy: outer lava, inner glacier. If you use power level at least once a week, it earns a dot. If you never touch it, skip it for now.
Show me the nerdy details
Microwaves heat food by exciting water molecules, but not evenly. Lower power settings often work by cycling the magnetron on and off, which gives heat time to spread through conduction. That’s why “50% power for longer” can reduce explosive hot spots in soups and sauces. You don’t need perfect technique. You just need a predictable way to reach power level without wandering into random modes.
- Stop/Cancel is the first dot because it ends mistakes instantly.
- Start and +30 reduce daily friction and mis-press risk.
- Manual Time Cook keeps you independent of quirky presets.
Apply in 60 seconds: Put one dot on Stop/Cancel and practice finding it five times in a row with eyes closed.
Anchor points: build a tactile map that never drifts
Anchors are the secret. Most people fail because they place dots like confetti: “This one feels important, dot it.” Anchors are different. Anchors create a map your fingers can trust.
Number pad anchors: mark 5 (center) and 0 (bottom-center)
On a typical keypad, 5 is the center of gravity. If you can find 5 by touch, you can locate 2, 8, 4, 6 like a mental compass. And 0 is your bottom landmark. Marking both makes time entry dramatically easier.
Small anecdote: the first time I tried this setup, I thought “5 is enough.” Then I realized 0 is where my hand lands naturally when I’m rushing. Adding the 0 dot cut my mis-presses in half, purely by feel.
Time Set anchors: mark Time Cook + Start as a two-step pair
Pairing is a power move. If your routine is “Time Cook, numbers, Start,” then Time Cook and Start should feel like two ends of a short hallway. When those two are reliable, everything else can be learned gradually.
Door/Handle cue: add a small cue near the latch area (if safe and non-slip)
Some people benefit from a non-button cue: a tiny tactile marker near the door edge or handle to orient themselves to the appliance quickly. If you do this, keep it away from heat vents, seams that collect moisture, and any moving parts. The cue should never snag towels or sleeves.
Let’s be honest… most panels feel like glass sudoku
If your microwave is an over-the-range unit and the panel is above eye level, even sighted people miss buttons. Touch navigation is not “special.” It’s just… sensible.
Here’s what no one tells you… one good anchor beats five random dots
A single anchor can train your hand. Five random dots train your anxiety.
- Yes/No: Does your microwave have a number pad?
- Yes/No: Can you feel or hear a click when you press a button?
- Yes/No: Can you reliably find Stop/Cancel within 2 seconds?
Apply in 60 seconds: If you answered “No” to the click question, choose thinner dots and avoid thick bumps on frequently pressed keys.
Different microwave types: your marking plan changes
Not all panels behave the same. Treating them the same is how you end up with peeling dots, missed touches, and a sad little pile of adhesives in the junk drawer.
Physical button panels: raised dot “lands” work best
If your microwave has real buttons with travel, you can use standard tactile dots confidently. The press itself confirms you’re on a button. This is the easiest scenario.
- Use one dot for Start, a distinct cue for Stop/Cancel.
- Keep dots away from the center of the press area if it causes discomfort or reduces button travel.
Membrane keypads: thin dots or micro-bumps to avoid peeling
Membrane keypads are the “almost button” panels. They often respond fine to tactile markers, but thick markers can peel from heat and cleaning. For these, choose lower-profile dots (or trimmed bump material) and focus on anchors rather than blanket labeling.
Neutral entity note: products like 3M Bumpon style bumpers and accessibility “bump dots” from vendors such as MaxiAids are commonly used, but brand choice matters less than surface prep and dot placement. If you’re building a consistent home system across multiple rooms, the same “minimal + consistent” logic works beautifully for tactile thermostat labeling too.
Capacitive touch panels: when dots fail, use side cues and routines instead
If your panel is fully capacitive, some stickers interfere with touch sensitivity, and some surfaces reject adhesives. In that case:
- Use tactile cues on the frame or nearby surfaces (not on the active touch area), if safe.
- Use a consistent “touch flow” routine (we’ll give one) to reduce wrong-mode presses.
- Consider audio or accessible appliance alternatives if this is a daily struggle.
Dial + button combos: mark the dial’s “home” position and one confirm button
If your microwave uses a dial (common on some newer designs), mark a single “home” reference point on the dial edge, then mark the confirm action (often Start). Your hand learns positions faster than labels.
If you want official, safety-oriented guidance on microwave operation and safe use, the FDA maintains consumer information on microwave ovens and safety basics: FDA microwave oven safety guidance.
Placement rules: where the dot goes matters more than the dot
A tactile marker is only as good as its consistency. This is where a lot of “pretty good” setups become “shockingly reliable.”
Use “edge bias”: place dots on a consistent corner (top-left) of key buttons
Pick one location rule and stick to it. My favorite: top-left corner of each marked button. Why? It reduces ambiguity. Your finger approaches, finds the dot, and you know which button boundary you’re in.
- If the panel has rounded buttons, choose “upper edge” instead.
- If the panel is cramped, choose “left edge” to avoid crowding.
Create a “two-dots means danger” code (for Stop/Cancel or Power Level)
Here’s the dot grammar that works in real kitchens:
- One dot = common action (Start, +30 seconds).
- Two dots = safety or mode control (Stop/Cancel, Power Level).
It’s memorable. It’s teachable. It survives fatigue.
Keep spacing readable: one dot per function, not per label
If a button says “Time Cook / Cook Time / Time” or has two functions, decide which function you care about. Mark that function, then treat the other as “secondary.” The goal is not completeness. The goal is confidence.
Avoid blocking backlight text and indicator windows
Some panels rely on tiny backlit text near the button. A dot placed directly over that text can remove the last scrap of visual usefulness for a low-vision user. Edge bias helps. So does choosing a smaller dot for the number pad. If glare is part of the problem, you can pair tactile anchors with a lighting fix like glare-free under cabinet lighting so the whole kitchen stops fighting your eyes.
- One-dot buttons should be the ones you use daily.
- Two-dot buttons should stop or control modes.
- Anchors (5 and 0) turn the keypad into a map.
Apply in 60 seconds: Quick sanity check: If you had to heat tea for 60 seconds right now, how many dots would you need? Aim for 3–5, not 12.
Count your weekly microwave habits:
- A = How many times you use +30 seconds per week?
- B = How many times you enter a custom time (numbers) per week?
- C = How many times you use Power Level per week?
Result: If A is high, prioritize +30. If B is high, prioritize keypad anchors. If C is high, prioritize Power Level. Your “minimal reliable dot set” is usually Stop + Start + (either +30 or Time Cook) + 5, plus 0 if you often enter times with a zero.
Neutral next step: Pick the highest habit and dot for that first.
Common mistakes: the stuff that causes mis-presses
Most mis-presses happen for boring reasons: hurry, steam, poor contrast, and panels that change their mind about what a button does. Here’s what to avoid, with the “why” spelled out.
Marking presets first (Popcorn traps you in guesswork)
Presets often depend on hidden variables: food weight, moisture content, how full the bag is, whether the microwave sensor is accurate, and whether your microwave is feeling dramatic today. If you label Popcorn first, you encourage yourself to use the least predictable option as your default.
Over-marking: turning the panel into tactile noise
This is the big one. Too many dots make every button feel “important,” which defeats the entire purpose. Your fingers need contrast: marked vs unmarked. When everything is marked, nothing is.
Small confession: I’ve done this with a different appliance. I felt proud for five minutes. Then I spent a month annoyed with myself.
Putting dots dead-center (they wear faster and confuse boundaries)
Center placement gets the most friction from pressing, cleaning, and general life. It also makes it harder to tell which button you’re on if buttons are tightly packed. Edge bias wins again.
Ignoring cleaning/steam: adhesive failure is the silent saboteur
Kitchens are humid. Microwaves get wiped down. Adhesives weaken. If a dot shifts by even a few millimeters, it can turn a safe setup into a confusing one. Plan for maintenance (we’ll cover a simple replacement rhythm).
- Wipe the panel dry after cleaning.
- Avoid oily cleaners on the adhesive area.
- Do a quick “dot check” once a week.
Don’t do this: safety + durability dealbreakers
This is the short list of “nope,” written with love and a little fear of soup volcanos.
Don’t mark Vent/Fan or Light (on over-the-range units) before Stop/Start
Over-the-range microwaves add extra controls. It’s tempting to mark them because they’re on the edge and easy to reach. But they’re not your primary risk controls. Mark Stop/Start first so your heat controls are stable before you decorate the accessory buttons.
Don’t place dots near seams that trap moisture and peel
Seams are where steam and cleaner residue collect. A dot placed on a seam is a dot with a short, tragic life.
Don’t use thick bumps that jam doors or snag towels
Thicker is not always better. A dot that catches a sleeve can eventually peel. A dot near the door that interferes with closing is a safety risk. Keep markers low-profile near moving parts.
Don’t rely on “one dot = Start” across different microwaves (verify layout)
If you set up multiple microwaves (home, office, a parent’s home), don’t assume consistency. Manufacturers rearrange layouts for sport. Always verify with a short practice run.
Choose Minimal Dots if you want speed, low maintenance, and fewer mis-presses under stress.
- Time cost: 10 minutes to set up.
- Maintenance: Replace 1–3 dots occasionally.
- Best for: Most households, most caregivers.
Choose Expanded Labeling if you’re training a very specific routine that requires multiple modes (defrost, power steps, sensor reheat).
- Time cost: 30–60 minutes to set up and test.
- Maintenance: More dots to check for peeling/shift.
- Best for: OTs teaching a structured cooking protocol.
Neutral next step: Start minimal. Expand only if you hit a real, repeatable need.
Presets last: when to mark Popcorn, Defrost, Reheat
Presets can be helpful, but they’re also where microwaves get… poetic. “Reheat” sometimes means “sauna.” “Defrost” sometimes means “half-cooked edges.” Mark them only when they consistently behave on your model with your food.
Only mark presets you use weekly (otherwise it’s clutter)
Weekly use is a great threshold because it reflects muscle memory. If you use “Beverage” once every two months, you won’t remember what you marked it for. Your fingers will just find a dot and wonder why it exists.
Defrost gets a dot only if you understand weight/time steps
Many defrost modes require you to enter weight, select food type, or press start multiple times. If you don’t already use it successfully, don’t label it as if it’s a safe shortcut. Instead, use manual time at lower power (Power Level earns its keep here).
Reheat gets a dot only if it consistently behaves on your model
Some sensor reheats are decent. Some are chaos. Test it three times on the same type of food (leftover rice, soup, or pasta) before you “promote” it to dot-worthy.
Tiny confession: “Popcorn” is often a chaos button
Popcorn buttons are the haunted attic of appliance design: full of hope, weird outcomes, and a smell you can’t quite explain. If you love popcorn, consider timing manually so you can stop when the popping slows. That’s not just accessibility. That’s sanity.
- Mark a preset only after it behaves consistently for you.
- Manual time plus Stop/Cancel is safer than “mystery modes.”
- Power Level often beats Defrost in real kitchens.
Apply in 60 seconds: Pick one preset you think you need. Test it three times this week. If it fails once, keep it unmarked.
Micro-routine: a 10-second “touch flow” to prevent runaway heating
This is the routine that makes everything else easier. It’s short. It’s teachable. It prevents runaway heating and wrong-mode surprises. I’ve seen it reduce mistakes simply because it stops people from improvising under pressure.
Step 1: Find Stop/Cancel (confirm reset)
Tap Stop/Cancel once to reset the panel. This clears weird modes, leftover times, and “why is it blinking at me” confusion.
Step 2: Find Time Cook (enter manual mode)
If your microwave needs a manual entry button, press it now. If it doesn’t, skip this step and go straight to time entry.
Step 3: Enter time using 5/0 anchors to orient
Find the 5 dot, then move to the numbers you need. If you’re entering “1:30,” your hand can locate 1 and 3 from the 5 anchor, then find 0 from the bottom landmark.
Step 4: Press Start, then use Add 30 Seconds for small adjustments
Start begins cooking. Add 30 becomes your safe “micro-adjust.” If you’re unsure, add less time and repeat. That’s not timid. That’s controlled.
A friend once asked me to “just make the microwave easier” for a parent who had recently lost vision. The family had already tried: they dotted every button, every preset, every mode. It looked impressive. It worked for exactly one day. The next morning, half-asleep, the parent reached for what they thought was Start and hit a preset instead.
The microwave did its little beep-beep confidence dance and began heating… for much longer than intended. Nothing catastrophic happened, but the smell of scorched soup became the kind of memory that sticks to a kitchen. We stripped the dots back to five: Stop/Cancel, Start, +30, 5, and Time Cook. Then we practiced one routine: reset first, manual time, start, adjust. The parent stopped guessing. The family stopped hovering. The kitchen got quiet again.
Household setup: make it stick for everyone
A tactile setup fails when only one person understands it. Your goal is a shared system that survives guests, babysitters, and the well-meaning relative who “cleans everything thoroughly” and accidentally nudges a dot.
Create a 1-page legend card (what each dot means)
Keep it simple. This can be a printed card in a drawer, a note on the fridge, or a phone note shared with caregivers. Example:
- Two dots = Stop/Cancel
- One dot = Start
- One dot = +30 seconds
- One dot = 5 key
- One dot = 0 key (optional)
Teach a shared “reset first” habit (Stop/Cancel before any cook)
This habit is the cheapest safety upgrade you’ll ever install. Even sighted users benefit. It stops the microwave from “remembering” the last mode or time entry and surprising the next person. If the emotional side of training new routines is the harder part, a guide on coping with vision loss as a couple can help keep the tone calm and cooperative instead of “correction-heavy.”
Keep spare dots and a cleaning-safe checklist nearby
Spare dots matter because kitchens are real. Adhesives age. People scrub. Steam happens. Keep a few extras in a labeled bag and replace as needed.
- Quick wipe, not aggressive scrubbing on the dot area.
- Avoid oily cleaners directly on adhesives.
- Weekly: run a “touch check” for shifted dots.
For broader, practical guidance on labeling and living skills for blindness and low vision, reputable organizations like the American Foundation for the Blind and Perkins often share techniques that translate well to appliance setup. If you’re standardizing “what goes where” across bathroom and kitchen items too, you may find the same minimal, repeatable system useful in tactile labels for shampoo and conditioner.
- Two dots: Stop/Cancel (panic brake)
- One dot: Start
- One dot: +30 Seconds
- One dot: 5 key (anchor)
- Optional one dot: 0 key (bottom landmark)
Goal: You should be able to reset, set time, and start cooking without hunting. If you can do that, you’re done.
Your panel may differ. The point is the anchor logic: center (5) plus bottom landmark (0).
Next step: one concrete action
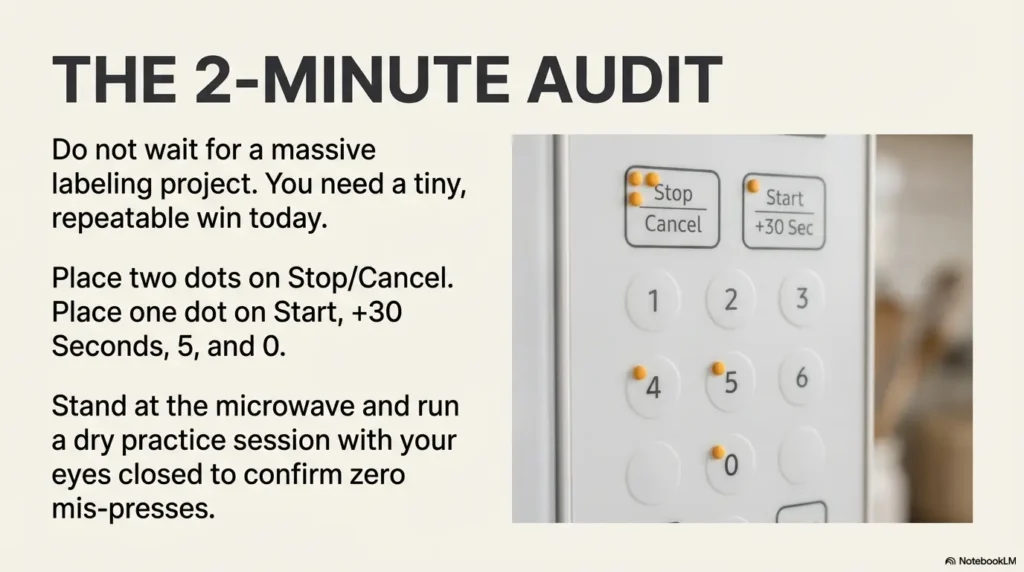
Do this today, not “someday when you have time.” You don’t need a full labeling project. You need a tiny, safe, repeatable win.
Do a 2-minute audit today: mark Stop/Cancel, Start, Add 30 Seconds, plus 5 on the keypad, then run a dry practice session (no food) to confirm zero mis-presses.
- Place two dots on Stop/Cancel (or one larger tactile cue).
- Place one dot on Start and +30 seconds.
- Place one dot on 5 (and 0 if you often enter times with zeros).
- Practice the routine: Stop, Time Cook (if needed), time, Start, +30.
If you want additional practical accessibility training resources (especially for caregivers and skill-building), these organizations are solid starting points: American Foundation for the Blind.
FAQ
What buttons should I mark first on a microwave for low vision?
Mark Stop/Cancel first, then Start, then Add 30 Seconds, then Time Cook (if required), and finally your keypad anchor (5, plus 0 if helpful). This gives you a safe exit and a reliable cooking path before you add convenience labels.
Should I mark Start and Stop with different textures or just different locations?
Different textures is best if you can do it cleanly. A simple system is one dot for Start and two dots for Stop/Cancel. If you only have one dot style, use consistent placement rules and “dot count” as the differentiator.
Where should I place a raised dot on a button so it doesn’t peel off?
Avoid placing the dot dead-center where fingers press hardest. Use an edge bias like the top-left corner or upper edge. Also avoid seams, vents, or textured areas that collect moisture.
What if my microwave has a flat touch panel and stickers won’t work?
Use tactile cues near the panel (frame edges, a nearby reference point) and rely on a short routine: reset first, manual time, start, adjust. Some capacitive panels reject adhesives or become less responsive. In those cases, fewer markers and better routines usually outperform “more labels.”
Is it better to mark the number pad or the cook presets?
Mark the number pad anchors (5 and optionally 0) before presets. Anchors help with every manual cook. Presets only help when they’re consistent on your specific model and for your typical foods.
How do I mark a microwave without covering the text labels?
Use small dots and place them at a consistent edge, not over the printed text. If the text is already hard to see, preserving what remains can still help low-vision users who use touch and vision together.
What’s the safest “default routine” to avoid overheating food?
Reset first (Stop/Cancel), use manual time (Time Cook if needed), start, then adjust in small increments (+30 seconds). When in doubt, use lower power for longer on foods that splatter or form hot spots.
Will raised dots damage the microwave or void a warranty?
Raised dots are typically removable adhesives and usually don’t permanently alter the appliance. That said, warranties vary. If you’re concerned, use minimal dots, avoid vents and moving parts, and test removal on a small, inconspicuous area first.
How often do tactile markers need replacing in a steamy kitchen?
It depends on cleaning habits and heat exposure. Many setups last months, but kitchens are rough environments. A good practice is a quick weekly “dot check” and a replacement plan when a dot shifts or edges start lifting. If you’re building a broader fall-risk and home-safety plan alongside kitchen upgrades, this pairs well with aging vision fall prevention at home and (for nighttime routines) low vision nighttime bathroom safety.
Conclusion: The curiosity loop from the beginning is simple: why do “fully labeled” panels fail? Because touch needs contrast and structure, not decoration. When you label Stop/Cancel as the panic brake and build anchors around Start, +30, and the 5 key, the panel stops being a puzzle and becomes a path. If you have 15 minutes, do the minimal dot set today, run a dry practice session, and teach one shared routine. That’s the moment a kitchen quietly becomes safer.
Last reviewed: 2026-02-26