
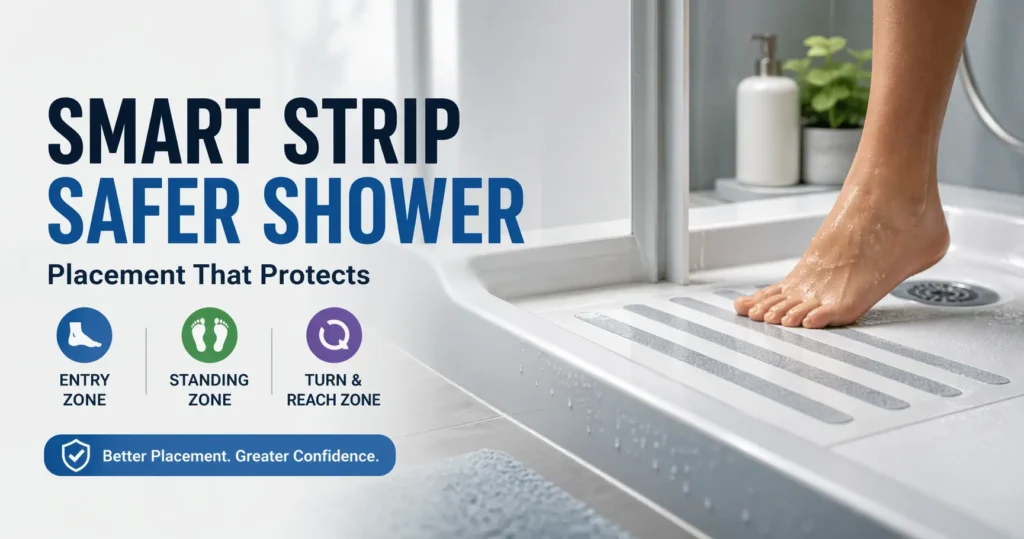
Strategic Grip: Redefining Shower Safety for Low Vision
A safer shower rarely begins with buying more traction. It begins with putting grip in the three places where the body quietly negotiates risk: the first landing, the standing spot, and the turn to reach soap or the faucet.
Anti-slip placement is not a product problem; it is a movement problem. In a bright, wet bathroom where glare flattens edges, random strip placement leaves the most critical moments unprotected. This erosion of confidence can compromise your daily independence.
This guide maps the floor around real foot movement:
- 🚿 The Entry Zone – Secure your first landing.
- 🚿 Main Standing Area – Stability during the core routine.
- 🚿 Turn-and-Reach Path – Protection while adjusting faucets or soap.
Not more strips. Better placement. And that changes everything.
Fast Answer: Anti-slip shower strips placement for low vision matters most where feet first land, where they stay under running water, and where they turn to reach soap or the faucet. The safest layouts usually create a predictable traction path instead of random full-floor coverage. For many people, three zones matter most: the entry landing area, the main standing zone, and one turn-and-reach zone.
Table of Contents
Start With Placement, Not Product: Where Slips Actually Begin
Most shower falls do not start in the middle of a perfect stance
People imagine slipping as one big cinematic event in the center of the tub, as if the floor suddenly betrays them with opera-level drama. Real life is usually much quieter. Trouble often starts during a weight shift. One foot is half turned. A hand is reaching. The body is not planted, and vision is not fully confirming where the edge, drain, or slick patch begins. That is why placement comes first. The body does not need traction in the abstract. It needs traction at the moments when balance is negotiating with uncertainty.
Low vision changes how people judge wet surfaces, edges, and foot position
Low vision is not one thing. For some people it means reduced contrast sensitivity. For others it means central vision loss, dimness, glare trouble, patchy field loss, or a general fogginess that makes wet white surfaces melt into one another. In a shower, those problems stack. Water reflects light. Soap changes friction. Pale surfaces swallow edges. A floor can look calm and still behave like ice with good manners.
I have seen more than one bathroom setup that looked tidy on paper and still felt wrong the second someone stepped into it. The strips were technically present. They were also in the wrong places. That is the design failure hiding in plain sight.
Why “more strips everywhere” can create noise instead of safety
More grip is not always more useful. When strips are scattered without logic, the foot cannot learn the pattern. In a low-vision context, predictability matters almost as much as friction. If traction appears in a random patchwork, the body never receives a clean message about where stable footing begins and where it does not.
- Find where feet first land
- Notice where turning happens
- Build around routine, not aesthetics
Apply in 60 seconds: Stand outside the shower and name the three spots where your feet are most likely to pause, not just pass through.
Eligibility checklist: Is anti-slip shower strips placement the right first move?
- Yes if the main issue is slick flooring during entry, standing, or turning.
- Yes if the person can still shower independently but wants more predictable footing.
- Maybe not alone if there were recent falls, sudden balance changes, or the person already needs wall support to stay upright.
Next step: If you checked the third line, treat strips as one layer of safety, not the whole plan.
Entry Zone First: The First Step In Is Often the Real Risk Point
Place strips where the leading foot lands when entering the shower
The first wet step deserves more respect than it gets. Entry is a transfer. Transfer means risk. One foot is inside, the other is outside or crossing the threshold, and the body is temporarily split between two surfaces. That is not the moment for decorative minimalism. It is the moment for traction under the landing foot.
If the shower has a tub wall to step over, identify where the first inside foot actually lands. It is rarely dead center. Most people have a favored side. They angle slightly. Their foot lands a little forward or a little to the left. Place the first traction cluster there, not where the product diagram pretends people stand.
Cover the step-over or threshold-side landing area without blocking drainage
Placement near the threshold should stabilize the entry path without creating a tiny dam that traps water. Leave enough open floor around the drain route for water to move naturally. This is one reason narrow strips often beat oversized mats in certain showers. You can aim them where weight lands without turning the whole floor into a maintenance experiment.
The first wet step often matters more than the longest shower minute
It feels almost unfair, but the dangerous part is often not the five calm minutes under the spray. It is the transition in and out. A caregiver might think, “We already fixed the middle.” Meanwhile the person using the shower keeps having that same breath-catching moment at the doorway. The floor is announcing the problem. We should listen.
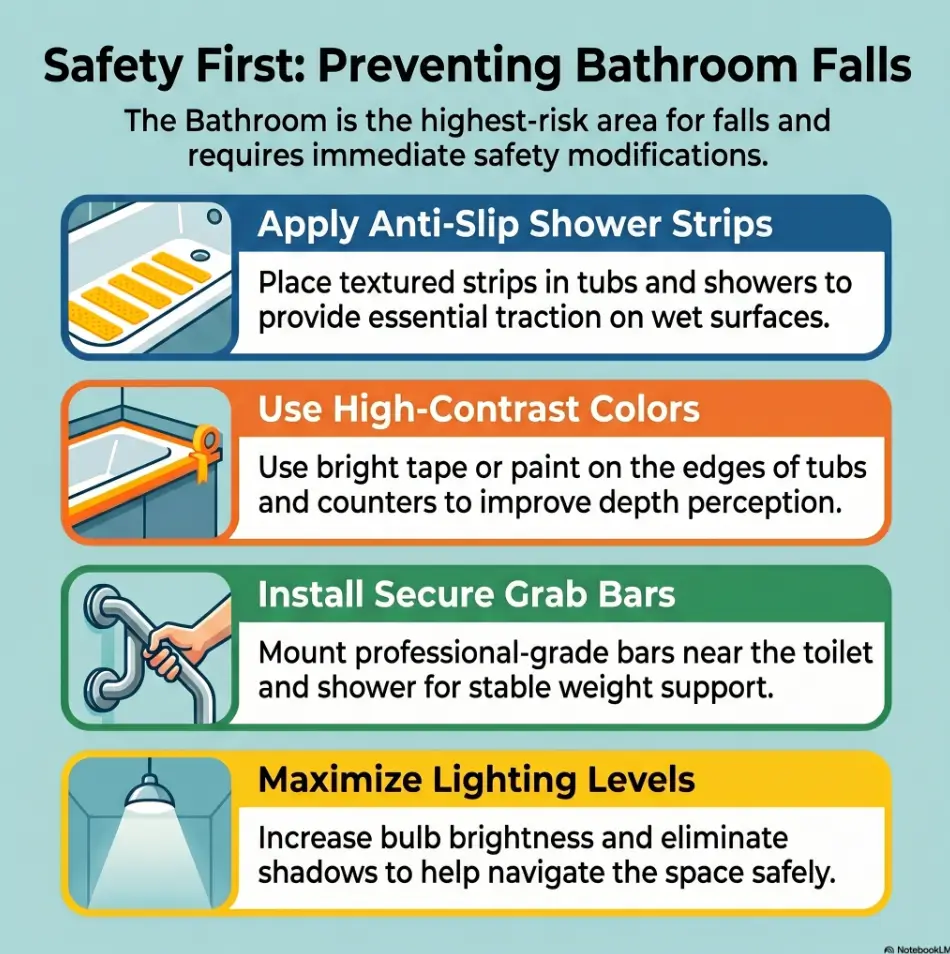
Occupational therapy home safety checklists have long included non-slip strips and grab bars as practical bathroom changes, and that pairing is important. The strip addresses the floor. The bar addresses the transfer. One without the other can still leave a gap wide enough for trouble to step through. If nighttime trips to the bathroom are part of the pattern, it also helps to think beyond the shower itself and review broader low vision nighttime bathroom safety habits around lighting, route clarity, and hand support.
Practical rule: if you can afford only one carefully planned traction zone at first, make it the entry landing zone.
Standing Zone Matters More Than Full Coverage
Put traction where a person actually stands under running water
Once inside the shower, most people settle into one habitual standing spot. That spot may not be centered. It may be slightly back from the spray. It may sit beside a grab bar. It may lean away from the cold first blast of water because nobody enjoys that little ambush. Anti-slip strips should frame the real standing zone, not the mathematical midpoint of the floor.
Center placement around routine body position, not the geometric middle
This is where many installations go politely wrong. The strips look balanced, symmetrical, maybe even magazine-worthy. But the person bathing stands six inches away from that neat arrangement because the showerhead angle, soap shelf, and elbow room all pull them elsewhere. Safety does not care whether the layout looks centered from the hallway. Safety cares where the heels actually live.
Wet feet, soap, and stillness can be a worse mix than movement
Counterintuitive, but true: standing still on a soapy surface can be as risky as moving across it. Micro-adjustments happen constantly. A foot rotates. Weight shifts from heel to forefoot. One knee unlocks. The body is doing dozens of tiny negotiations. Good strip placement supports those invisible corrections.
Decision card: When to prioritize entry vs standing zone first
| Prioritize Entry First | Prioritize Standing Zone First |
| Step-over tub, nervous first landing, near-slip during transfer | Walk-in shower, stable entry, slipping under soap or running water |
| Time trade-off: faster to solve | Comfort trade-off: better for daily confidence once inside |
Neutral action: Choose the zone that matches the last moment the person felt unsure, not the one that seems most obvious.
Show me the nerdy details
Slip risk is rarely uniform across a shower floor. It changes with water flow, soap residue, foot angle, and how often weight is transferred through one side of the body. That is why a targeted layout can outperform broad but poorly matched coverage. In design terms, you are solving for high-risk contact points, not surface percentage.
I once watched someone demonstrate their “safe shower setup” by pointing to the strips with pride, then stand somewhere else entirely once the water turned on. That moment explained the whole article in under ten seconds.
Turn-and-Reach Areas: The Quiet Danger Spot Most People Miss
Add strips where a person pivots to reach soap, shampoo, or the faucet
The most dangerous move in many showers is not stepping in. It is the small twist toward the shampoo bottle. That humble reach changes everything. The head turns. The trunk rotates. One foot anchors while the other corrects. Vision may leave the floor altogether. If there is a true “quiet danger spot,” this is it.
Placement should support turning, not just straight-line standing
A good turning zone usually sits just off the main standing area, near whatever the person reaches for most often. That might be a wall niche, a hanging caddy, a bench edge, or the faucet side. You do not need to pave the whole arc. You need enough traction under the foot that bears weight during the pivot.
Here’s what no one tells you: many slips begin during small sideways corrections
Not every slip is a dramatic forward slide. Sideways corrections are sneaky. The body starts to drift, then tries to rescue itself with a tiny lateral step. If that step finds only slick tile, the correction becomes the problem. In low vision, that risk can increase because the person may not see soap film, water pooling, or the exact boundary between the secure and insecure patch of floor. It can also rise when bottles look and feel too similar, which is why some households pair shower traction with tactile labels for shampoo and conditioner so reaching becomes less visually demanding in the first place.
Useful test: stand in the shower when it is dry and mimic reaching for soap three times. Watch which foot stays planted and which foot rotates or nudges outward. That planted foot deserves better footing.
“The dangerous places are usually the ordinary places repeated every day.”
Along the Usual Path: Build a Tactile Route, Not a Random Scatter
Create a clear foot path from entry to standing zone
For low vision, consistency is a kind of mercy. A good strip layout can act like a tactile sentence the feet learn to read. Entry. Stand. Turn. Return. When the pattern is stable, the body spends less energy guessing. That matters more than people think. Bathroom safety is not only about preventing injury. It is also about reducing the daily mental tax of feeling uncertain on a wet floor.
Use consistent spacing so traction feels predictable underfoot
Spacing should be close enough that a wet foot is likely to contact traction during normal use, but open enough that water can drain and cleaning remains realistic. Exact spacing depends on strip size and floor layout, but consistency is the larger principle. Avoid one dense cluster followed by a blank region that the foot interprets as “maybe safe?” Predictable layouts are easier to trust and easier to remember.
For low vision, repeatable layout can matter as much as grip itself
This is where texture becomes orientation. The feet are learning. After a few showers, the person may know, without looking, “I have landed in the right place.” That is not trivial. It is a form of independence. And frankly, independence in the bathroom is one of those quiet dignities people will defend with fierce tenderness. The same design logic appears in other daily routines too, whether you are building a low vision filing system or sorting out a key identification system that can be learned by touch.
Infographic: The 3-Zone Shower Traction Map
Zone 1: Entry Landing
Place grip where the first inside foot lands. This is the transfer zone.
Zone 2: Standing Zone
Center strips under the real showering position, not the visual center of the floor.
Zone 3: Turn-and-Reach
Add support where the body pivots toward soap, shampoo, faucet, or bench.
Rule of thumb: a simple, learnable route beats decorative scatter.
Do Not Cover the Whole Floor Blindly
Too many strips can complicate cleaning, drainage, and foot feedback
There is a familiar home-safety temptation: if some protection is good, then blanket protection must be better. Bathrooms often punish that logic. Overcrowding the floor can make cleaning harder, encourage residue buildup, and reduce the contrast between meaningful traction zones and ordinary surface. It can also create a textured field that feels confusing rather than reassuring.
Random placement can leave critical gaps exactly where weight shifts happen
A full-looking floor can still have dangerous blank spots in the one place the foot actually pivots. Coverage percentage is a seductive metric because it feels measurable. But the floor does not grade itself on percentages. It grades itself on whether the user had traction when balance got complicated.
Let’s be honest: full-floor coverage sounds safer than it often performs
There is also the maintenance problem nobody mentions until later. Adhesive products live hard lives in hot water, soap film, and cleaning chemicals. More pieces mean more edges to monitor, more surfaces to scrub, and more chances for one poorly adhered strip to become its own annoyance. Not usually a villain, but occasionally a tiny plastic heckler.
Mini calculator: How many strips do you likely need?
Count your priority zones first.
- Entry landing zone = 2 to 4 strips
- Main standing zone = 4 to 8 strips
- Turn-and-reach zone = 2 to 4 strips
If your first estimate is 20+ strips in a standard shower, pause. You may be solving uncertainty with quantity instead of observation.
Neutral action: Trim the plan until each strip answers a clear movement need.
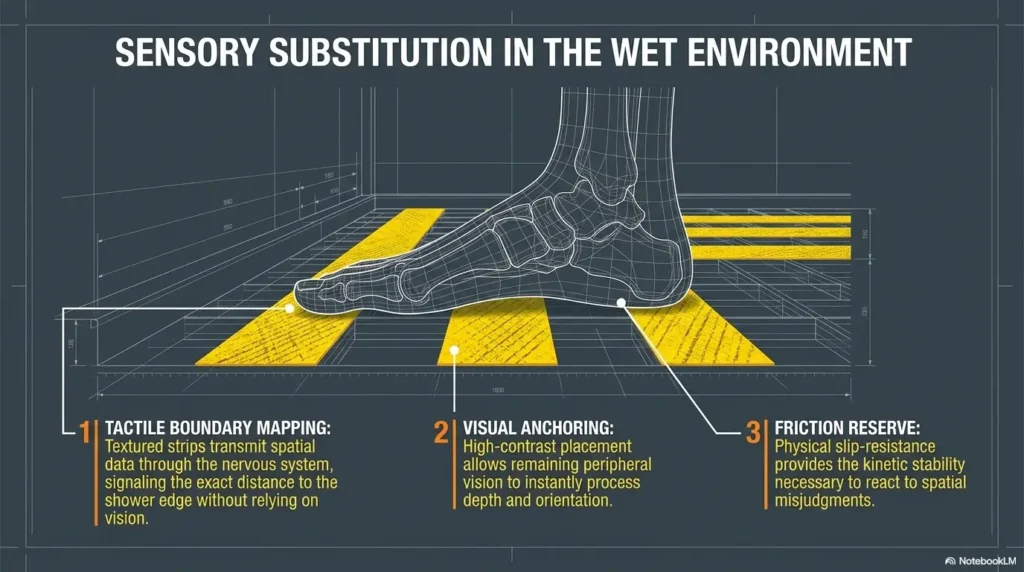
Texture Versus Contrast: Low Vision Needs More Than Slip Resistance
Placement works better when traction zones are also easy to detect
A low-vision bathroom is not solved by friction alone. The floor should also communicate. Some people benefit from strips that are easier to see against the shower base. Others benefit more from a tactile difference they can feel instantly. The best answer depends on the vision pattern, the floor color, lighting, and glare.
Contrast around strip areas may help with orientation, depending on the shower floor
The National Eye Institute notes that people with low vision often benefit from brighter light and environmental adjustments that improve usable vision. In the bathroom, that does not mean a harsh spotlight worthy of a detective drama. It means reducing glare, improving edge visibility, and making important zones easier to distinguish. If the shower floor and strips are both pale and glossy, the eyes may receive almost no useful signal. In some homes, the problem begins even earlier with broader white tile floor glare, bathroom mirror glare, or lighting that is simply too sharp for comfortable orientation.
Safety improves when feet and eyes receive the same message
That phrase matters. If the foot feels traction but the eye cannot locate the zone, the user may still hesitate. If the eye sees a contrast patch but the footing is inconsistent, trust still breaks. The goal is alignment. Texture and visibility should point to the same safe route.
I once walked into a bathroom where the shower floor was bright white, the strips were clear, and the overhead bulb threw a sheet of glare across everything. Technically, the strips were there. Practically, the floor read like a blank wet mirror. Good design sometimes begins by admitting that “invisible” is not always elegant. Sometimes it is just hard to use. Even simple lighting tweaks, including learning how to make a flashlight less harsh during setup or inspection, can reveal how much visual comfort shapes safe movement.
Show me the nerdy details
Low vision can involve contrast sensitivity loss, reduced visual fields, glare sensitivity, or central vision changes. These affect how well a person detects edges, textures, and reflective surfaces. A strip layout that is easy to feel but impossible to see may still be workable, but it may increase hesitation. A well-matched lighting and contrast strategy can reduce cognitive load during bathing.
Common Mistakes With Anti-Slip Shower Strips Placement
Putting strips only in the center while ignoring entry and turning points
This is probably the most common error. It comes from thinking of the shower as a room rather than a sequence of movements. Center-only placement looks neat. It also misses the threshold landing and the turn to reach essentials, which are often where balance gets conversational in the worst way.
Spacing strips too far apart for reliable contact under wet feet
If the foot can easily land between strips during the moments that matter, the layout is decorative, not functional. Too-wide spacing often happens when people stretch one package across too large an area. The result is a constellation instead of a route.
Placing strips over curved, dirty, or poorly prepared surfaces
Adhesive traction depends on surface prep. Soap scum, residue, moisture, and textured curves can shorten the life of the installation. This is not glamorous advice, but it is real. A careful ten-minute prep job can matter more than the brand logo on the packaging.
Choosing layout by appearance instead of actual movement pattern
If the layout was chosen by standing outside the shower and eyeballing symmetry, start over. A good layout should survive a dry-run movement test. If it only survives a photograph, it is auditioning for the wrong role.
- Do not center by default
- Do not stretch spacing too wide
- Do not ignore surface prep
Apply in 60 seconds: Ask one simple question: “Where did the last near-slip almost happen?” Then design around that answer.
Quote-prep list: What to gather before comparing strip products
- Shower type: tub/shower combo or walk-in
- Floor color and glare level
- Main slip point: entry, standing, turning, or exit
- Whether grab bars or a bench are already installed
- Who is doing the cleaning and maintenance
Neutral action: Product comparison gets much easier once you know your movement map.
Who This Is For, and Who It Is Not For
This is for adults with low vision who want more predictable shower footing at home
If the main problem is uncertainty on a wet shower floor, this guidance is for you. It is especially useful for someone who can still shower independently but feels the floor is becoming less trustworthy. That quiet distrust matters. It changes behavior long before a true fall ever occurs.
This is for caregivers setting up a safer bathing environment without remodeling
Caregivers are often asked to solve a safety problem with one trip to the hardware store and half a Saturday afternoon. Fair enough. Anti-slip strips are one of the few bathroom changes that can be relatively affordable, fast, and meaningful if placed with care.
This is not for major balance loss, repeated falls, or urgent mobility decline without clinical input
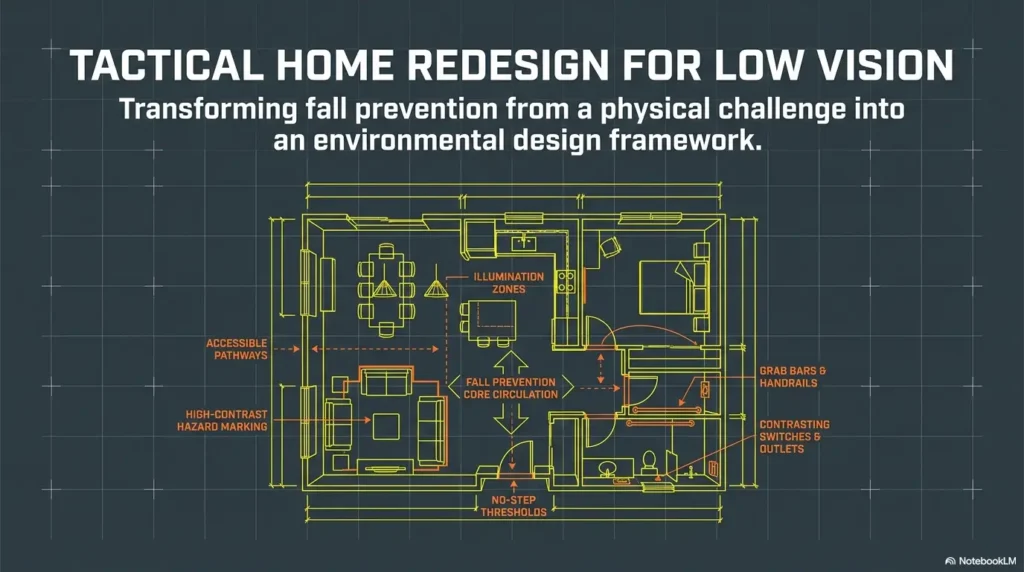
If a person is having repeated near-falls, grabbing walls, freezing during transfers, or struggling to identify the shower edge at all, traction alone is not the whole story. That may call for a broader fall-risk review, vision rehabilitation support, better lighting, grab bars, a tub transfer bench, or professional assessment. There is no dignity lost in widening the safety plan. Quite the opposite. A larger home approach may include the kind of room-by-room thinking covered in aging vision fall prevention at home or a condition-specific setup such as a wet AMD home safety checklist.
Some problems are floor problems. Some are balance problems. Some are vision problems. Many are three-part harmonies nobody asked for.
Small Shower, Different Rules: Placement Changes With Layout
Narrow tubs need a simpler path from entry to standing point
In a narrow tub, there is less room for fancy logic. Keep the pattern simple. Entry landing, main standing zone, maybe a modest turn-support area if product reach requires it. Overcomplication in small spaces usually backfires. The tighter the footprint, the more important each strip becomes.
Walk-in showers may need traction near the spray zone and turn zone
Walk-in showers often reduce the drama of the step-over transfer, but they create their own geography. Water may spread more broadly, especially with handheld sprayers or open layouts. The safe standing area may shift depending on where the spray hits and where the user turns to reach controls or shelves.
Built-in benches, grab bars, and handheld sprayers change where strips matter most
Features reshape movement. A built-in bench may shift the key pivot point closer to the seat edge. A vertical grab bar near the entry may make threshold support more effective. A handheld sprayer may reduce turning toward the wall niche. The strip layout should adapt to those realities.
Bathroom safety is annoyingly local. A plan that works beautifully in one shower can feel clumsy in another only two feet wider. There is no shame in that. It is simply the price of reality.
Coverage tier map: How the plan changes by shower complexity
| Tier 1 | Small tub, one user, clear routine | Entry + standing zone |
| Tier 2 | Tub with product reach or turning issues | Entry + standing + turn-support |
| Tier 3 | Walk-in shower, wider spray zone | Standing zone + turn zone + exit path |
Neutral action: Match the layout to the shower’s behavior, not to a generic package diagram.
Before You Stick Anything Down, Test the Movement Pattern
Watch where feet pause, pivot, and brace during a normal shower routine
The smartest layouts usually begin before the adhesive backing ever peels off. Run a dry rehearsal. No water, no soap, no urgency. Step in as usual. Stand where you normally stand. Reach for soap, shampoo, faucet, towel, bench, and grab bar. Watch what the feet do. That ordinary choreography is the blueprint.
Mark likely traction zones before permanent placement
Painter’s tape is your friend here. Mark the entry landing spot, the standing zone, and the turn-and-reach zone. Then repeat the movement once more. If the tape sits where the feet do not, move it now. It is much easier to adjust tape than regret confidence later.
The smartest layout usually begins with observation, not adhesive backing
People rush installation because the product makes the job look instant. Bathroom safety is rarely instant. Five to ten minutes of observation can save you from a layout that is technically installed and practically wrong. In home design, haste has a habit of dressing up as efficiency.
Short Story: A daughter once helped her father add shower strips after he admitted he had started pausing at the tub edge every morning. They almost placed the strips in a neat centered rectangle because it looked “finished.” Then they did one dry run. His first foot landed far left, his standing spot was slightly back from the spray, and every reach for soap turned him toward the faucet wall.
They changed the whole layout in less than three minutes. A week later, he said the shower felt “less slippery,” but what he really meant was more revealing. He said it felt easier to trust. That sentence matters. Safety is not only the absence of a fall. Sometimes it is the return of an ordinary motion no longer wrapped in doubt.
Show me the nerdy details
A dry-run test lowers variables. Without water and soap, you can isolate the movement pattern itself. This helps distinguish routine foot placement from surface slipperiness. Once you know where the body wants to go, you can place traction where it will matter once the surface conditions become more challenging.
When Placement Alone Is Not Enough
Repeated near-falls can signal a bigger bathroom safety problem
If near-falls keep happening even after thoughtful strip placement, take that seriously. Repeated instability may point to problems beyond surface traction, including lighting, medication effects, lower-body weakness, neuropathy, delayed reaction time, vestibular issues, or worsening vision.
Poor lighting, no grab bar, and slick soap routines can overpower good strip placement
There is a limit to what floor traction can do by itself. A shower with poor lighting and no stable hand support can remain risky even with an excellent strip layout. The same is true if soap is dropped regularly, products are stored in awkward reach zones, or the user is rushing. Safety is cumulative. Weak links matter.
If balance is changing fast, the shower floor is not the only issue anymore
The CDC’s falls guidance emphasizes prevention as a system, not a single trick. In practice, that means asking a larger question: what else changed? If the answer includes worsening confidence, slower stepping, new fear, dizziness, or visual decline, the shower floor may be only where the problem became visible first.
- Pair traction with lighting
- Pair entry support with grab bars when needed
- Escalate when near-falls repeat
Apply in 60 seconds: Ask whether the last problem was caused by the floor, the transfer, the lighting, or the balance itself.
Next Step: Do One Dry-Run Foot Map Before Installation
Step into the dry shower and note where the first foot lands, where you stand, and where you turn to reach products
If this article did nothing but get you to do that one dry run, it would still earn its keep. Foot mapping turns vague anxiety into visible information. Suddenly the floor has a story. You can see the entry point, the standing point, and the pivot point. Once those are marked, product decisions become much easier and much less random.
Mark those three zones first before deciding how many strips you actually need
Three zones are enough for most first-pass installations. Add only after you understand the route. This keeps the layout lean, maintainable, and easier to trust.
Better placement begins with one honest map of movement, not a guess
That is the whole principle in one sentence. Not a guess. Not symmetry. Not coverage theater. An honest map of movement.
Safety / Disclaimer
This article is for general educational purposes and is not medical advice, occupational therapy advice, or individualized fall-risk assessment. Anti-slip shower strips can improve surface traction, but they do not replace grab bars, adequate lighting, safe transfer strategies, or clinical evaluation when balance or vision is changing. If a person has already fallen, is afraid to shower, or cannot reliably identify the shower edge or standing area, treat that as a broader safety issue rather than a simple flooring problem.
When to Seek Help
A recent fall, repeated near-falls, or new fear of showering
Fear is data. If someone begins delaying showers, asking another person to stay nearby, or describing the bathroom as “suddenly hard,” do not dismiss that as fussiness. Bodies often know before language catches up.
Rapidly worsening vision or major difficulty identifying shower edges and surfaces
When the visual problem is changing quickly, the right next step may involve an eye-care provider, low-vision rehabilitation support, or both. A smarter environment helps, but it should not be the only response.
Needing wall support, furniture support, or another person nearby just to bathe safely
At that point, the shower routine may need a larger redesign. This could include grab bars, transfer equipment, a shower chair, product relocation, improved lighting, or hands-on professional assessment.
FAQ
Where should anti-slip shower strips go first in a low-vision bathroom?
Start with the entry landing zone. That first inside step is often the highest-risk moment because it combines transfer, wet surface contact, and limited visual confirmation. After that, prioritize the main standing zone and the place where the person turns to reach products.
Is it better to place strips at the shower entrance or under the water stream?
It depends on where the uncertainty happens. If the problem is stepping over a tub wall or onto a wet base, entry comes first. If the person feels stable entering but slips while washing or shifting under running water, the standing zone may deserve first priority. Many users ultimately need both.
How far apart should shower strips be for reliable footing?
There is no single universal measurement because strip size and shower layout vary, but the spacing should be consistent and close enough that a wet foot is likely to contact traction during normal standing and turning. If the foot can easily land in blank gaps during the highest-risk movement, the layout is too sparse.
Should anti-slip strips go near the drain?
Only if that area is part of the actual standing or turning pattern. Avoid blocking drainage or crowding the water path without a clear reason. The drain area is not automatically a traction zone just because it sits in the middle of the floor plan.
Can you put shower strips in a bathtub and a walk-in shower the same way?
No. Tub/shower combinations usually need special attention at the step-over landing point. Walk-in showers often shift the priority toward the standing and turning zones because entry is easier but water spread may be wider. The layout should follow the user’s movement pattern in that specific space.
Do anti-slip strips help if the main problem is poor balance, not slippery flooring?
They may help a little, but they are not enough by themselves when the core issue is balance loss. In that case, traction should be treated as one support layer alongside grab bars, lighting, clinical assessment, and possibly adaptive equipment.
Are clear strips good enough for low vision, or does visibility matter too?
Visibility can matter a lot. Clear strips may work for some people, especially if tactile feedback is enough and glare is low. But if contrast sensitivity is reduced or the shower floor is visually confusing, a more detectable layout can improve orientation and confidence.
How many shower strips are usually enough without overcrowding the floor?
For many standard showers, a thoughtful first layout might use enough strips to cover three functional zones: entry, standing, and turning. The right number is the number that clearly supports those zones without turning the entire floor into a maintenance puzzle.
Final Thoughts
The hook at the beginning was simple: where does confidence disappear? Now you have the answer. Usually not everywhere. Usually in three small places. The first landing. The standing spot. The turning point. Once those are visible, anti-slip shower strips placement for low vision becomes less of a shopping decision and more of a movement decision.
That is the quiet relief in this work. You do not need to guess across the whole floor. You need to pay attention to the body’s honest route. In the next 15 minutes, do a dry-run foot map, mark three zones with tape, and check whether the planned layout follows real movement instead of visual symmetry. That one small rehearsal may prevent the kind of bathroom uncertainty that never makes a headline but changes a person’s whole morning.
Last reviewed: 2026-04.