


Nighttime Bathroom Fall Prevention for Low Vision
At night, the most dangerous step usually isn’t in the bathroom—it’s the turn you make while half-awake, when the hallway is dim, the floor looks “flat,” and your hand reaches for support that isn’t there.
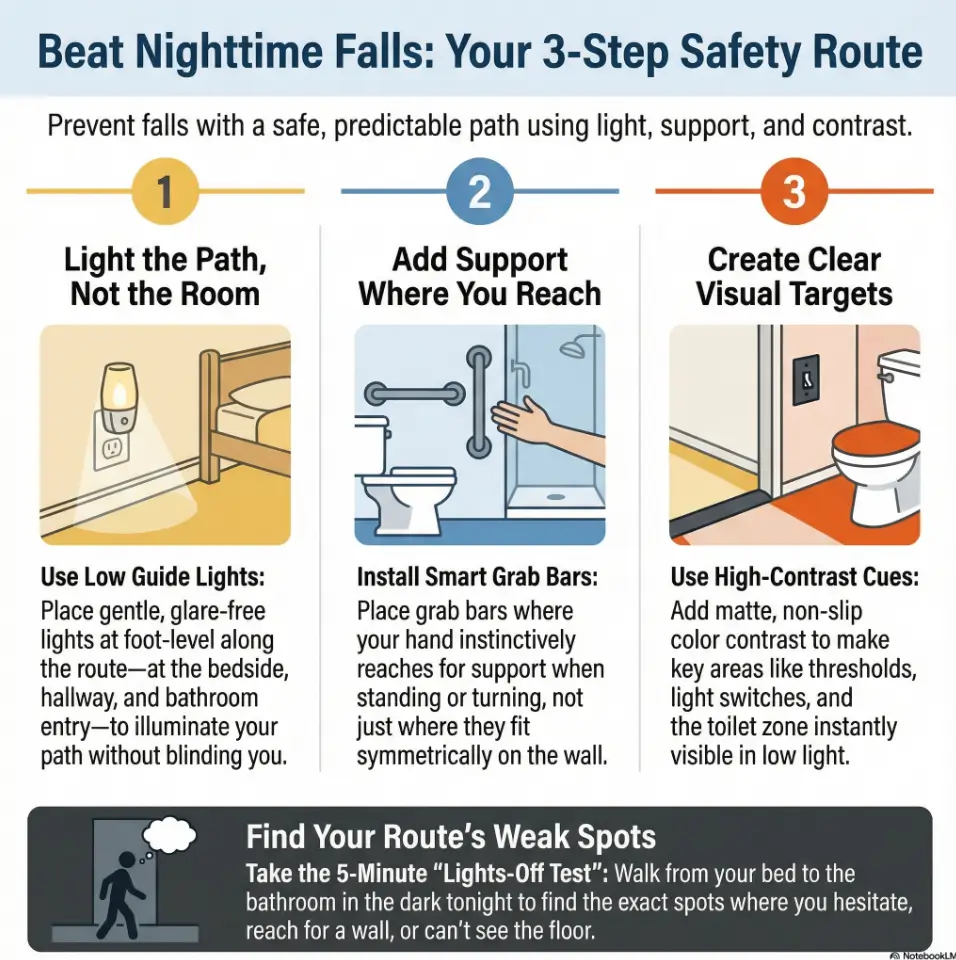
It’s a route-design problem: creating a glare-free path your feet can read, your hands can trust, and your eyes can “lock onto” fast—bedside to hallway to threshold to toilet. Keep guessing and delaying, and you risk the kind of near-fall that steals sleep even when you don’t hit the floor.
This post helps you build a calm, repeatable setup using motion lights (placed before the bathroom), real grab bars where your hand naturally lands, and high-contrast cues that make the toilet zone the easiest target in the house.
The backbone is simple and testable: a 5-minute “lights-off route test” that reveals what daytime hides—then you fix one hazard and re-test.
No remodel. No perfection. Just safer nights.
- Start where your feet touch down
- Light the decision points
- Add one reliable hold
- Make the target obvious
Safety note: Home-safety education only—not medical advice. Falls can cause serious injury. If you feel faint, unusually weak, severely dizzy, or your vision changes suddenly and you’re unsure what it means, don’t “DIY your way through it”—get medical guidance.
To prevent nighttime bathroom falls with low vision, build a glare-free route, add handholds where your hand naturally reaches, and create high-contrast targets you can “aim” for fast. Place motion lighting at bedside + hallway + bathroom entry (not just inside the bathroom), install grab bars at toilet and shower entry, and add contrast to thresholds, switches, and the toilet zone. Finish with a 5-minute “lights-off route test” to catch what daylight hides.
Table of Contents
Route-first audit: the 5-minute “lights-off test”
Most fall-prevention advice is room-by-room. That’s fine in daylight. But nighttime falls are route-based. The risk isn’t “the bathroom.” It’s bed → first steps → hallway → threshold → toilet reach.
Do this right now (5 minutes): turn off the main lights, keep only what you’d normally have at night, and walk your usual route—slowly. You’re not testing bravery. You’re testing your setup.
- Step 1: Stand up from bed and pause. Do you feel steady for 3 seconds?
- Step 2: Take three steps. Are your feet landing in shadow?
- Step 3: Find the hallway “decision point.” Do you hesitate or reach for the wall?
- Step 4: Cross the bathroom threshold. Any lip, rug edge, or change in floor texture?
- Step 5: Aim for the toilet. Can you identify it instantly without scanning?
Reader snapshot: A caregiver once described it as “a daily obstacle course nobody signed up for.” Daytime was manageable. At 2 a.m., the route became a guessing game—one missed step, one near fall, then the anxiety spiral that makes sleep worse.
- Audit bedside, hallway, threshold, toilet reach
- Mark the 3 “decision points” where you hesitate
- Change one thing, then re-test in the dark
Apply in 60 seconds: Move anything on the floor within one arm’s reach of the bed. That first step is sacred.
Start at bed: why the first 3 steps decide the whole night
Those first steps are when your body is most groggy and your blood pressure can dip. Add low vision, and your brain is doing extra work just to identify edges. Give yourself a “landing zone” that’s boring, flat, and predictable.
Mark 3 decision points: bedside → hallway → bathroom entry
Decision points are where people slow down, reach out, or pivot. That’s where you want lighting cues and hand options. If you only light the bathroom, you’re asking your feet to solve the hardest part in the dark.
Open loop: the one spot most people never test (but falls start there)
It’s not the toilet. It’s the moment you turn—around a bed corner, through a door, or at a hallway bend. Turns steal balance and attention. Your fix: place a small guide light at the turn (baseboard/plug-in) and remove anything that “catches” toes at the pivot.
Motion lights, not glare: build a “feet-hands-targets” system
Here’s the counterintuitive truth: nighttime lighting fails when it’s designed like daytime lighting. You don’t need the whole room bright. You need information: where your feet go, where your hand can land, and where the target is.
Feet lights: under-bed and baseboard guidance for safe footfalls
Feet lights should be low and directional. Think “runway,” not “stadium.” Under-bed strips or baseboard-level motion lights reduce harsh shadows and help your brain read the floor faster.
- Place one light at the bedside landing zone.
- Place one light at the hallway turn (if you have one).
- Place one light near the bathroom threshold so the floor change is obvious.
Hand lights: the reach zones (doorframe, grab-bar approach, switch plate)
Hand lights prevent the “blind grab.” A small light near the doorframe or switch plate helps you orient without waving your hands around like you’re trying to summon Wi-Fi.
Target lights: make the toilet zone the easiest thing to find
The toilet zone is the destination. If you have to scan for it, you’re adding time, stress, and extra steps. A subtle, low-glare cue (like a small night light aimed at the wall behind the toilet) can make the target obvious without blasting your eyes.
Let’s be honest… brighter isn’t safer at 2 a.m.
Too-bright light can cause a “contrast shock” when your eyes are adapted to darkness. You step into a bright bathroom, then step back into a darker hallway and everything becomes a silhouette again. The safer move is consistent, gentle guidance lighting along the route.
Curiosity gap: the “helpful” setting that causes more stumbles than darkness (and how to fix it)
It’s the short timeout. The light turns off mid-route and you instinctively speed up. Fix it by choosing a longer on-time (or layering two lights so one stays on while the other resets). Your goal is “no surprises,” not “perfect automation.”
Troubleshoot: when motion sensors miss you—two backup options that don’t add clutter
- Backup #1: A plug-in dusk-to-dawn guide light at baseboard height in the hallway.
- Backup #2: A smart plug schedule that turns on a low lamp for your usual nighttime window.
Show me the nerdy details
Low placement reduces glare and makes floor texture changes easier to read because the light angle creates gentle shadows at edges. If you rely on one overhead light, the floor can look flat—especially if contrast sensitivity is reduced. “Information lighting” is about making boundaries obvious with less brightness, not more.
- Low lights for feet (under-bed/baseboard)
- Small cue at hand level (door/switch)
- Gentle target cue at the toilet zone
Apply in 60 seconds: Stand in the hallway and look toward the bathroom. If your feet disappear in shadow, you need a low guide light before you need a brighter bulb.
- Plug-in: Best for “always works,” minimal maintenance. Ideal for hallway/baseboard lights.
- Battery: Best when outlets are limited, but requires a battery routine (missed batteries = dark route).
- Smart: Best when you want a predictable schedule (e.g., 10 p.m.–6 a.m.) without relying on motion.
Neutral next action: Pick one route point (bedside, hallway, threshold) and choose the simplest option you’ll actually maintain.

Grab bars that actually catch you: placement by reach + movement
Grab bars aren’t décor. They’re a physics tool. At night, you’re managing three hard moments: standing up, turning, and stepping over transitions. Your bar setup should match those moments—not a Pinterest photo.
Toilet zone: the stand-to-sit reach test (your hand’s “natural grab”)
Do this test in daylight first: sit on the toilet (or a similar-height chair). Stand up slowly. Where does your hand instinctively go? That’s your placement clue. Many people reach forward or slightly to the side—not perfectly beside the hip.
- If you push up with both hands: consider a stable toilet safety frame or dual support points.
- If you twist to stand: you need a bar that supports the turn, not just the lift.
Shower/tub entry: entry bar vs inside bar (two different saves)
Entry is where slips happen. Inside is where fatigue shows up. Treat them as two separate problems:
- Entry bar: helps you step in and step out safely.
- Inside bar: helps you stabilize while washing and turning.
Strength reality check: why towel bars and paper holders are not safety equipment
They’re tempting. They’re also not designed to take body-weight force. If you grab and it fails, you’ve traded a near fall for a real fall.
Here’s what no one tells you… the bar placement that feels wrong—until you try one stand-up
A slightly forward support point can feel odd because it breaks symmetry. But for many bodies, forward is where leverage is. If your “natural grab” is forward, honor it. You’re designing for the moment you’re most vulnerable, not for how the wall looks at noon.
Mistake-proofing: studs, anchors, and when to hire a pro
If you’re unsure about wall structure, this is the moment to bring in a qualified installer or handyman. A properly installed bar is calm. A questionable bar is a future headline.
Show me the nerdy details
The highest forces often happen during transitions—standing up and turning—because the body shifts load quickly. That’s why placement “where your hand reaches” matters. It reduces the distance between your center of mass and your support point, which can reduce wobble and panic-grabbing.
- Do you feel dizzy when you stand up at night?
- Have you had a fall or near-fall in the last 30 days?
- Do you rely on towel bars, counters, or doorframes for balance?
- Do you have trouble identifying the toilet quickly in low light?
- Are you unsure what’s behind the wall where a bar should go?
Neutral next action: If you answered “yes” to any two, prioritize a clinician conversation and/or an occupational therapy home-safety evaluation while you do the simple lighting and clutter fixes.
Contrast cues that work fast: turn your bathroom into a “targeting lane”
Low vision isn’t just “blur.” Often, it’s reduced contrast sensitivity—meaning edges and objects blend together, especially in low light. Your job is to make the bathroom legible at a glance. For many families, the “why” behind that low-light struggle traces back to age-related eye diseases after 60—so designing the environment is often the most practical lever you can pull today.
Toilet-first targeting: seat, flush, wall behind, and floor boundary
Pick one simple contrast strategy and repeat it. Consistency beats creativity.
- If the toilet is white against a light wall, add a darker cue behind it (a darker towel, a contrasting wall element, or a non-patterned backdrop).
- If the floor and toilet base blend, add a boundary cue near the toilet zone (a contrasting strip or matte rug that does not slide).
Edge marking: thresholds, tub lip, shower curb, and counter edges
Edges are where feet trip and hands miss. High-contrast edge cues help your brain “read the map.”
Switch finding: raised markers + consistent placement (same cue every time)
A tiny tactile marker on the switch plate can reduce the need to scan. The key is consistency: always place it in the same corner so your fingers learn the location.
Open loop: which contrast choice backfires in glossy bathrooms (and what to use instead)
Shiny tape or highly reflective surfaces can create glare and visual noise. If your bathroom has glossy tile or mirrors that catch light, prioritize matte cues and avoid busy patterns. Simple, solid contrast is easier to process at night.
- Mark edges that feet cross (thresholds, tub lip)
- Make the toilet zone a fast-find target
- Use tactile markers for switches and “always-touch” spots
Apply in 60 seconds: Stand in the hallway and point to the toilet without stepping into the bathroom. If you can’t, add a single contrast cue behind or beside it.
Composite micro-story: A common moment: someone turns on the bathroom light and the mirror flares like a spotlight. The eyes squint, the floor becomes “flat,” and the person moves faster just to get out of the glare. A matte, lower-level cue plus gentler route lighting often solves more than a brighter bulb ever could. If low vision is tied to macular changes, knowing the difference between dry vs wet age-related macular degeneration can also help families anticipate which tasks become harder first—and design the bathroom cues accordingly.
Slip traps at 2 a.m.: rugs, wet floors, and invisible slick
At 2 a.m., traction is your best friend. Unfortunately, the bathroom is where traction goes to die: water, smooth floors, curled mats, and that one rug that “seems fine.”
Don’t trust bath mats: curl + slide + low-contrast deception
Mats fail in three ways: they curl, they slide, and they camouflage edges. If you keep a mat, make sure it’s stable, flat, and visibly distinct from the floor—without being visually busy.
Shower exits: the wet-foot transition you must treat like a hazard zone
The step out is a high-risk moment: wet feet + weight shift + turn. Treat it like a mini “landing zone” with a stable surface and a reachable support point.
Cleaner warning: products that leave a slippery film (how to test safely)
Some cleaners and polishes can leave residue. If the floor feels slick when dry, it’s not going to improve when wet. When in doubt, test carefully in daylight with supportive footwear and one hand on a stable surface.
Mistake framing: the #1 “I’ll fix it later” item that causes repeat near-falls
It’s the loose, sliding mat. People tolerate it because it’s “temporary.” But temporary hazards become permanent habits. If you’ve had one slip or near slip, treat it like a deadline.
Input 1: Count your decision points (bedside, hallway turn, bathroom entry). Input 2: Count your risky transitions (threshold, tub entry/exit). Input 3: Count your “reach moments” (toilet stand, shower entry, night switch).
Output: Aim for 1 support (light cue or handhold) per point. If you have 7 points, plan 7 supports. If you can only do 2 tonight, start with bedside and bathroom entry.
Neutral next action: Write your number on a sticky note. Then fix the first two points this week.
Nighttime urgency isn’t always “just aging”: when to pause and assess
This section is here for one reason: you deserve safety without guessing. If you’re waking often, rushing, or feeling dizzy, the risk goes up—no matter how good your lighting is.
Medication side effects: what to discuss with a clinician
Some medications (or combinations) can increase nighttime dizziness or sleepiness. If you’ve had new falls, near falls, or “whoa” moments when standing, bring a list of your meds—including over-the-counter—to your next appointment and ask specifically about fall risk. If a new prescription lines up with sudden blurriness, it can help to review patterns like Topamax-related sudden blurry vision so you can describe symptoms clearly and promptly.
Orthostatic hypotension signs: the stand-up dizziness pattern to take seriously
If dizziness hits right after standing and eases after a minute, that pattern matters. The practical fix is often “stand, pause, breathe, then walk”—but the medical “why” should be checked, especially if it’s new or worsening.
When to seek help (don’t wait): red flags
- Fainting or blacking out
- New weakness, numbness, or trouble speaking
- Chest pain or severe shortness of breath
- Severe dizziness that doesn’t settle
- Sudden vision change
- Head injury after any fall
- Pause after standing (3–5 seconds) before walking
- Review meds if dizziness or sleepiness changed recently
- Seek care fast for red flags, not “wait and see”
Apply in 60 seconds: Put a stable chair or solid surface within reach at the bedside so you can stand and pause safely.
Short Story: “The 2 a.m. sprint that wasn’t about speed” (120–180 words) …
It started with a tiny panic: “I can’t take the glare.” The bathroom light felt harsh, so the person began rushing—three fast steps to get in, three fast steps to get out. The route became a nightly sprint, and the sprint became normal. One night, a sock slipped on a smooth patch of floor near the threshold.
No dramatic crash—just that stomach-drop moment where your body catches itself in time. The next day, the fix wasn’t heroic. It was quiet: a low guide light in the hallway, a matte contrast cue near the toilet zone, and a rule that felt almost too simple—stand up, pause, then walk. The “sprint” vanished. Not because the person became stronger overnight, but because the environment stopped demanding speed.
Renter-friendly upgrades: no-drill safety wins that still hold up
If you rent, you’re not powerless—you’re just playing a different game: reversible changes, portable supports, and lighting that doesn’t require rewiring.
Lighting without wiring: plug-in motion lights + smart plugs (what to prioritize)
- Prioritize bedside and bathroom entry first.
- Use a scheduled low lamp if motion sensors are inconsistent.
- Keep the route visually consistent night-to-night.
Temporary contrast: removable cues that won’t damage surfaces
Look for matte, removable markers that won’t peel paint or leave residue. Avoid shiny materials that create glare in bathrooms with bright tile or mirrors.
Alternative supports: toilet frames, shower chairs, handheld shower options
Portable supports can be life-changing when permanent installation isn’t possible. The best one is the one that feels stable and doesn’t force awkward twisting. If you’re specifically planning safety upgrades around AMD-related low vision, a focused companion list like this wet AMD home safety checklist can help you prioritize what matters most without turning your home into a project.
- Tier 1: Clear the bedside landing zone + one low guide light
- Tier 2: Add a threshold cue + stabilize/replace any sliding mat
- Tier 3: Add toilet-zone targeting (contrast + a reliable reach point)
- Tier 4: Add shower entry support (stable handhold + slip control)
- Tier 5: Full route system + professional install/OT assessment if needed
Neutral next action: Choose your tier for this week. Start at Tier 1 and move up only when it feels calm and consistent.
Common mistakes: “looks safe” setups that fail at night
Some safety setups look excellent in daylight and still fail at 2 a.m. The difference is usually glare, surprise, or clutter creep.
Mistake #1: one bright bathroom light + dark hallway (contrast shock)
This setup creates visual whiplash. Fix it by adding gentle route lighting outside the bathroom so your eyes aren’t constantly re-adapting.
Mistake #2: lighting the room, not the route (feet still land in shadow)
Overhead light can leave the floor deceptively flat. Low guide lights solve the footfall problem.
Mistake #3: installing bars where the stud is—not where your hand goes
Stud placement matters, but your reach matters more. If a bar can’t be installed where you need it, consider alternate hardware or professional help.
Mistake #4: pattern overload (too many cues slows decisions)
Busy patterns and too many markers can be visually confusing. Choose a simple cue system and repeat it.
Open loop: the “helpful clutter” that quietly reintroduces trip hazards
It’s the well-intended extra items: baskets, spare towels, a new bin “just for tonight,” the cute stool that becomes a toe-catcher. Your rule: nothing lives on the route. If it’s useful, it gets a home off the walking lane.
- One-lane rule: one clear lane from bed to bathroom, always.
- Door rule: keep doors either fully open or fully closed—no “half-open surprises.”
- Floor rule: nothing on the floor except what must be there.
One-page checklist: bedside → hallway → bathroom in 10 minutes
If you only read one section, make it this one. It’s the “do the work, get the win” checklist—built for tired humans who don’t want a home renovation, just a safer night.
Bedside (60 seconds): landing zone, footwear, phone/flashlight reach
- Clear a shoe-box sized space beside the bed
- Place supportive footwear within reach (avoid slippery socks)
- Put a flashlight/phone in the same spot every night
Hallway (2 minutes): cords, pet items, door positions, one clear lane
- Move cords off the lane (tape down temporarily if needed)
- Relocate pet bowls and toys away from the route
- Set doors fully open/closed to prevent “edge surprises”
Bathroom (5 minutes): grab points, contrast targets, non-slip priorities
- Identify a stable reach point at toilet standing
- Add one matte contrast cue to the toilet zone or threshold
- Remove or stabilize any sliding mat
Weekly reset: batteries, sensor test, mat edges, clutter sweep
- Test motion lights (do they trigger reliably?)
- Check mat edges (any curl?)
- Do a 30-second floor scan on the route
- Route lane stays clear
- Lighting guides feet, not eyeballs
- Support points are real, not decorative
Apply in 60 seconds: Re-run the lights-off test after each change. Your body will tell you what worked.

FAQ
What’s the safest night light setup for low vision—plug-in, battery, or smart lights?
Plug-in is usually the most dependable because it doesn’t rely on remembering batteries. Battery can work when outlets are limited, but only if you commit to a maintenance routine. Smart lighting is great if you want predictable schedules (for example, consistent low light during typical sleep hours) and don’t want to depend on motion triggers.
Where should grab bars go for the toilet if I’m not sure about my balance?
Start with your “natural grab.” Sit, stand, and note where your hand reaches without thinking. That’s the location to prioritize. If you push up with both arms, a stable toilet safety frame can be a practical option, especially when wall installation is uncertain.
Are suction grab bars safe for the shower?
They can fail without warning if the seal loosens. If you need true body-weight support, prioritize properly installed, secure hardware or a stable alternative like a shower chair plus a fixed support point. If you use suction products for balance cues only, re-check the seal frequently and never treat them as load-bearing.
What brightness is best if glare bothers me at night?
Safer doesn’t mean brighter. Aim for gentle, consistent route lighting that avoids harsh contrast changes. If glare is a problem, lower the light source (baseboard/under-bed), choose matte cues, and avoid direct light reflecting off mirrors or glossy tile.
What’s the cheapest change that reduces nighttime falls the most?
Clearing the bedside landing zone and adding a low guide light at the first decision point can make an outsized difference. It reduces toe-catching clutter and gives your feet immediate visual information during the groggiest part of the night.
Can contrast tape damage tile, paint, or laminate?
Some adhesives can leave residue or pull paint. Test a small area first, choose removable/matte options, and avoid applying on fragile paint or freshly painted surfaces. For renters, prioritize reversible cues and portable contrast strategies.
Should I keep the bathroom door open at night?
Either fully open or fully closed tends to be safer than “half-open.” Half-open creates a hard-to-see edge that invites shoulder bumps and toe catches. Choose the option that keeps the route predictable.
What if I rent and can’t drill into walls?
Focus on lighting, route clearing, and portable supports. Plug-in motion lights, consistent cue placement, stable toilet frames, and shower chairs can significantly reduce risk without permanent changes.
How do I reduce nighttime bathroom trips without dehydrating?
Don’t restrict fluids to the point of dehydration. Instead, discuss frequent nighttime urination with a clinician, review timing of beverages and certain medications, and address sleep and urgency triggers. If nighttime dizziness is part of the picture, bring it up directly—your fall risk matters. If it helps, bring notes using a printable symptom diary for seniors so patterns don’t get lost in the moment.
After a fall, when should I go to urgent care or the ER?
Seek urgent evaluation for head injury, severe dizziness, chest pain, shortness of breath, new weakness/numbness, confusion, or sudden vision changes. If you hit your head or feel “not right,” don’t wait it out. And for ongoing prevention, staying current with how often seniors should get dilated eye exams can matter more than people think—because vision changes don’t always announce themselves politely.
Next step: do one “tonight fix” before you sleep
Perfection is not the goal. A safer night is the goal. Pick the one change that removes the biggest surprise from your route—and do it before your head hits the pillow.
Tonight: run the lights-off test, then fix one biggest hazard immediately
- Option A (Light): Add a low guide light at the bedside landing zone.
- Option B (Route): Clear and protect one safe lane to the bathroom.
- Option C (Handhold): Add one reliable support at the toilet standing zone (portable or installed).
Close the loop from the hook: the thing daylight hides is rarely “the bathroom.” It’s the route. Fix the route, and the night stops feeling like a test.
Last reviewed: 2025-12.