


The most dangerous medication mistake in a low-vision home isn’t dramatic—it’s quiet.
It’s the bottle that feels “right” in your hand, the recording you made too fast, the refill week when everything looks the same.
Medication management for low vision gets hard for modern reasons: identical amber bottles, tiny type, swapped generics, and routines that collapse the moment you’re tired or rushed. Keep guessing long enough and you don’t just lose time—you risk a wrong dose, a missed critical pill, or a scary “wait…what did I take?” spiral.
This post gives you a practical, two-layer system: keep the pharmacy label as the source of truth, then add a talking label maker or voice sticker for one-press confirmation—on pill bottles first, then pantry and fridge items that create constant uncertainty.
Two-layer labeling means: the printed prescription label stays visible for exact directions, while an audio tag stores a short script (name, strength, timing) you can replay instantly to confirm identity without squinting.
You’ll also get a refill-proof workflow (clean → place → record → confirm → log) and simple durability tests so your labels don’t fail in real life—especially in the same “real life” places where low-vision nighttime bathroom safety can quietly make or break confidence.
Educational information only—not medical advice. Do not change doses or schedules based on labels alone. Always verify against your pharmacy label and prescriber instructions. If you’re unsure, call the pharmacy for clarification.
For low vision, the safest setup is two-layer labeling: keep the original pharmacy label as the legal source of truth, then add a talking label (audio tag) or voice sticker for quick confirmation. Choose systems with loud playback, simple buttons, strong adhesive, and reliable battery life. Use one consistent “script” (name, strength, when to take) and standardize placement across pill bottles, pantry items, and fridge containers.
Table of Contents
1) “Talking label” vs “voice sticker”: the decision in 30 seconds
Let’s make this simple: talking label makers and voice stickers both store a short audio message you can replay later. The difference is how you trigger playback, how reliably it works when life gets messy, and how easy it is to keep consistent across refills.
Audio playback types: tap-to-play, button-to-play, and smartphone-triggered
- Button-to-play: You press a tactile button on the tag. Often easiest for low vision because it’s predictable.
- Tap-to-play: A quick tap triggers playback. Fast, but sometimes finicky on curved bottles or when your hands are cold.
- Smartphone-triggered: A phone app reads a tag (e.g., via NFC/QR). Useful if you already keep a phone nearby, less ideal if you want “no phone required.”
Best fit by use case: pill bottles vs pantry bins vs fridge containers
- Pill bottles: Prioritize tactile buttons, loud playback, and “refill-proof” routines (you’ll repeat this often).
- Pantry bins: Bigger surfaces, so adhesive is easier. Think: simple voice labels for similar-looking containers (rice vs sugar is a classic trap).
- Fridge containers: Condensation matters. Pick labels that survive wipe-downs and cold plastic.
The hidden tradeoff: convenience vs verification (don’t skip the print label)
Audio labels are your speed lane, not your courtroom transcript. Keep the pharmacy label visible and readable for anyone who can help—family, home health, even “future you” on a weird Tuesday. One habit that changed everything for me: I stopped treating audio as “replacement” and started treating it as confirmation. That tiny mindset shift prevents big mistakes.
Neutral next action: Pick one lane, then label just three items before you buy a whole ecosystem.
Show me the nerdy details
Audio labeling works best when the “interaction cost” is low: one consistent gesture (press/tap), one consistent placement on the container, and a short standardized script. If a system requires two hands, perfect lighting, or a phone unlock every time, it tends to fail under real-world fatigue.
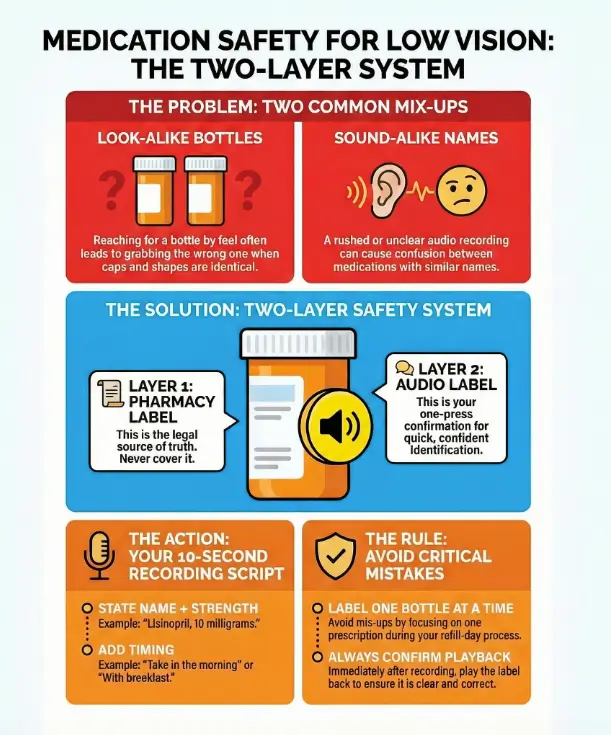
2) The real goal: prevent the two most common mix-ups
Most medication mistakes don’t happen because people are careless. They happen because the environment is loud, you’re tired, and packaging looks too similar. The American Foundation for the Blind has long highlighted medication safety challenges that come with low vision—labels, shapes, markings, measuring devices—because vision loss changes the whole “read and confirm” loop.
Look-alike bottles: same shape, same cap, different drug
If you’ve ever reached into a drawer and pulled out the “right” bottle by feel…only to realize it was the neighbor bottle with the same cap—welcome. I’ve done this with vitamins versus prescriptions. The fix is not willpower. The fix is identity cues that survive no-light, no-glasses, no-patience moments—especially in a home where wet AMD home safety risks can add one more layer of uncertainty to everyday routines.
- Keep bottles in fixed positions (left-to-right order) and don’t break the map.
- Use audio tags plus one tactile cue (a band, a bump dot, a textured sleeve).
- Separate “daily essentials” from “as-needed” meds in different containers.
Sound-alike names: when audio helps—and when it can still trick you
Audio is powerful, but you can still mishear similar names—especially if the recording is rushed. Your script should include purpose or timing so the label isn’t just a name floating in space.
- Say: “Metformin, 500 milligrams, with dinner” (not just “metformin”).
- Say: “Blood pressure pill, morning” (if your pharmacist approves that phrasing and it matches the bottle)—and if you’re managing hypertension-related eye risk, keep an eye on signals like hypertensive retinopathy during your regular exams.
Here’s what no one tells you… “I’ll remember it” is the first failure point
Memory feels strong right up until it isn’t. The brain doesn’t fail dramatically—it fails quietly, with confidence. That’s why your system needs frictionless verification: one press, one replay, and you’re done.
- Prevent look-alike bottle swaps
- Prevent sound-alike name confusion
- Build a one-press verification habit
Apply in 60 seconds: Pick your most-confusing two bottles and physically separate them right now.
3) What to look for in the best talking label makers (pill bottles first)
Shopping for audio labeling tools can get weirdly emotional. You’re not buying “a gadget.” You’re buying fewer mistakes—and that’s worth being picky about details people love to ignore.
Volume you can actually hear: speaker placement + loudness
Look for playback that stays clear in a real home: running water, a TV, an air purifier, a fan. If possible, test volume before committing. If you can’t test, prioritize systems known for strong output and simple controls.
Buttons you can actually feel: tactile cues, raised shapes, click feedback
The best devices don’t require you to “find the button with your eyes.” They teach your fingers. Raised arrows, a central bump, a firm click—these are not luxuries. They’re usability.
Adhesive that survives real life: humidity, fridge cold, kitchen grease
Adhesive fails for boring reasons: lotion on your hands, steam from cooking, condensation from the fridge, wipe-downs with a damp cloth. Plan for that reality. A system that needs babying will not survive your routine.
Battery reality check: replaceable vs rechargeable, low-battery signals
Batteries are a hidden cost. Replaceable batteries can be easier for long-term reliability; rechargeable can be simpler if you already have a charging routine. Either way, you want clear low-battery signals, not a surprise silence when you need it.
Multi-item organization: numbering, categories, and re-record speed
If you label more than 5–7 items, organization matters. Some people do categories (Morning / Evening / As-Needed). Others do numbers (1–10) and keep a printed index. Either works—what matters is that you can re-record quickly during refill week without making it a weekend project.
Show me the nerdy details
Reliability comes down to repeatable micro-steps: the fewer distinct actions (hold, press, wait, confirm) and the fewer “mode switches” (record mode vs play mode confusion), the lower the error rate. A predictable tactile interface reduces cognitive load, especially when lighting or fatigue is working against you.
4) Voice stickers that don’t quit: durability tests you can do at home
Here’s my slightly chaotic truth: I don’t fully trust a label until it survives a few days of real life. The good news is you can test durability before you label everything you own.
The 3-day test: condensation, handling, and wipe-down proof
Put a label on a fridge container or a water bottle and live normally for three days. Open, close, wipe, cook, and rinse like you usually do. If it peels, drifts, or slides, you’ve learned something valuable without risking a medication mix-up.
The “pocket friction” test for pill bottles (keys + lint + life)
Carry a labeled “dummy” bottle in a bag or jacket pocket for a day. If the label edge catches, peels, or gets shredded by friction, you’ll see it fast. I learned this the hard way when a label corner started lifting—and suddenly my “quick confirmation” required two hands and a deep sigh.
When stickers fail: curved surfaces, textured plastic, and powder residue
- Curves: Smaller labels adhere better on rounded bottles than wide, stiff ones.
- Texture: Some plastics are lightly pebbled; adhesive hates that.
- Residue: Lotion, powder, or label glue from old stickers reduces grip.
Quick fix: Clean the surface with mild soap and water, dry completely, and avoid placing labels over seams or embossed markings.
5) Setup that sticks: a repeatable labeling workflow (takes 15 minutes)
If you only do one thing from this article, do this: build a workflow you can repeat on refill day when you’re distracted. A perfect system you can’t maintain is just a fancy regret.
Step-by-step: clean surface → place tag → record → confirm → log
- Clean: Wipe the placement spot and dry it fully.
- Place: Put the tag where your fingers naturally land (more on that below).
- Record: Use a short standardized script.
- Confirm: Play it back immediately. No exceptions.
- Log: Write the item on a simple medication list or note (paper or phone)—many people pair this with a printable symptom diary for seniors to keep one “single source” record that’s easy to share with family or clinicians.
The 10-second recording script that prevents “future you” confusion
Keep it short. Keep it consistent. Here’s a script you can copy:
- Name: “Lisinopril”
- Strength: “10 milligrams”
- Timing: “Morning” or “With breakfast” (only if it matches your pharmacy directions)
- Special note: “As needed” or “Do not take with grapefruit” (only when you’re sure)
My personal rule: if it takes longer than 10 seconds to say, it probably belongs on a separate medication list—not on the label.
Placement rules: where your fingers land first (cap, shoulder, side)
- Cap edge: Great for tactile finding, but don’t block child-safety features.
- Shoulder: Often stays clean and avoids the printed pharmacy label.
- Side panel: Works if it doesn’t cover key printed info and you can find it reliably.
A tip from low vision educators: avoid covering the print label so someone else can still read it for you when needed. That one decision keeps your system “shareable,” which is a safety feature—and it also complements practical skills like low-vision reading strategies for seniors with AMD when you want to double-check details without strain.
Let’s be honest… if it’s hard to re-record, you won’t maintain it
If recording requires a manual, a special mode, or a tiny button combo, refill week will break your system. Choose tools that make re-recording feel boring—and that’s a compliment.
- Legal directions
- Name + strength
- Refill info
- One-press replay
- Your 10-second script
- Same placement every time
- Faster confirmation
- Fewer mix-ups
- Less daily stress
- Record → Confirm → Log
- Repeat on refill day
- Ask pharmacy when unsure
This is not medical advice—just a quick way to estimate daily friction.
Neutral next action: Use the estimate to decide whether you want “phone-based” or “no-phone” labeling.

6) Pantry + fridge labeling: the underrated win for medication safety
This part surprises people: labeling your pantry and fridge can reduce medication stress. Not because food is “medicine,” but because food choices can interact with meds, and because household mix-ups (supplements, OTC products, look-alike bottles) often start in the kitchen.
Reduce “ingredient mistakes” that affect meds (grapefruit, caffeine, alcohol)
You don’t need to memorize every interaction. You just need to label the items that repeatedly cause “wait, is this the one I should avoid?” moments. I once kept a bottle of grapefruit juice in the fridge because it felt “healthy,” and then spent a week asking myself if it mattered for a family member’s prescription. A simple voice label—“ask pharmacist about interactions”—would have saved mental noise. If you’re also trying to make food choices easier in a low-vision household, a structured plan like a 7-day DASH meal plan and grocery list can reduce decision fatigue in the same way good labeling does.
Shared households: preventing mix-ups with supplements and OTC products
- Label supplements with “Supplement” at the start of the audio.
- Store OTC pain relievers separately from prescriptions (different shelf or bin).
- If two people use similar vitamins, add a name: “Mom’s vitamin D,” “Alex’s vitamin D.”
Cold storage tips: labels on lids vs labels on sides (what stays readable)
Lids get handled a lot, which is good for “finding by touch,” but they also get washed and swapped. Side labels survive longer but can be harder to locate quickly. If you’re labeling leftovers or weekly meal prep, consider a simple rule: lid labels for “this week,” side labels for “repeat items.”
- Separate supplements and OTC products
- Label common interaction triggers
- Use consistent placement on containers
Apply in 60 seconds: Pick one “always confusing” pantry item and add a voice label today.
7) Who this is for / not for
Audio labeling is a strong tool—but it’s not the whole toolbox. It shines when it reduces daily friction. It struggles when the problem is bigger than labels.
Best for: low vision, mild cognitive load issues, busy multi-med routines, caregivers
- People who can follow a routine but need faster identification/confirmation
- Caregivers managing a spouse/parent’s medications
- Households with many look-alike bottles
Not enough on its own: severe confusion, frequent medication changes, high-risk regimens
If someone is frequently disoriented, repeatedly mis-doses, or can’t remember whether they already took a pill, labels alone may not be sufficient. That’s when you want structured packaging, supervised administration, or medical guidance. This is not a “try harder” situation—it’s a “make it safer” situation.
When you should choose a pharmacy solution instead (large print, blister packs, med sync)
Many pharmacies can provide accommodations like larger print labels upon request, and some services offer alternative packaging. The CDC’s medication safety guidance emphasizes following label directions and creating routines; the FDA also emphasizes keeping a medication list. If your regimen is complicated, a pharmacist can often recommend options like synchronized refills, unit-dose packaging, or a simplified schedule. And if your medication routine is tied to chronic eye conditions, staying current with an annual eye exam checklist for seniors can help you catch changes before they ripple into everyday safety.
- Yes if you mostly need faster identification/confirmation.
- Yes if refills are predictable and you can re-record reliably.
- Maybe not if medication changes weekly and you’re already overwhelmed.
- Maybe not if there’s confusion about whether a dose was already taken.
Neutral next action: If you checked any “maybe not,” call your pharmacist and ask about packaging or label accommodations.
8) Common mistakes that quietly cause medication errors (and how to avoid them)
This section is the heart of the guide. Because most errors aren’t dramatic. They’re quiet. They happen in the gap between “I’m pretty sure” and “I verified.”
Mistake #1: recording “two pills” without saying which strength
Two pills of 5 mg is not the same as one pill of 10 mg. Your label should always include the strength. If you don’t know the strength, don’t guess—use the pharmacy label or call the pharmacy.
Mistake #2: relying on color caps or bottle shape as identity
Manufacturers change. Pharmacies swap generics. Colors shift. If your system relies on “the blue one,” it will eventually fail at the worst time.
Mistake #3: putting the audio tag on the wrong bottle during refills
This is the refill trap: you’re opening bags, you’re juggling paperwork, you’re tired, and suddenly you’ve attached the “morning” tag to the “evening” bottle. The fix is boring—and effective: one bottle at a time. Tag it, record it, confirm it, put it away. Then move on.
Mistake #4: skipping the “confirm playback” step after recording
I used to skip playback when I felt confident. Then I once recorded a label while the faucet was running and couldn’t hear what I said. That label sat on the bottle like a liar until I fixed it. Playback takes 3 seconds. It’s worth it—especially for medications that already cause visual side effects, like the kind discussed in Topamax and sudden blurry vision, where “wait…is this the right one?” can spike fast.
- Always record name + strength
- Never rely on color/shape alone
- Confirm playback immediately
Apply in 60 seconds: Play your most-used label right now—if it’s unclear, re-record it today.
9) Don’t do this: risky shortcuts people take when they’re tired
Tired brains invent shortcuts. They feel efficient. They’re also how a small labeling problem becomes a safety problem.
“I’ll label it later” becomes “I never labeled it”
Later is a myth when you’re busy. If you can’t label it now, put it in a “needs label” bin so it doesn’t blend into the routine. The bin is a visual/tactile guilt trip—in a friendly way.
Reusing old tags on new prescriptions (the refill trap)
Reusing tags feels smart until one message doesn’t match the bottle. If you reuse, you need a strict rule: remove the tag, re-record, confirm before it returns to the shelf. No “temporary” messages.
Storing loose pills in unmarked containers (travel + purse chaos)
I get it: you’re going out, you don’t want a whole bottle. But loose pills without identity are a risk. If you must travel, use a labeled organizer and keep a photo or list of what’s inside. Better yet, ask the pharmacy about safe travel options for your specific medications—and if eye drops are part of your regimen, keep a quick reference for TSA carry-on rules for glaucoma eye drops so “travel logistics” doesn’t turn into a missed dose.
Short Story: I once helped a friend’s parent set up a “simple” medication drawer. We were proud—everything lined up, everything had a place. Two weeks later, refill day happened. New bottles came in, the labels looked almost identical, and the old “map” quietly broke.
The next morning, they hesitated, replayed a label, and still felt unsure because the audio didn’t include the strength. Nothing bad happened—but the stress spike was real. We fixed it in ten minutes: re-recorded with name + strength + timing, added a small “refill day” checklist on paper, and made a rule that only one bottle gets handled at a time. The drawer didn’t become “perfect.” It became calm again.
10) When to seek help (don’t push through uncertainty)
There’s a difference between “I need a better system” and “I need help right now.” If you’re hovering in uncertainty, choose safety.
Call your pharmacist today if you can’t confirm: name, strength, or directions
Pharmacists are built for this question. If the label is unclear, the instructions feel confusing, or you suspect you attached a tag to the wrong bottle, call. The FDA’s consumer guidance emphasizes keeping an accurate medication list and asking questions—because medication errors are preventable when information is clear. If you’re managing diabetes as well, understanding practical costs like Medicare diabetic eye exam cost can remove one more barrier to staying on schedule with vision care.
Get urgent medical help if you suspect an overdose or missed critical dose
If you think you took the wrong medication, doubled a dose, or missed a medication that’s time-sensitive, seek urgent guidance. When in doubt, contact a medical professional or emergency services in your area. Don’t “wait and see” if the risk feels real.
Ask your clinic about: simplified regimens, blister packs, home health support
Some regimens can be simplified. Some can be packaged in a way that reduces daily decision-making. If confusion is recurring, ask about support options. That’s not failure—that’s good risk management.
FAQ
What’s the difference between a talking prescription label and a voice sticker?
A talking prescription label is typically a pharmacy-provided accessible label system designed for prescriptions. A voice sticker/tag is usually a consumer tool you apply yourself. Both can help, but pharmacy solutions may integrate better with prescription information, while DIY tags give you flexibility across pantry and fridge items.
Are talking label makers HIPAA-safe to use at home?
At home, you control what you record. If privacy matters, avoid recording sensitive details (full name, diagnosis). Record only what you need to safely identify and take the medication (name, strength, timing). If multiple people share a space, consider using initials or location-based cues instead.
Can I put voice labels on pill bottles from any pharmacy?
Yes, you can attach a consumer voice label to most standard pill bottles. The key is placement: don’t cover critical printed information, and make sure the label adheres securely. Always verify your audio message against the pharmacy label.
What’s the safest way to label medications for someone with low vision and memory issues?
Use a layered system: keep the pharmacy label visible, add audio confirmation, and pair it with a structured routine (organized storage + a medication list + reminders). If memory issues are significant, ask a pharmacist or clinician about packaging and supervision options.
Do audio labels work in the fridge or freezer?
Many do, but condensation and cold plastic can weaken adhesive. Run a three-day condensation and wipe-down test before labeling important items. For freezer use, prioritize labels known for strong adhesion and place them where hands don’t constantly scrape the edges.
How do I label supplements so they don’t get confused with prescriptions?
Start every supplement label with the word “Supplement,” then add the name and timing. Store supplements in a different bin or shelf from prescriptions. This reduces accidental substitution—especially when bottles look alike.
What should I record on the audio label (name, dose, timing, warnings)?
Keep it short: name + strength + timing. Add one brief warning only if you’re certain it’s correct and consistent with your pharmacy instructions. If you’re unsure, don’t freestyle—call the pharmacy and confirm what should be included.
Are there pharmacy programs in the US that provide accessible labels?
Some pharmacies and services offer accessibility accommodations such as larger print, alternative packaging, or accessible labeling options. Availability varies. The fastest path is to ask your pharmacy directly what accommodations they can provide for low vision. If your eye condition is evolving, it can also help to know what symptoms deserve quicker follow-up—like diabetic macular edema symptoms—so care stays proactive, not reactive.
How do I prevent mix-ups when two people share the same medicine cabinet?
Assign separate zones (left/right shelves), use name cues in audio, and avoid keeping identical items next to each other. If both people take similar meds or supplements, add a second cue (tactile band, different bin, or numbered system).
What’s better: a weekly pill organizer or keeping meds in original bottles?
It depends on your risk profile and routine. Original bottles preserve the pharmacy label; organizers reduce daily handling and can improve adherence. Many people do both: keep bottles as the reference, fill an organizer with a careful, repeatable process, and confirm with a medication list.
12) Next step (one concrete action)
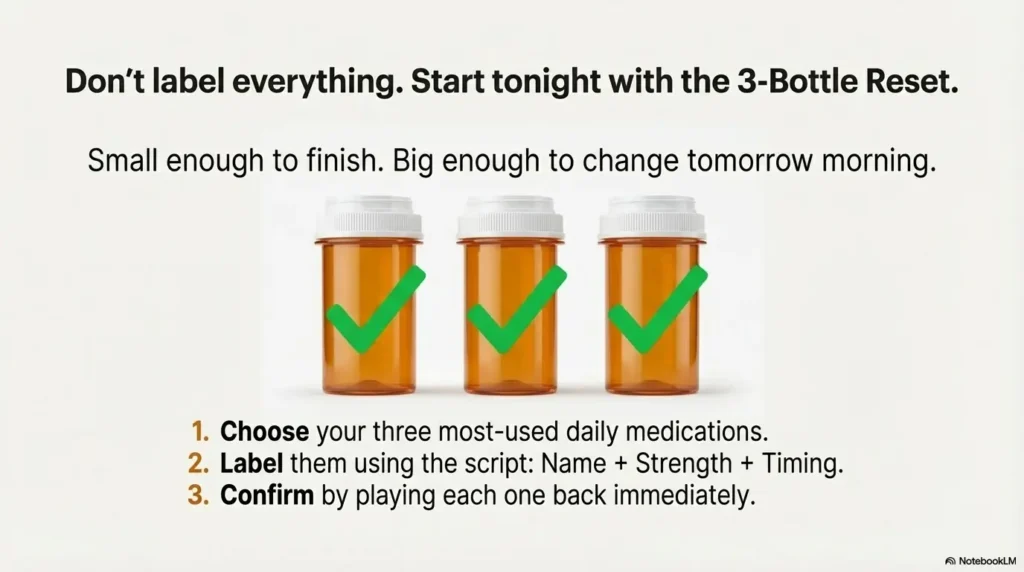
If you’re overwhelmed, don’t label everything. Do a 3-bottle reset tonight. It’s small enough to finish, big enough to change tomorrow morning.
Do a “3-bottle reset” tonight: label your top 3 daily meds using the same script, same placement, and a quick verification call to the pharmacy if anything is unclear.
- Choose the three meds you touch most days.
- Clean the placement spot, then attach the label without covering the pharmacy text.
- Record: name + strength + timing.
- Play it back immediately.
- Write the three meds on a simple medication list (paper is fine).
- Your prescription bottle(s)
- Your current medication list (include OTC + supplements)
- Questions: large print? accessible labels? packaging options? synchronized refills?
- A note about what’s hardest: reading, identifying, remembering, or organizing
Neutral next action: Put these items in one place now so tomorrow’s call takes 5 minutes.
Conclusion
You don’t need a perfect tool. You need a system that still works when you’re tired, rushed, or irritated at the universe. That’s the quiet power of two-layer labeling: the pharmacy label stays the truth, and audio becomes your calm, one-press confirmation.
And here’s the open loop from the beginning, closed honestly: the point isn’t to “fight your vision.” The point is to build an environment where you can act with confidence anyway.
Try this within 15 minutes: Label three bottles, confirm playback, and write a medication list line for each. If anything feels uncertain, call your pharmacist—because safety beats guesswork.
Last reviewed: 2025-12-30.