

Precision Without the Guesswork: Tactile Tools for Low-Vision Cooking
The wrong measuring cup doesn’t ruin dinner with fireworks; it ruins it quietly with dense muffins or thin soup. For those with low vision, aging eyes, or cataracts, embossed numbers often disappear in the kitchen glare, turning a simple recipe into a sequence of frustrating negotiations.
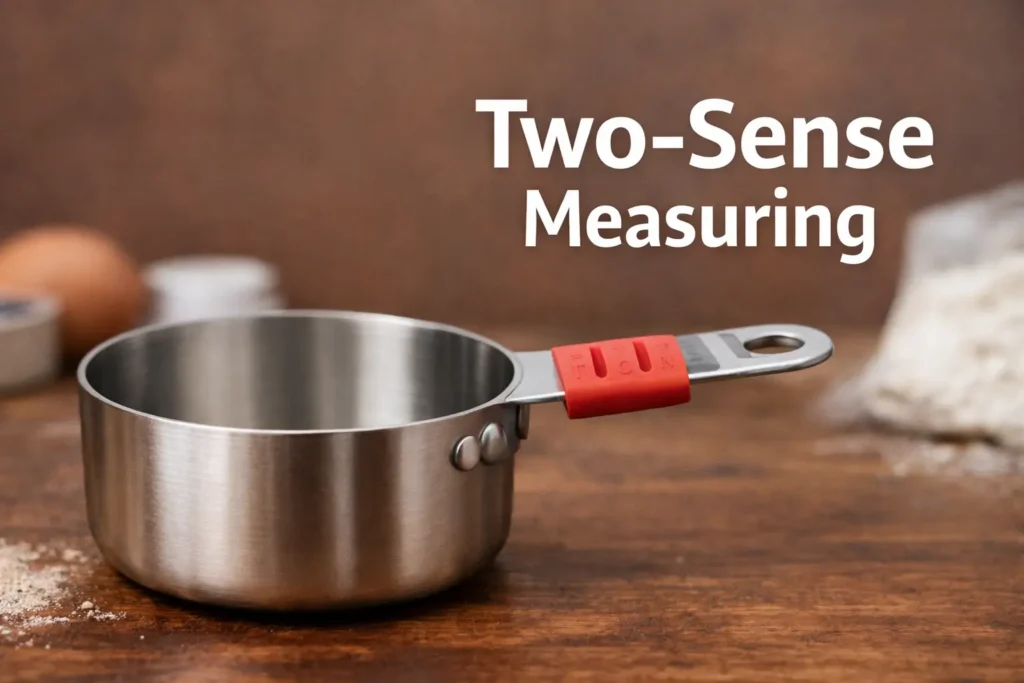
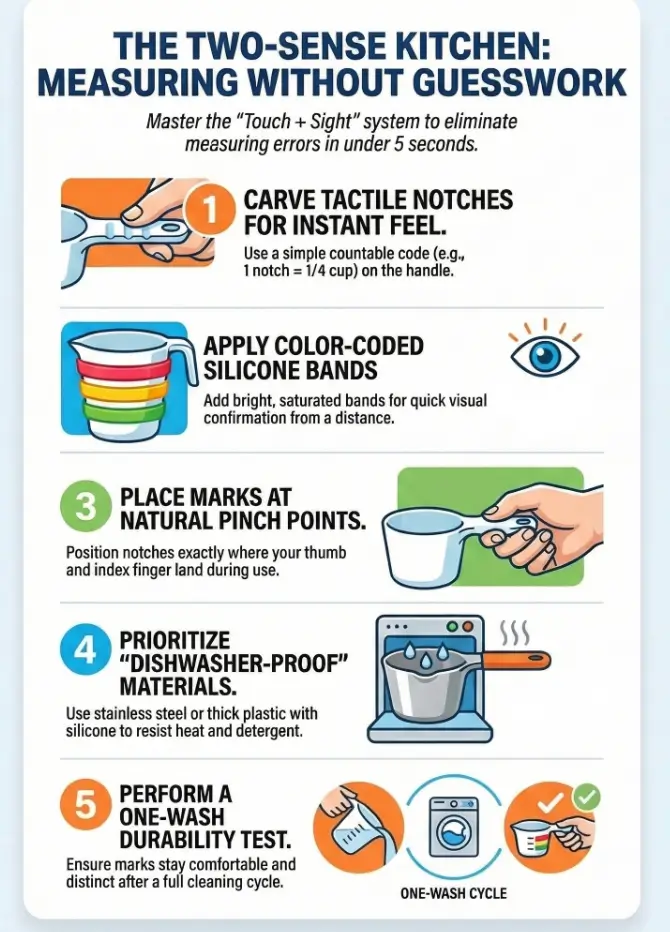
Stop the “close enough” guesswork. This guide introduces a durable two-sense system: tactile notches for instant identification and silicone bands for fast visual confirmation.
- ✔ Tactile Notches: Instant ID by touch, even with wet hands.
- ✔ Silicone Bands: High-contrast visual markers that won’t fade.
- ✔ Kitchen-Proven: Built to survive steam, flour, and the dishwasher.
No Pinterest aesthetic here, just practical, boring reliability. Start with our 10-minute pilot test and reclaim your confidence in the kitchen.
Table of Contents
Hook: Stop Paying the “Wrong Cup” Tax
The quiet chaos: when “close enough” becomes a ruined recipe
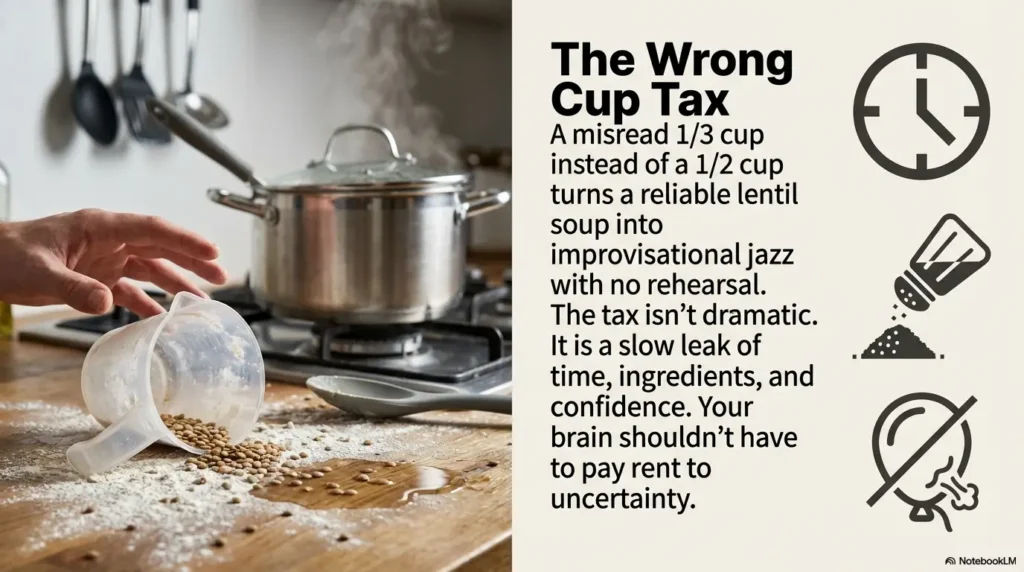
I once tried to “eye-ball” brownies after misreading the 1/3 cup. The batter looked fine. The smell was promising. The texture… had other plans. That’s the tax: not dramatic, not cinematic, just a slow leak of time, ingredients, and confidence. If you cook with low vision, cataracts, or aging eyes, the kitchen can become a place where you keep re-checking the same thing, like your brain is paying rent to uncertainty.
The goal: grab, confirm, pour without squinting or second-guessing
A good marking system doesn’t ask you to “remember harder.” It makes the tool itself do more work. That’s why we’re using redundancy: touch and sight working together like a safety latch. If one sense is compromised (glare, steam, wet hands), the other catches the error. The same logic helps with other kitchen systems too, whether you are building low-vision spice jar labels or a more reliable freezer organization system for low vision.
- Tactile marks prevent “wrong grab” errors.
- Color bands reduce re-checking and decision fatigue.
- A one-wash test makes durability non-negotiable.
Apply in 60 seconds: Pick the cup you use most and decide where your fingers naturally pinch the handle.
Eligibility checklist (quick yes/no)
- Yes if you own a set with handles thick enough to notch (metal or sturdy plastic).
- Yes if your dishwasher regularly eats stickers/ink markings.
- Yes if you share tools with family and need a code others can learn fast.
- No if the handle is brittle, thin plastic that flexes sharply.
- No if you’re marking a collectible set you don’t want to alter.
Neutral next action: If you answered “yes” to 3+ items, start with the one-cup pilot near the end of this article.
Materials First: Build a System That Survives the Dishwasher
Best cups to mark: metal handles, thick plastic, wide handles
Your best candidates are boring, strong, and a little chunky. Think stainless sets (like OXO-style metal cups), thick plastic with a wide handle, or anything with enough “meat” to hold a notch without turning into a stress fracture later. If you can pinch the handle firmly without it flexing like a diving board, you’re in business.
What to avoid: thin brittle plastic, painted markings you’ll scrape off
If the handle feels like a credit card, skip it. Thin plastic cracks. Painted markings scrape. And “permanent” marker is only permanent until hot water and detergent decide it’s a seasonal trend. (Dishwasher detergent is basically a breakup text for weak labels.)
Tool kit (budget to premium): file, deburring tool, silicone bands, food-safe silicone
- Budget: small metal file (or nail file for light work), fine sandpaper, silicone bands.
- Mid: deburring tool + file, calipers or ruler for consistent placement, silicone bands.
- Premium: rotary tool with a gentle sanding drum (low speed), plus a deburring tool.
Micro-check: “If it melts, it fails.”
Any add-on you choose should tolerate heat and detergent. Silicone bands are popular because they’re grippy and washable. For sealants/adhesives, don’t gamble on mystery craft glue. In the U.S., the FDA explains that “food contact substances” include materials used in cookware and surfaces that touch food, which is why it’s worth being picky about what you add to tools you handle while cooking.
Show me the nerdy details
Durability is mostly about three enemies: detergent alkalinity, heat cycling, and abrasion. Notches and engravings survive because they’re physical geometry, not a coating. Bands survive when they’re silicone (not cheap rubber) and fit snugly. Adhesives fail when they soften in heat or when water creeps under the edge and lifts them.
One mid-article resource that’s worth skimming (official perspective):
Notches That Make Sense: A Tactile “Language” You Won’t Forget
Choose a tactile code (simple, consistent, scalable)
The best tactile codes have two qualities: you can feel them instantly, and you can explain them to someone else without sounding like you’re reciting ancient runes. Your fingers are smart, but they’re not interested in memorizing a complicated mythology while you’re also timing pasta.
Suggested notch map (US set): 1/4, 1/3, 1/2, 2/3, 3/4, 1 cup
Here are two practical options. Pick one and stick with it. Consistency beats cleverness.
Option A: “Countable notches” (fastest to learn)
- 1/4 cup: 1 notch
- 1/3 cup: 2 notches
- 1/2 cup: 3 notches
- 2/3 cup: 4 notches
- 3/4 cup: 5 notches
- 1 cup: 1 long notch (or a wide “bar” notch)
Why it works: your fingers can count quickly, and “one long notch” feels distinct.
Option B: “Shape cue” (best if counting is annoying)
- 1/4 cup: one notch
- 1/3 cup: two notches close together
- 1/2 cup: one notch + one shallow “dot” (a tiny dimple)
- 2/3 cup: two notches + one shallow dot
- 3/4 cup: three notches
- 1 cup: wide notch
Why it works: the pattern changes, not just the count.
Placement rules: where fingers naturally land (not where labels look pretty)
Place the tactile mark exactly where your thumb and index finger pinch. Not near the end of the handle “for aesthetics.” Not on the top edge “because it’s visible.” Your hand has habits. Reward them. This is the same principle behind good tactile label placement on pill bottles and even tactile dots for microwave buttons: the cue has to live where your fingers actually go.
Let’s be honest… you won’t memorize a complicated code.
If your system needs a legend taped inside a cabinet, it’s already losing. The best code is the one you can teach in 30 seconds while someone is preheating the oven and asking where the vanilla is.
Quick method: mark one “reference” cup first (like 1/2 or 1 cup), then replicate placement by feel. I’ve found that once the first notch feels right, your fingers become ruthless QA testers. They’ll tell you if notch #2 is drifting.
Mini calculator: “How many times do you re-check?”
Enter your estimate:
- Checks per cooking session: ____ (typical 5–20)
- Seconds per check: ____ (typical 5–15)
- Sessions per week: ____
Result: (checks × seconds × sessions) = ____ seconds/week you can claw back.
Neutral next action: Do the one-cup pilot and see if your “seconds per check” drops after one week.
Silicone Bands: Fast Visual Confirmation Without Tiny Print
Band strategy 1: one band per size (color ladder)
If you want the simplest visual layer: assign one color per cup size. Bright, saturated colors tend to read better than pale pastels under overhead kitchen lighting. The “ladder” idea means the set feels ordered, not random.
- Example ladder: 1/4 = yellow, 1/3 = orange, 1/2 = red, 2/3 = green, 3/4 = blue, 1 cup = black.
- Why black works: it’s visually loud and easy to spot.
Band strategy 2: stacked bands for fractions (quick math, zero squint)
If color recognition is unreliable for you (or your lighting is a menace), stack identical bands:
- 1/4: 1 band
- 1/3: 2 bands
- 1/2: 3 bands
- 1 cup: 1 thick band or 4 thin bands (choose what’s easiest to feel/see)
This can be especially nice if you also have arthritis or low grip strength because the bands add friction. The cup feels less slippery when your hands are wet.
Best band sizes/materials: high-temp, snug fit, non-slip texture
Aim for bands that fit snugly without forcing the handle to flex. Too loose and they migrate. Too tight and you’ll hate them. Silicone generally holds up well in hot water and detergent, which is why it’s used in so many kitchen tools (spatulas, jar openers, heat mats).
How to keep bands from migrating or rolling during washing
Two fixes that don’t require glue:
- Position them in a “stop zone”: place the band just before a handle curve or thickening.
- Use texture as a brake: choose bands with ridges or a matte finish instead of glossy.
Personal confession: I once used bargain rubber bands as a “temporary solution.” They didn’t melt dramatically like a movie. They just got weird. Stretchy. Slippery. Like they lost their will to live. Silicone is the grown-up choice.
The Two-Sense Lock: How Notches + Bands Prevent “Oops”
Why tactile-only can fail (wet hands, fast cooking, wrong grip)
Tactile marks are powerful, but real kitchens are chaotic. When your hands are wet, you may grip a cup slightly differently. If you’re rushing, you might pinch the handle in a new spot. That can make even a good notch pattern feel “off” for a split second.
Why visual-only can fail (low contrast, glare, kitchen lighting)
Glare turns embossed numbers into ghosts. Steam fogs your glasses. Overhead LEDs create harsh reflections. Visual-only systems can betray you at the exact moment you’re trying to be quick and confident. A small upgrade like glare-free under-cabinet lighting can make the visual layer work harder for you instead of against you.
The “confirm step” habit: touch first, glance second, pour last
This is the whole trick:
- Touch to identify (notches).
- Glance to confirm (bands).
- Pour only after both agree.
Here’s what no one tells you… steam and glare are your real enemies.
The enemy isn’t your eyesight. It’s the environment. The two-sense lock is basically you refusing to do kitchen work in “hard mode” anymore.
Short Story: The soup that taught me to distrust “almost.” (120–180 words)
One winter, I was making a big pot of lentil soup, the kind that’s supposed to be forgiving. I had music on, the stove was humming, and my glasses were doing that annoying thing where they alternate between “helpful” and “decorative.”
I grabbed what I thought was the 1/2 cup for broth concentrate. It was the 1/3. Not catastrophic, just enough to make the flavor thin and vaguely disappointed. I tried to correct it with “a little extra” of everything. Suddenly the soup wasn’t soup; it was improvisational jazz with no rehearsal. The next day I notched my most-used cup, slipped on a bright band, and realized something: the goal isn’t perfection. It’s removing unnecessary doubt so your attention can go back to the food, the timing, and the joy.
Decision card: Notches vs. Raised dots vs. Labels
Trade-off: permanent modification.
Trade-off: adhesives can fail over time.
Trade-off: readability and wash durability vary wildly.
Neutral next action: If you’re undecided, do notches on one cup and bands on the whole set. See which reduces mistakes fastest.
Make It Durable: Food-Safe, Dishwasher-Safe, No-Flake Marking
Sealing notches (when needed) without creating sharp edges
Often, you don’t need to “seal” a notch at all, because the notch itself is the mark. What you do need is comfort: smooth edges, no burrs, no little metal splinters waiting to ruin your day. If you’re working with metal, deburr and polish the notch so it feels intentional, not like an accident.
Safe adhesives and sealants (what to look for on labels: food contact, high-temp)
If you add anything beyond the notch and band (like a tiny dot of silicone to create a tactile bump), choose materials intended for high heat and kitchen environments. In the U.S., organizations like NSF publish standards around materials used in food equipment, including components like sealants and gaskets. You don’t need to become a standards nerd, but you can borrow the mindset: materials should be appropriate for repeated washing and contact in cooking environments.
Smoothness test: no burrs, no snags, no finger scratches
Run your fingertip over the notch like you’re trying to find a thread snag on a sweater. If it catches, it needs more smoothing. You’re not chasing perfection. You’re avoiding micro-injuries and keeping the handle comfortable for daily use.
One-wash test: run a cycle, then re-check tactile clarity
Do one full dishwasher cycle, then check:
- Are the notches still crisp to the touch?
- Did the bands migrate or loosen?
- Do any edges feel sharper after washing?
Anecdote: the first time I did this, I realized one notch was too shallow. It “felt” fine when dry, but after washing it got harder to detect. I deepened it slightly, re-smoothed, and the problem vanished.
- Notches last because they’re physical shape, not ink.
- Comfort matters: deburr like you mean it.
- Bands last when they’re snug and textured.
Apply in 60 seconds: After washing once, do a “blind grab” test with eyes closed and wet hands.
Who This Is For / Not For
For: low vision, cataracts, macular degeneration, aging eyes, night cooks
If tiny markings fade into glare, this is for you. If your best vision happens at noon but your cooking happens at 7 p.m., this is for you. If you’re tired of holding a cup under the light like you’re interrogating it, welcome.
For: households sharing tools (kids/partners/roommates)
A shared code reduces household friction. Not dramatically. Just in that quiet way where you stop saying, “No, not that cup,” and start saying, “Use the three-notch one.”
Not for: collectors’ sets you don’t want to alter permanently
If you’d be upset seeing a notch on a fancy set, keep it pristine and use bands-only or a removable labeling approach.
Not for: extremely thin plastic handles (risk of cracking)
If the handle flexes or looks stressed when you squeeze, don’t notch it. Use silicone bands and a non-permanent tactile marker strategy instead.
Common Mistakes (Don’t Do This)
Mistake 1: Random notch placement (your fingers can’t “find” it)
If the mark isn’t where your hand naturally lands, it becomes a scavenger hunt. Marks should be “auto-found.”
Mistake 2: Too many codes (you’ll revert to guessing)
Complexity feels smart on day one and cruel on day seven. Keep it simple enough that you can remember it while you’re multitasking.
Mistake 3: Sharp burrs (pain + contamination risk)
Burrs are the tiny villains. Smooth them down. Always.
Mistake 4: Cheap bands that stretch, slide, or melt
If the band turns into a floppy bracelet after two washes, it’s not a tool. It’s clutter.
Mistake 5: Marking only one cup (the set becomes a liar)
A single marked cup in an unmarked set is like putting one labeled key on a ring of mystery keys. Eventually, you grab the wrong one and blame yourself. Don’t.
Open Loops: The “Kitchen Conditions” That Decide Everything
Wet hands: how tactile contrast changes when slippery
With wet hands, shallow markings feel less distinct. This is why you should test after washing and also with damp fingers. If you can’t reliably feel the code when your hands are wet, deepen the notches slightly and re-smooth.
Flour dust: how bands and notches behave when coated
Flour can fill grooves and soften tactile detail. The fix is simple: keep notches deep enough to survive a light coating, and choose bands with texture so they remain grippy even when dusty.
Low light: the lighting tweak that makes bands pop
If your kitchen has one harsh overhead light, it can turn everything into glare. A small under-cabinet LED strip (even a battery option) can help colors read more clearly. It’s not about brightness, it’s about directional light that reduces reflections. If you want to refine that setup, a guide to glare-free under-cabinet lighting can make the band colors easier to trust at a glance.
Shared kitchens: how to teach your code in 30 seconds
This is the script that works:
- “Notches tell you the size by touch. Count them.”
- “Band color confirms it if you want a quick glance.”
- “When in doubt: touch, glance, pour.”
Quote-prep list (if you decide to buy a better set later)
- Handle material (stainless, thick plastic) and handle width.
- Whether the size markings are engraved/embossed (not printed paint).
- Whether the set includes the fractions you actually use (1/3 and 2/3 matter).
- Whether bands can fit without slipping (handle shape matters).
Neutral next action: Before buying, pinch the handle in-store and imagine where a notch would go.
A quick nod to real-world entities people often encounter: OXO and Norpro both sell measuring sets with different handle designs; Pyrex and Anchor Hocking are common for glass measuring cups (a different situation since you’re not notching glass); and if you’re looking at “sanitizing” claims on dishwashers, you may see NSF language on some models. You don’t need a shopping spree to do this project, but it helps to recognize what you’re working with.
Set Design: Make Your Marking System Future-Proof
If you add new cups later, will the code still work?
Future-proofing is simple: reserve “space” in your code. If you start with a code that only works for four cups, adding 2/3 or 3/4 later can force you into awkward hacks. Choose a pattern that scales.
Standardize across tools: cups, spoons, scoops, even medicine cups (with caution)
Yes, you can standardize the same tactile language across measuring spoons. It’s satisfying, like your kitchen speaks one clean dialect. Just be cautious around anything medical: medicine dosing should be done with tools intended for medication and guidance you trust. Still, the idea holds: a consistent tactile code reduces errors across your whole measuring ecosystem. That same consistency matters in other parts of the house too, from a low-vision clothing tag system to large-print prescription labels that are easier to verify without strain.
The “one-minute audit” checklist for staying consistent
- Are notches placed in the same pinch zone on every cup?
- Do bands still fit snugly after washing?
- Can you identify each cup with eyes closed in under 2 seconds?
- Is the code explainable in one sentence?
- Pick a notch code that covers your full set.
- Keep placement consistent to avoid “searching by touch.”
- Audit monthly in one minute.
Apply in 60 seconds: Hold every cup once and confirm you feel the mark in the same spot.
FAQ
What’s the easiest way to mark measuring cups for low vision?
The easiest durable approach is a two-layer system: one tactile mark you can feel instantly (a notch pattern on the handle) plus one visual cue you can recognize at a glance (a silicone band). If you don’t want permanent changes, start with bands-only and add tactile markers that can be removed later.
Are silicone bands dishwasher-safe on measuring cups?
Many silicone bands handle dishwashing well because silicone is commonly used in kitchen tools designed for heat and washing. The real key is fit: a snug band stays put and doesn’t stretch into uselessness. If the band becomes loose after a few washes, swap it for a thicker or textured option.
How do I make tactile notches without cracking plastic handles?
Don’t notch thin or brittle plastic. If the handle flexes sharply when pinched, skip cutting and use bands plus removable tactile bumps instead. If the plastic is thick and sturdy, make shallow notches gradually, avoid sharp corners, and smooth the edges thoroughly so stress doesn’t concentrate.
What notch pattern is easiest to remember for US measuring cups?
The easiest is a simple count: 1 notch = 1/4, 2 = 1/3, 3 = 1/2, 4 = 2/3, 5 = 3/4, and a single wide notch for 1 cup. It’s fast because it’s countable and the “wide notch” stands out immediately.
Can I use rubber bands instead of silicone bands (and will they melt)?
Rubber bands often degrade, stretch, and slip after repeated hot-water cycles and detergent exposure. Even when they don’t “melt,” they can lose structure and become unreliable. Silicone is generally more stable for kitchen conditions and provides better grip and longevity.
How can I label cups if I can’t modify them permanently?
Use silicone bands, removable tactile markers, and consistent storage order so location becomes an additional cue. If you’re already organizing other cooking zones, that same mindset pairs well with low-vision freezer organization and clearly differentiated spice jar labeling systems.
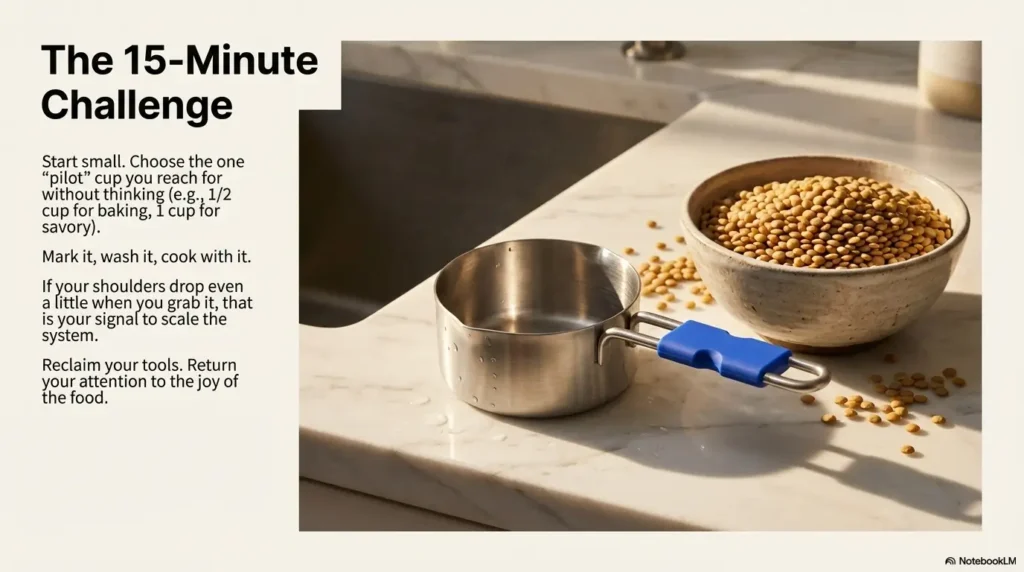
Next Step: Do the “One Cup Pilot” in 10 Minutes
Pick your most-used cup (usually 1/2 or 1 cup)
Choose the cup you reach for without thinking. This is where your system should feel instantly rewarding. If you bake often, 1/2 cup is a strong candidate. If you cook savory and eyeball a lot, 1 cup may be your anchor.
Add one tactile notch pattern + one silicone band
Make one notch pattern you can recognize blind. Then add one band that’s unmistakable. Don’t try to finish the whole set on day one unless you genuinely enjoy projects like this. (Some people do. They also label their charging cables. I respect them.)
Wash once, cook once, then decide if you scale the system to the full set
This is where the confidence comes back. If the pilot cup works, the rest is just repetition.
Infographic: The Two-Sense Workflow (Touch → Glance → Pour)
1) Touch
Find the notch pattern in your pinch zone. Count or feel the shape cue.
2) Glance
Confirm with the silicone band: color ladder or stacked bands.
3) Pour
Only pour when both cues agree. No second-guessing tax.
If you want additional low-vision cooking techniques beyond measuring tools, VisionAware (by the American Printing House for the Blind) has practical, safety-minded strategies for cooking with vision loss. And if you’re the kind of person who likes knowing what “serious” food-equipment materials standards look like, NSF publishes information on standards such as NSF/ANSI 51 that cover materials used in food equipment and components like sealants and gaskets.
Two helpful resources near the finish line:
Remember that hook, the “wrong cup” tax? This is how you stop paying it: your kitchen tools become trustworthy again. Not perfect. Trustworthy. And once that happens, your attention returns to what matters: timing, flavor, and the small quiet pride of making something that turns out the way you meant it to.
If you do one thing in the next 15 minutes: mark one cup, wash it once, then cook once. If your shoulders drop even a little when you grab it, that’s your signal to scale the system.
Last reviewed: 2026-03-07