

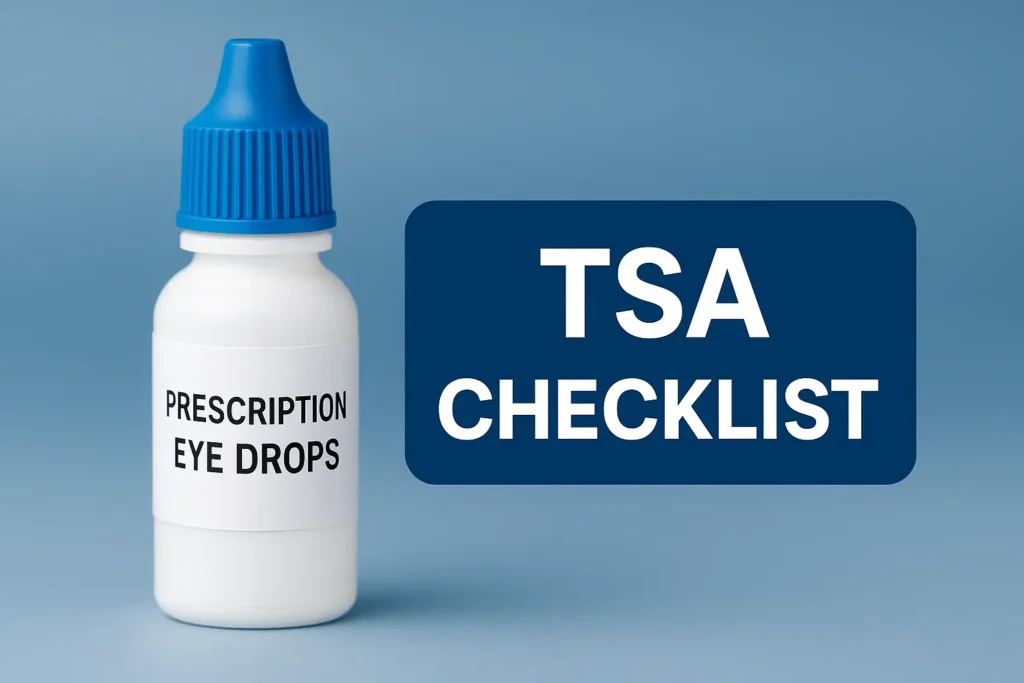
TSA glaucoma eye drops carry on: 7 Simple checklist rules
TSA Glaucoma Eye Drops Carry On: The Travel-Proof Checklist
The fastest way to ruin a trip is to let a tiny bottle become a mystery at the checkpoint—buried, unlabeled, leaking, or (worst) sitting in a bag that gets gate-checked without warning.
If you’re searching TSA glaucoma eye drops carry on, you’re not trying to “bend rules.” You’re trying to keep a glaucoma pressure routine intact when life is already full while the line moves, bins stack, and your brain is running on airport time.
Keep guessing and you risk extra screening, missed connections, or landing with your meds out of reach—an avoidable kind of panic.
This post gives you a calm, travel-proof checklist: how to pack for fast access, when the 3.4 oz / 100 mL math matters, how to declare medically necessary liquids, and the one-line script that keeps you from overexplaining. You’ll also build a backup plan with a labeled pouch and prescription details—so a spill or lost bag doesn’t become a crisis.
Definition: Carrying glaucoma eye drops through TSA means packing prescription eye drops in your carry-on under the liquids rules, using the medical exception when needed, and presenting them clearly (label + quick declaration) so screening stays simple.
No drama.
No hiding.
Just fewer surprises.
Let’s make your drops the easiest item in your bag to understand.
Table of Contents
The 60-second truth about TSA and eye drops
Here’s the deal: TSA is not trying to keep you from seeing. They’re trying to screen liquids safely and consistently. That means your job is to make your eye drops easy to understand at a glance—what it is, how much, and why it’s in your carry-on.
If your glaucoma drops are in a typical small bottle, they usually fit under the standard liquid limit of 3.4 oz / 100 mL. If you have a larger medically necessary liquid, TSA’s public guidance says you can bring it in reasonable quantities, but you should declare it at the checkpoint. “Declare” sounds dramatic. In real life it’s usually one calm sentence and a bottle you can point to.
I used to overthink this and do the frantic “hide it in the quart bag” shuffle like I was smuggling water onto a spaceship. It didn’t make me faster—it made me look nervous. And nervous is slow.
- Number to remember: 3.4 oz equals 100 mL for standard liquids.
- Number to budget: add 5–10 extra minutes if you’re declaring medical liquids or traveling with multiple bottles.
- Operator mindset: prepared beats perfect.
- Keep liquids visible and accessible
- Stay under 3.4 oz when you can
- If you can’t, declare calmly—don’t hide it
Apply in 60 seconds: Put your drops in a top pocket you can reach with one hand.
Rule 1: Carry-on first—checked bag is never your only plan
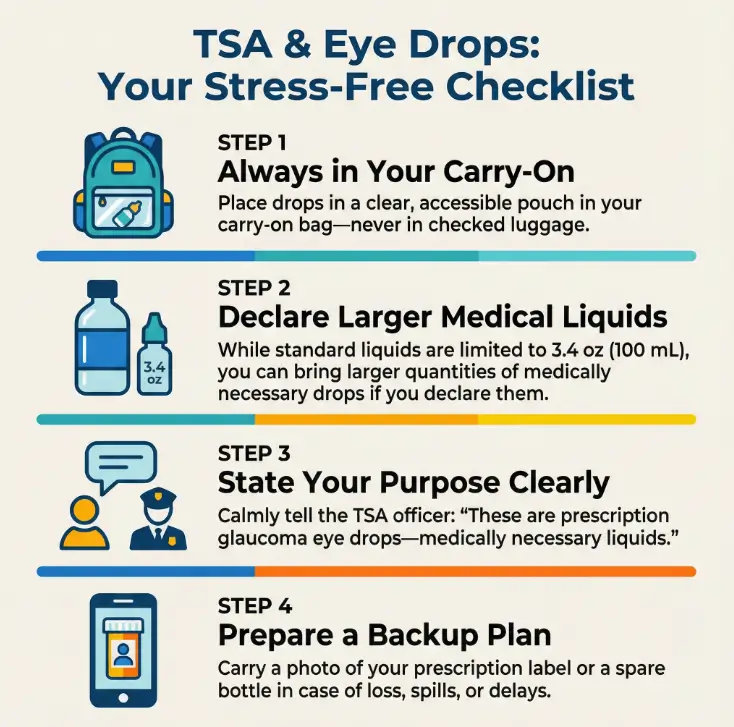
This rule is the quiet hero. If you only do one thing, do this: your glaucoma drops live in your carry-on. Not your checked bag. Not “whichever bag has room.” Carry-on.
Why? Because delays happen, bags go wandering, and sometimes a gate agent forces a carry-on to be checked at the last minute. If your drops are inside that bag, you’ve just outsourced your eye pressure routine to an airport roulette wheel. No thanks.
I once watched my bag get tagged at the gate and disappear down the belt like it had a better vacation planned than I did. I spent the next 6 hours thinking about one tiny bottle instead of the trip. It’s a special kind of pointless stress.
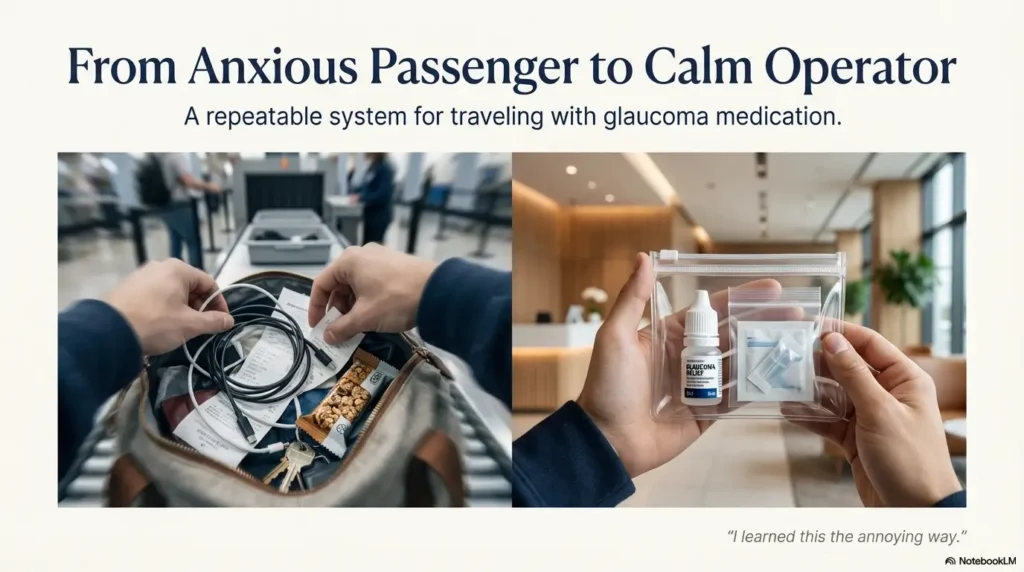
Practical move: create a “medical core” pouch that never leaves your sight. It takes 2 minutes to build and saves you hours of anxiety.
- Carry-on: primary bottle(s) + backup dose plan
- Personal item: a second copy of essentials if you can (tiny pouch)
- Checked bag: extras only (never the only bottle)
Pull-quote: “Your trip is optional. Your drops aren’t.”
Rule 2: Size math—3.4 oz / 100 mL, and when to declare more
Most glaucoma drops are small. Great. If your bottle is under 3.4 oz / 100 mL, it’s usually treated like other liquids. If it’s bigger, or you’re carrying multiple medically necessary liquids, TSA guidance allows that—but the smooth path is to declare it at screening.
Declare means: don’t wait for the officer to discover it and guess. You’re simply helping them categorize it fast. If you have TSA PreCheck, you may still be asked to separate medical liquids depending on the lane and the officer. Think of PreCheck as “fewer steps,” not “no steps.”
I used to pack every drop bottle into the quart bag like it was mandatory. Then I’d panic because my toothpaste also needed a spot. Here’s the truth: medical liquids don’t need to play musical chairs with shampoo. You can keep them separate so they’re easier to show.
- Number: 1 quart bag is for standard liquids; your medical pouch can be separate.
- Number: 2 bottles is common for a longer trip—primary + backup.
- Fast check: if the bottle label shows mL, you can compare it instantly to 100 mL.
- Stay under 100 mL when possible
- Medical liquids can be separate from the quart bag
- Declare early to avoid the slow “surprise discovery”
Apply in 60 seconds: Flip the bottle and find the mL size—say it out loud once so you remember it.
Rule 3: Proof without drama—labels, prescriptions, and a one-line script
Security doesn’t need your life story. They need clarity. The easiest “proof” is simply original labeling—the pharmacy label on the bottle or box, or the manufacturer packaging that clearly identifies it as medication.
If you’re traveling with multiple bottles, a larger medical liquid, or you’re connecting internationally, bring a lightweight backup: a photo of the prescription label or a copy of your prescription info. Not because TSA always demands it—because it helps you solve problems if something spills, breaks, or gets questioned at a non-US checkpoint.
Here’s the one-line script that keeps you from rambling:
“These are prescription glaucoma eye drops—medically necessary liquids. I can take them out for screening.”
I once tried to be “helpful” and explained my entire diagnosis in a security line. The officer didn’t need my memoir. The people behind me definitely didn’t. Now I keep it short and professional. My blood pressure thanks me.
International note: if you depart from the UK or transit through UK security, government guidance allows essential medicines over 100 mL in hand luggage, but you may need proof of prescription for larger containers. If you’re departing from Korea, Japan, or EU airports, rules can be similar but enforcement can feel different by airport and equipment. Your safest universal play is clear labeling + a copy of prescription details.
- Number: keep 1 digital copy (photo) and 1 physical backup if you’re nervous.
- Number: 10 seconds—aim to explain what it is in one breath, not a speech.
Rule 4: Pack like a calm operator—leak-proof, fast access, zero fumbling
This rule is about speed. Not sprinting speed—line-flow speed. The faster you can present your drops, the less likely you’ll get stuck in the “open bag, move items, re-pack while sweating” loop.
My packing pattern now is boring in the best way:
- Small clear pouch: drops + a few alcohol wipes (optional) + tissues
- Secondary seal: a tiny zip bag inside the pouch for leak protection
- Placement: top pocket of personal item (not buried under chargers)
Leak prevention matters more than people admit. Pressure changes and rough handling can turn a cap that felt “tight” at home into a sticky mess at altitude. A second seal costs you 12 seconds and can save the bottle.
I once opened my pouch mid-flight and found a little “drop perfume” coating everything. My headphones smelled like medicine for two days. Since then, I double-seal like a person who learns from pain.
Quick packing test: can you pull your drops out with one hand while holding your passport in the other? If yes, you’re ready.
- Number: 2 layers of sealing beats 1 layer of hope.
- Number: keep 1 spare cap if your bottle design is flimsy (some are).
Rule 5: Screening flow, 2025 US—tight connection, PreCheck, and extra minutes
If you’re time-poor, this is your section. The security line isn’t where you want to improvise a new routine. The goal is to be smooth even when you’re tired, jet-lagged, and carrying a coffee you’ll abandon anyway.
What to do:
- Before you reach the bins, put your medical pouch where you can grab it.
- When you step up, say the script: “Prescription glaucoma eye drops—medical liquids.”
- If asked, remove them for screening. If not asked, keep them accessible anyway.
Time math that actually helps: add 5 minutes if you’re declaring medical liquids, and add 10 minutes if you’re traveling with multiple medications, syringes, or assistive devices. Is it always needed? No. Does it protect your connection? Yes.
I once tried to “save time” by saying nothing and keeping everything buried. I did not save time. I got selected, my bag was searched, and I stood there quietly regretting my choices like a character in a slow comedy.
If you’re connecting internationally into the US: remember TSA screening happens at US checkpoints, not overseas. But overseas security may screen your liquids too. That’s why labeling and calm presentation are universal—especially if you’ve ever had that quiet, nagging thought of “is this just aging, or is it something more serious?” and you want your care routine to stay steady.
- Declare medical liquids early
- Budget 5–10 extra minutes for screening
- Keep the pouch reachable so you don’t “bag-explode”
Apply in 60 seconds: Practice the one-line script once before you leave home.
Rule 6: In-flight reality—dry air, timing, and when not to dose
Carry-on is half the win. The other half is using your drops safely when you’re in the real world: dry cabin air, cramped seats, turbulent hands, and a tray table that looks clean until you stare at it for 2 seconds.
Two simple travel habits:
- Schedule buffer: dose before boarding when possible, not while juggling elbows mid-flight.
- Clean hands plan: use sanitizer or wipes before dosing, then wait a moment so you’re not putting wet alcohol near your eye.
If you wear contacts, consider whether your drops are compatible and whether you’ll need a lens case—especially if you’re not sure which glaucoma drops play well with contact lenses. The cabin dries you out, and “dry eye panic” can feel like a medical emergency when it’s really just dehydration plus recycled air. Keep it boring: water, routine, and steady timing.
A tiny confession: I once tried to dose during turbulence and blinked the drop straight onto my cheek like a cartoon. It was almost impressive. Now I dose before boarding or after landing unless it’s truly time-sensitive.
- Number: aim for 1 planned dosing window per travel leg (before boarding or after landing).
- Number: keep 1 tissue ready—drops and gravity are not always friends.
Show me the nerdy details
Some eye drops can blur vision briefly, and ointments or gels can blur longer. In-flight lighting, dry air, and fatigue can amplify that blur. If you must dose during the flight, do it when the seatbelt sign is off, your hands are steady, and you can keep your bottle tip clean. Avoid letting the bottle tip touch your lashes or skin—contamination is a sneaky way to ruin a bottle mid-trip.
Rule 7: Backup plan—replacement, insurance coverage tiers, and your pharmacy move
This is the rule that separates “minor inconvenience” from “trip-ending stress.” You don’t need a disaster bunker. You need a replacement path.
Your backup plan has three layers:
- Layer 1 (best): carry a backup bottle in your personal item.
- Layer 2 (realistic): have prescription details available so a pharmacy can help.
- Layer 3 (financial): understand your coverage and what you can pay if you must.
Here’s where the money language matters, without getting weird about it: if you need an emergency refill, your out-of-pocket cost can depend on your coverage tier, deductible, and whether the medication needs prior authorization. If your drops are a specialty medication, the friction can be higher. If they’re generic, the refill can be simpler. Either way, the “I’ll solve it later” plan becomes expensive in time and stress—especially for travelers who are high-risk for glaucoma while navigating Medicare and don’t want surprise delays.
Commercial entity signals, neutral and useful: if you’re in the US, you may interact with your insurer, a pharmacy chain, and your prescriber’s office. In the UK, you may interact with NHS services and a local pharmacy depending on your situation. In either case, having the right information ready is the difference between a 10-minute solution and a day-long spiral.
I once had a cap crack inside my bag. The bottle didn’t leak much, but it was enough to make me doubt every future dose. That day taught me the real definition of “backup”: not extra stuff—extra certainty.
- Yes/No: Is each bottle clearly labeled as medication (or in its original box)?
- Yes/No: Is the bottle size under 100 mL, or medically necessary if larger?
- Yes/No: Can you show prescription details quickly if asked?
- Yes/No: Do you have a backup bottle or a refill plan?
- Yes/No: If replacing it costs money, do you know your coverage tier or deductible status?
Next step: If you hit “No” on any line, fix it in 5 minutes—label, photo, or backup bottle.
Neutral action: Save this checklist and confirm your medication policy on your provider’s official page.
- Best when you have 1–2 small bottles
- Fast access at the gate and in-flight
- Lowest risk if checked bags delay
Trade-off: you may remove it for screening depending on the lane.
- Best for longer trips or multi-dose regimens
- Reduces “what if I run out” stress
- Lets you pack comfort items too
Trade-off: never put your only supply in checked baggage.
Neutral action: Screenshot this card and verify your airline’s carry-on rules before you fly.
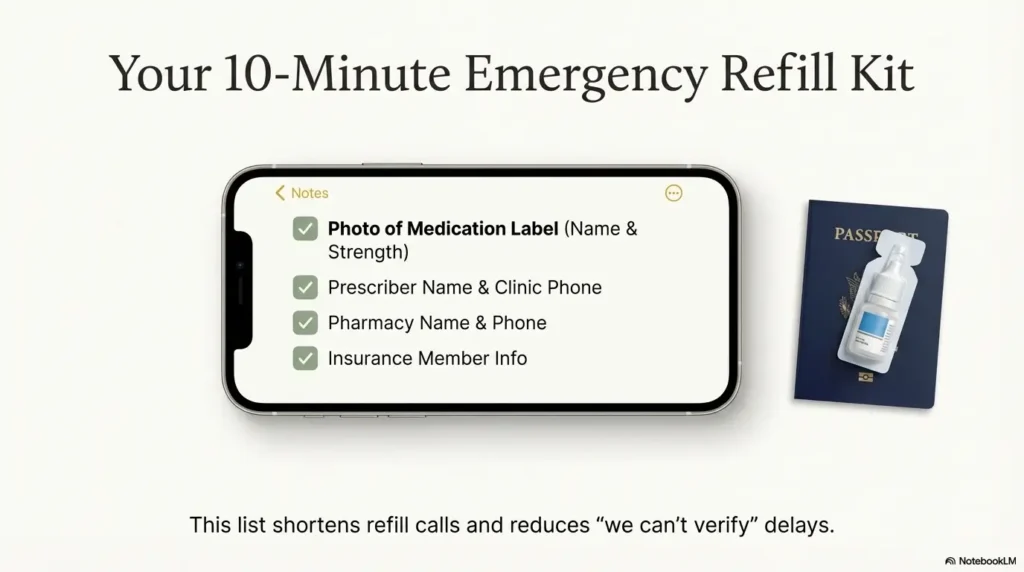
- Medication name and strength (photo of label)
- Prescriber name and clinic phone
- Your pharmacy name and phone
- Insurance member info, if applicable
- Travel insurance details if you rely on it
Why this helps: it shortens refill calls and reduces “we can’t verify” delays.
Neutral action: Save this list and confirm your plan’s refill policy on the official portal.
Money Block: 60-second pack estimator
Let’s make this painfully easy. This estimator doesn’t guess the chemistry of your bottle. It simply helps you decide how conservative you want to be, based on your trip length and your comfort level.
Neutral action: Save your result and confirm your medication quantities with your clinician or pharmacist if you’re unsure.
Mistakes that trigger extra screening (and how to unstick them fast)
This section is your “avoid the slow lane” insurance. The fastest way through TSA is to avoid looking like you’re hiding something. Most delays happen for boring reasons, not suspicious ones.
Common triggers:
- Unlabeled bottles (especially decanted into a generic travel container)
- Sticky, leaking caps that look like tampering
- Buried liquids under a tangle of chargers, coins, and snacks
- Big liquid clusters that look like a “liquids bag” exploded
- Over-explaining until your story changes mid-sentence (fatigue does this)
How to unstick it fast: stop talking, present the item, use one sentence, and follow instructions. The officer’s job is the procedure. Your job is cooperation, not persuasion.
I’ve watched people argue themselves into a longer inspection. The officer didn’t look angry—just committed to the process. Every extra sentence became another reason to re-check. Calm is the shortcut.
If your bottle alarms or gets flagged: don’t panic. Medical liquids can receive extra screening. It doesn’t mean you did something wrong. It usually means the machine or policy requires a closer look.
Short Story: The “gate-check surprise” lesson (120–180 words)
I was running late, doing that heroic little airport jog that feels athletic until you see yourself reflected in a window. At the gate, the agent announced overhead bins were full and asked for volunteers to gate-check carry-ons. My brain said “Sure, that’s helpful.” My hands said “Absolutely not.” Because in that bag—buried under a hoodie and a charger—was my only bottle of glaucoma drops.
I had ten seconds to choose between being polite and being able to see comfortably tomorrow. I stepped aside, opened the bag, and pulled out a tiny medical pouch like it was a passport. The agent nodded. The bag got checked. The pouch stayed with me. That flight was fine. But the lesson stuck: if your meds aren’t instantly reachable, you’ll eventually face a moment where you have to choose fast—and you’ll hate the options.
- Keep bottles labeled
- Store them on top, not buried
- Use one calm sentence—then stop talking
Apply in 60 seconds: Move your medical pouch to the most reachable pocket right now.
A simple infographic: the airport checkpoint flow
FAQ
Q1) Can I bring glaucoma eye drops in my carry-on?
Yes, in most common bottle sizes this is routine. Keep them labeled, accessible, and be ready to remove them for screening if asked.
60-second action: Put your drops pouch in the top pocket of your personal item now.
Q2) Do eye drops have to fit in the quart-sized liquids bag?
Standard liquids often go in the quart bag, but medically necessary liquids can be handled separately and declared. Keeping medical liquids separate can actually speed things up because you can present them quickly.
60-second action: Create a dedicated medical pouch instead of mixing it with toiletries.
Q3) What if my bottle is larger than 3.4 oz / 100 mL?
TSA public guidance allows medically necessary liquids in reasonable quantities, but you should declare them at the checkpoint. Keep proof handy and expect possible extra screening.
60-second action: Practice the one-line script once before your travel day.
Q4) Do I need a doctor’s note for TSA?
Often, clear labeling is enough for typical drops. A doctor’s note can help in edge cases and international travel, especially for larger containers or multiple liquids.
60-second action: Take a clear photo of your prescription label as a backup.
Q5) Can TSA open my eye drops?
Extra screening can happen, and procedures vary. Keep the bottle sealed, don’t tamper with it, and follow instructions calmly.
60-second action: Double-seal the bottle in a small zip bag to prevent leaks that look suspicious.
Q6) What should I do if my bag is gate-checked unexpectedly?
Always keep your drops in a pouch you can pull out in seconds. If your carry-on is taken, your medical pouch stays with you.
60-second action: Move drops from the main compartment to an outer pocket before you board.
Q7) What about traveling from the UK or Korea into the US?
You’ll pass security under the rules of your departure airport first, and TSA rules apply when you go through security in the US. Keep labeling and prescription details available so you can satisfy either system without stress.
60-second action: Store one screenshot of your prescription label in your phone’s favorites album.
Closing the loop: your 15-minute next step
Remember the hook—the tiny bottle that can quietly decide whether your trip feels safe or stressful? The solution isn’t fancy. It’s repeatable. You’re not trying to outsmart security. You’re trying to make your medication obvious, protected, and easy to screen.
Your 15-minute next step: build a dedicated medical pouch with two seals, add one backup (if you can), take a clear photo of your prescription label, and practice the one-line script once. Then run the estimator and adjust your plan to match your trip risk. You’ll walk into the airport with fewer unknowns—and that calm shows. And when you’re home again, keep the momentum with an annual eye exam checklist for seniors so travel doesn’t become the moment you realize you’ve been delaying care.
Last reviewed: 2025-12. Guidance described here aligns with published TSA and FAA passenger information pages, but checkpoint procedures can vary by airport and lane—so keep your plan flexible.