
Senior home safety guide
How to Mark Door Locks for Seniors
with Aging Eyes
A door lock can become strangely invisible when the porch light glares, the key ring feels crowded, or a silver deadbolt melts into a pale door like a coin dropped into snow. For many older adults, the problem is not memory or stubbornness. It is contrast, placement, shadow, texture, and the tiny betrayal of low light.
The safest way to mark door locks for seniors with aging eyes is not to cover the door in bright stickers. It is to create a small, consistent, easy-to-find system that helps the hand and the eye work together. A good mark says, “Here. This is the lock. This is the direction. Nothing else has changed.”
This guide walks through low-cost DIY options, safer exterior-door choices, tactile marking, keypad and smart-lock tips, nighttime testing, and the moments when a locksmith, occupational therapist, or family safety plan may be wiser than another strip of tape.
See faster
Use contrast that stands out in daylight, dusk, and porch-light glare.
Find by touch
Add raised cues that guide the hand without blocking moving parts.
Stay discreet
Improve safety without turning the front door into a public instruction sign.
Small cue, big calm: the best lock marking system is the one a senior can use quietly, quickly, and confidently at 9 p.m. with tired eyes. 🔑
Snapshot
This article is for adult children, caregivers, seniors aging in place, and home-safety helpers who want a low-cost way to make locks easier to see and use. You will learn where to place marks, what materials to compare, what mistakes to avoid, and how to test the setup before relying on it every day.
Table of Contents
Before You Mark Any Lock: Safety Comes First
Door lock marking looks simple. A sticker here, a dot there, and the job seems done before the coffee cools. But doors are safety points, privacy points, emergency points, and sometimes fall-risk points. A badly placed marker can confuse the person it was meant to help.
This guide can help you compare practical options and set up a safer visibility system. It cannot replace a home safety assessment, medical advice, locksmith guidance, or a dementia wandering plan. If lock confusion is frequent, sudden, or connected with memory changes, repeated lockouts, falls, wandering, or fear at night, treat that as a bigger safety conversation.
Before you act
Use lock marking as a visibility aid, not as a substitute for secure hardware, emergency planning, or medical support. For seniors with dementia risk, repeated nighttime exits, severe vision loss, or frequent lockouts, consider a qualified locksmith, occupational therapist, low-vision specialist, or local aging-in-place professional before changing exterior doors.
What this guide can help you do
You can use this article to choose safer marking materials, decide whether color or texture matters more, set up a consistent system, and test the lock in real-life lighting. The goal is not to make the door look “labeled.” The goal is to make the lock feel obvious to the person using it.
When to bring in help
Consider professional help when the lock is hard to operate, the key sticks, the deadbolt alignment is poor, the senior has arthritis or tremor, or several family members disagree on what is safe. A locksmith may solve a mechanical problem that no sticker can fix. An occupational therapist may notice lighting, reach, balance, and routine issues that the family has grown used to seeing.
Why Door Locks Disappear in Low Light
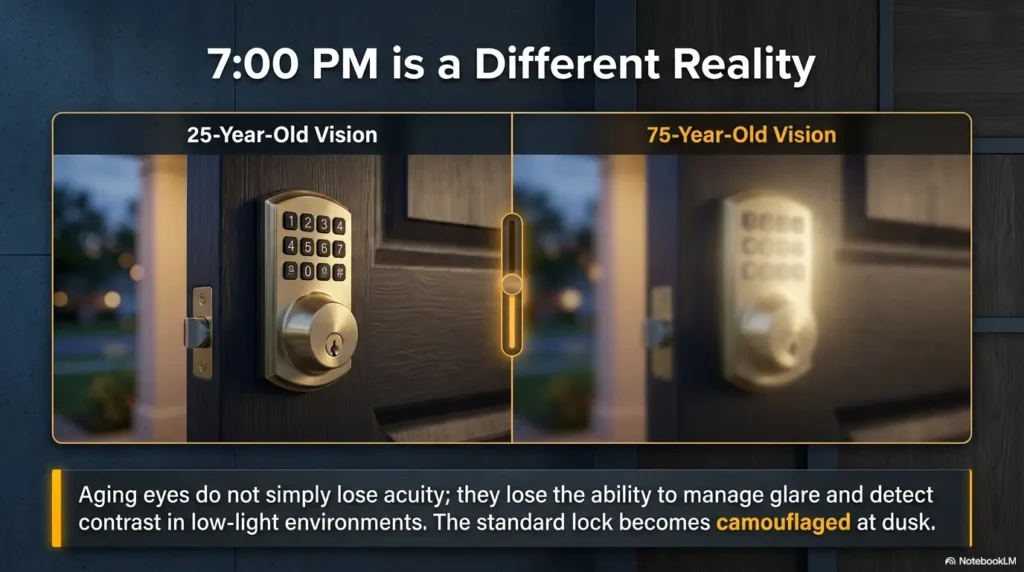
Aging eyes often need more light, more contrast, and less glare. That combination matters at the door because locks are usually small, reflective, and surrounded by surfaces that are not designed for low vision. Brass on brown wood, silver on white paint, and black keypads on dark trim can all blur into visual oatmeal.
The problem often appears first at transition moments: coming home at dusk, carrying groceries, stepping from a bright driveway into a shaded porch, or waking in the night to check a side door. These are exactly the moments when a senior should not be fumbling, bending, squinting, or trying five keys by feel.
Aging eyes need contrast, not decoration
Decorative labels can look charming in a craft drawer and vanish on a real door. The best door lock markings for seniors are functional: high contrast, matte, placed close to the lock, and simple enough to understand without explanation.
Think less “label the door” and more “create a landing strip for the eye.” The mark should guide attention to the keyhole, thumb turn, keypad start button, or latch position.
The five-second test before you mark anything
Before adding anything, ask the senior to stand where they normally stand and find the lock within five seconds. Do this without coaching. If they hesitate, lean forward, touch the wrong part, or say “I know it is here somewhere,” you have found the real problem.
- Can they see the keyhole without bending?
- Can they tell whether the deadbolt is locked or unlocked?
- Does the porch light create glare on the metal?
- Does the door color swallow the lock color?
- Can they use it with reading glasses off?
Key takeaway
If the lock is hard to find before marking, do not guess. Observe the exact moment of confusion first. Placement matters more than the fanciest sticker.
Who Should Use DIY Lock Marking, And Who Should Pause
DIY lock marking works best when the senior can still operate the lock safely and only needs better visual or tactile guidance. It is a support system, not a rescue system. That distinction matters.
For an independent older adult with mild low vision, a high-contrast mark can reduce frustration. For a caregiver helping a parent age in place, the same mark can make daily entry smoother. For a senior with repeated wandering, confusion, or emergency-access problems, the safer answer may involve a broader plan.
Best fit for DIY marking
DIY marking is usually a good fit when the lock is mechanically sound, the senior understands how the door works, and the main issue is visibility. This includes older adults who misplace the keyhole in dim light, have trouble seeing the thumb turn, or need a clear cue on which way the deadbolt turns.
Good fit for caregivers
Caregivers can use lock marking to standardize doors across a home. For example, every inside thumb turn might get one small raised dot above the lock position, while the most-used entry door gets one matte contrast ring near the cylinder. The fewer rules, the better.
Not ideal for dementia wandering risk
If the concern is wandering, repeated exits, or not recognizing the door, making the lock easier to find can create a new risk. In that situation, talk with medical, caregiving, or aging-in-place professionals about a safer plan. The answer may involve supervision, door alerts, environmental changes, or emergency planning rather than brighter labels.
| Situation | DIY marking may help | Consider professional help |
|---|---|---|
| Senior can use the lock but struggles in dim light | Yes, start with contrast and texture | If the lock sticks or requires force |
| Caregiver wants a consistent door system | Yes, use one rule for every door | If several doors have different lock types |
| Repeated lockouts | Maybe, if caused by visibility only | Yes, especially if keys, memory, or hardware are involved |
| Dementia wandering concern | Use caution | Yes, build a broader safety plan |
| Severe low vision or blindness | Texture may help | Yes, ask a low-vision specialist or OT |
Use High-Contrast Markers Where the Hand Already Goes
The best place to mark a door lock is usually not the largest empty space on the door. It is the small area where the hand already goes. Put the cue close enough to guide action, but not so close that it blocks the lock, traps dirt, peels into the keyhole, or covers screws and sensors.
A useful marker should answer one question quickly: “Where do I put my hand or key?” Anything beyond that can become visual chatter.
Mark the keyhole edge, not the whole door
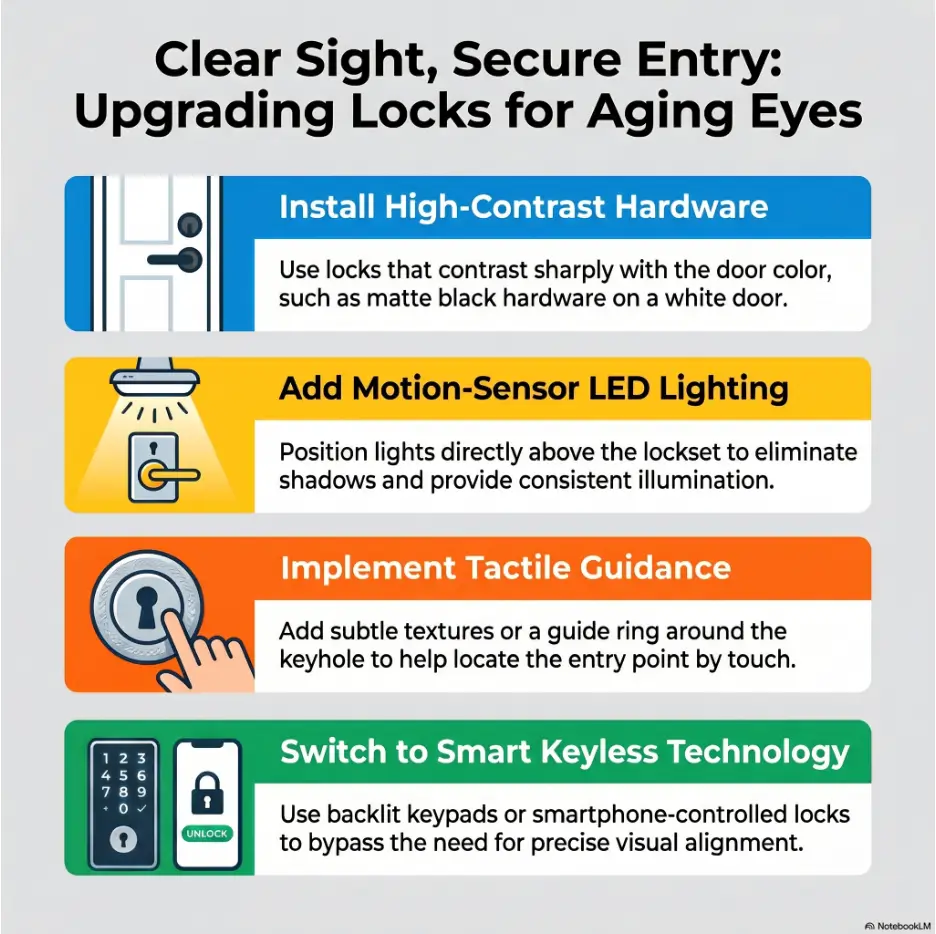
For a traditional key lock, place a small matte contrast cue beside or just around the keyhole. A full ring can work on some doors, but a partial mark may be more discreet and easier to keep clean. Avoid placing tape where the key rubs it every time, because peeling edges are tiny gremlins with office supplies.
For example, on a dark brown door with a brass lock, a small off-white matte marker near the keyhole may stand out better than yellow. On a white door with a silver lock, a dark charcoal or navy cue may be easier to spot than pale gray.
Put the cue beside the thumb turn, not behind it
For inside deadbolts, the thumb turn is often the most important part. Place the marker beside the turn, not hidden behind it. The cue should remain visible whether the lock is vertical or horizontal.
If the senior needs help knowing lock direction, use one consistent symbol or placement. For example, one raised dot above the thumb turn could mean “locked position” on every interior door. Do not invent a new code for each door unless you enjoy building a tiny escape room nobody requested.
Choose contrast pairs seniors can see quickly
High contrast is about difference, not brightness alone. Bright yellow tape on brass may not help. White on cream may look neat and fail completely. Compare the marker against the door, the lock, and the surrounding trim.
| Door or lock surface | Often easier to see | Often weaker |
|---|---|---|
| Dark wood door | Matte white, cream, light gray | Brown, brass, dark red |
| White or cream door | Matte black, charcoal, navy | Silver, pale yellow, beige |
| Brass lock | Dark matte cue beside the metal | Gold or yellow tape |
| Silver lock | Black, dark blue, or high-contrast matte cue | Light gray or shiny silver labels |
| Black keypad | Small light marker on start area or edge | Dark stickers or tiny text |
Quick rule
Do not choose a marker color in the store aisle. Choose it while standing at the door, under the lighting the senior actually uses.
The Tactile Trick: Make the Lock Findable by Touch
Tactile cues help when light is poor, glasses are off, hands are full, or vision fluctuates. They can be especially helpful during power outages or late-night checks, when the eye is tired and the hand wants a simple landmark.
The key is restraint. A tactile mark should guide, not obstruct. It should never interfere with the key, keypad, latch, door seal, alarm sensor, smart-lock cover, or moving parts.
Raised dots, rubber bumpers, and textured tape
Common tactile options include small raised dots, clear rubber bumpers, textured tape, and adhesive tactile markers. The best choice depends on the lock type and the senior’s hand sensitivity.
For many homes, one small raised dot near the keyhole or thumb turn is enough. More dots can create confusion, especially if the person already uses tactile labels on appliances, medicine bottles, remotes, or thermostats.
Why touch cues help at midnight
At night, even good vision can become unreliable. A tactile cue lets the senior locate the lock without scanning the whole door. It also reduces the urge to bend down, reach around blindly, or scrape the key along the door face.
If the senior has tremor, arthritis, numbness, or neuropathy, test tactile markers carefully. A marker that feels obvious to a younger caregiver may feel like nothing to an older hand. In that case, a larger textured area beside the lock may work better than a tiny dot.
Keep texture subtle but useful
- Place texture beside the lock, not inside the path of the key.
- Keep the marker low-profile enough that it does not catch sleeves or bags.
- Avoid rough material that can irritate thin skin.
- Check adhesive strength after humidity, cold weather, and cleaning.
- Use the same texture rule on every commonly used door.
Key takeaway
For low vision door lock help, tactile cues often matter as much as color. A senior should be able to find the cue with a fingertip, not just admire it under perfect lighting.
Color Coding Works, But Only If Color Is Not Alone
Color coding can be useful, but it is fragile when used by itself. Lighting changes color. Cataracts, macular degeneration, glare sensitivity, and color vision changes can make colors less reliable. A red sticker at noon may become a muddy smudge under a porch bulb.
Better systems pair color with shape, position, texture, or a repeated rule. That way, the cue still works when the color is less clear.
Pair color with shape, position, or texture
Instead of using only a blue sticker, use a blue raised dot. Instead of a red label that says “LOCK,” use a small red strip placed consistently above the locked position. The added shape or position gives the brain a second clue.
This is especially helpful in homes where several items are already labeled. If the TV remote, microwave, pill box, thermostat, and door locks all get random bright colors, the home starts to look like a confetti meeting with poor minutes.
What red, green, blue, and yellow can signal
Use color meanings only if the senior already understands them. Red may suggest stop or locked. Green may suggest go or unlocked. Yellow may signal caution. Blue can be useful as a neutral marker when red and green are confusing or too emotionally loaded.
The safer question is not “What color is best?” It is “Which cue can this person recognize quickly, in this doorway, at this time of day?”
Good, Better, Best lock marking options
| Option | Best for | Budget level | Watch out for |
|---|---|---|---|
| Good: matte contrast tape | Simple keyhole visibility | Low | Peeling edges, glare if too shiny |
| Better: contrast cue plus raised dot | Low light and touch guidance | Low to mid | Too many dots can confuse |
| Best: lighting, contrast, texture, and lock tune-up | Daily entry safety and reliability | Mid to higher | May require locksmith or OT input |
For many households, the “better” option is the sweet spot: one visual cue and one tactile cue. It is inexpensive, easy to test, and usually less cluttered than a full labeling project.
The Outside Door Needs a Quieter Strategy
Exterior doors need a balance between visibility and privacy. The mark should be clear to the senior standing at the door, but not so obvious that it tells strangers, “A vulnerable person lives here and this is the lock.”
That does not mean you should avoid exterior marking completely. It means the mark should be discreet, close to the lock, and not readable as an instruction from the sidewalk.
Make it visible to the senior, not obvious to strangers
A small matte contrast cue beside the cylinder is often better than a large label that says “KEY HERE.” The senior only needs enough information to find the keyhole from arm’s length. A passerby does not need a tutorial.
For apartment doors, shared hallways, or homes with frequent visitors, keep exterior cues even quieter. Interior marks can be larger because they are not public-facing.
Avoid large “unlock here” labels
Large exterior labels can also look institutional, which many seniors dislike. The goal is dignity as much as function. A well-placed cue should feel like a thoughtful tailoring job, not a warning sign stapled to the front of a life.
- Do not write “unlock,” “key,” or “senior” on the outside door.
- Do not mark hidden key spots or spare-key locations.
- Do not place reflective tape that flashes from the street.
- Do not block cameras, doorbells, sensors, or smart-lock covers.
- Do not make changes that violate rental or HOA rules without checking first.
DIY vs professional help
| Need | DIY may be enough | Paid help may be worth it |
|---|---|---|
| Lock is hard to see | Contrast tape, tactile marker, better lighting | Low-vision home assessment if several areas are difficult |
| Lock is hard to turn | Try only if minor and temporary | Locksmith to adjust hardware or replace worn lock |
| Keys are confusing | Key caps, tactile key system, one-entry routine | Lock rekeying, keyless options, caregiver access plan |
| Nighttime safety concern | Motion lighting and simple cues | Electrician, OT, or aging-in-place specialist if fall risk is high |
| Memory or wandering concern | Do not rely on marking alone | Medical and caregiving safety plan |
Before paying for upgrades, ask what problem you are solving. A premium smart lock may not help if the porch light causes glare. A locksmith may not help if the issue is low contrast. Good spending begins with a precise problem.
Nighttime Entry: The Moment Your System Gets Tested
Night is the honest inspector. A lock marking system that looks excellent at noon can fail under porch light glare, hallway shadow, or the strange blue-gray hour after sunset.
Test the door the way it is actually used. That means standing where the senior stands, holding what they usually hold, and using the glasses they usually wear or forget to wear.
Check from the driveway, porch, and hallway
For exterior doors, start from the driveway or walkway. Can the senior identify the correct door and approach safely? Then test from the porch. Can they find the keyhole without bending? Finally, test from inside the hallway. Can they tell whether the door is locked?
Each position can reveal a different problem. The porch may need lighting. The interior may need a larger thumb-turn cue. The walkway may need contrast on steps before the lock even enters the story.
Use motion lighting before adding more labels
If the lock is hard to see at night, do not automatically add more stickers. First check the lighting. A soft, well-aimed motion light can make the lock, key, threshold, and doormat safer at once.
Be careful with lights that are too bright or pointed directly at reflective metal. More light is not always better. Glare can turn a lock into a tiny mirror at the exact moment the senior needs clarity.
Try the setup with reading glasses off
Many seniors do not wear reading glasses when entering the house. They may be in a coat, carrying mail, or moving quickly out of weather. Test the lock marking system under that condition.
If the cue only works with reading glasses on, it may be too small. Choose a larger contrast shape, a stronger tactile cue, or better lighting.
Common mistake
Testing only in bright daylight gives false confidence. Always test at dusk, in full dark, and with the porch light on.
Keypads, Smart Locks, Deadbolts, and Sliding Doors Need Different Markings
Not all locks ask the same question. A keyhole asks, “Where does the key go?” A keypad asks, “Where do I start?” A smart lock asks, “What happens if the battery fails?” A sliding door asks, “Is the latch actually engaged?” Marking should match the job.
For keypads: mark the start point carefully
For a keypad lock, do not mark every number unless there is a clear reason. Too many markers turn the keypad into a tiny carnival. Instead, consider marking the start button, the enter button, or one orientation point that helps the senior locate the keypad correctly.
If the code uses repeated numbers, be cautious about marking those numbers on an exterior keypad. It may make the code easier for others to guess. A safer approach is to help with orientation rather than exposing the pattern.
For a deeper keypad setup, you may also want to review a dedicated guide on door lock keypad tips for seniors.
For smart locks: highlight the thumb turn and manual override
Smart locks can be convenient, but they should not become mysterious black boxes. Mark the interior thumb turn so the senior can tell locked from unlocked. Make sure the manual override, battery compartment, and emergency access method are understood by caregivers.
Avoid covering indicator lights, fingerprint sensors, cameras, speakers, charging ports, or sliding covers. If the lock has a manufacturer guide, follow it before applying adhesives.
For deadbolts: show direction without confusion
Deadbolts can be visually tricky because locked and unlocked positions may look similar at a glance. A small line, dot, or contrast cue near the locked position can help, but keep the rule consistent.
If one door locks with the thumb turn vertical and another locks with it horizontal, do not assume the senior will remember both. Consider standardizing hardware if confusion is frequent.
For sliding doors: mark eye level and hand level
Sliding doors often need two cues: one at hand level for the latch and one at eye level to show whether the door is secured. This matters because bending down to inspect a latch can create balance risk.
Use a simple contrast mark near the latch position, then test whether the senior can confirm the door is locked without crouching. If not, the latch may need adjustment or a more visible locking indicator.
Short Story: The sticker that moved two inches
Mara put a bright white label on her father’s back door after he complained that the lock “kept hiding.” The label was large, neat, and impossible to miss from the kitchen table.
Then she watched him use it at dusk. He reached for the keyhole, not the label. His hand covered the mark completely, and the porch light bounced off the brass deadbolt.
They moved the cue two inches to the left, changed it to matte charcoal, and added one small raised dot near the thumb turn inside. Suddenly the door stopped being a nightly argument.
The lesson was humble but useful: a marker does not help because it is visible to the caregiver. It helps when it meets the senior’s hand at the exact moment of use.
Caregiver Setup: Build a Simple Lock Legend Without Making a Mess
Caregivers often want to help quickly, which is understandable. But a home can become over-labeled in a weekend. The better approach is a small lock legend: one simple rule, repeated everywhere it makes sense.
A lock legend is not a public sign. It is a private reference system for the senior and trusted helpers. It keeps everyone from adding their own “helpful” sticker until the door looks like a committee meeting.
Use one rule for every door
Choose one visual cue and one tactile cue. For example, dark matte strip beside the keyhole, raised dot above the locked position, or cream marker on dark interior thumb turns. Then repeat that rule on the main doors.
- Use the same color family where possible.
- Use the same shape where possible.
- Use the same placement rule where possible.
- Do not label rarely used doors unless there is a clear need.
- Explain the system in one sentence.
Keep a small reference card inside
A small card near the family command center, not on the exterior door, can help visiting relatives or home aides understand the system. Keep it simple: “Raised dot means locked position. Cream mark means keyhole. Do not add labels without checking.”
This is especially useful when more than one person helps with the home. It prevents well-meaning chaos, the most common household decorating style in caregiving season.
Photograph and maintain the finished setup
Take a photo of each finished lock. Store it where family helpers can find it. Add a small maintenance date inside the home, not on the front door, so peeling tape does not become the villain six months later.
| Maintenance task | How often to check | Why it matters |
|---|---|---|
| Adhesive edges | Monthly | Peeling can catch keys or fingers |
| Color contrast | Seasonally | Lighting changes with weather and daylight |
| Tactile marker feel | Monthly | Dots can flatten, loosen, or collect grime |
| Lock movement | Monthly | Sticking locks increase frustration and force |
| Caregiver reference card | After any change | Everyone needs the same rule |
If you are building a broader low-vision home setup, related guides on bump dots vs tactile tape, light switches for seniors, and a home safety checklist for seniors can help you keep changes consistent rather than scattered.
Lock visibility framework
1. Observe
Watch where hesitation happens before adding anything.
2. Contrast
Choose matte light-on-dark or dark-on-light cues.
3. Touch
Add one raised cue near the hand’s natural path.
4. Test
Check daylight, dusk, dark, and glare conditions.
5. Maintain
Replace worn markers before they confuse the system.
Test Before You Trust It
The most important part of marking door locks for seniors is not the marking. It is the test. A system that has not been tested is just a hopeful decoration.
Testing should feel calm and respectful. The senior is not taking an exam. The door is. Watch the door fail, then fix the door.
Ask the senior to use the lock without coaching
After placing the marker, step back. Ask the senior to use the lock the way they normally would. Do not point, explain, or correct unless safety requires it. The first uncoached attempt tells you more than ten opinions.
Watch for hesitation, squinting, wrong turns, dropped keys, tapping around the wrong area, or frustration. These are not failures. They are data, wearing house shoes.
Change one thing at a time
If the mark does not work, change only one variable. Move the marker, change the color, add texture, or adjust lighting. Do not change everything at once or you will not know what helped.
This matters for learning. Seniors build habits through repetition. A stable system is easier to trust than a door that gets a new sticker wardrobe every Thursday.
Lock-marking mistakes that backfire
| Mistake | Why it backfires | Safer alternative |
|---|---|---|
| Glossy tape | Reflects porch lights and hides the lock | Matte, non-glare cue |
| Labels far from the keyhole | Eye sees the label but hand misses the lock | Place cue beside the action point |
| Tiny written words | Hard to read under stress or low light | Use shape, contrast, and texture |
| Large exterior instructions | May reduce privacy and look stigmatizing | Use discreet cue visible from arm’s length |
| Covering moving parts | Can block function or collect dirt | Keep marks beside, not on, mechanisms |
| Too many colors | Creates visual noise | Use one consistent rule |
Show me the nerdy details
Lock visibility depends on several interacting factors: luminance contrast, glare, viewing angle, working distance, surface finish, hand position, and cognitive load. A shiny bright marker can perform worse than a dull darker marker if it reflects the light source.
Aging eyes may adapt more slowly between bright and dim spaces. That is why a senior can see the lock clearly from inside the house but struggle after walking from a bright driveway to a shaded porch.
Tactile redundancy helps because it gives the brain another pathway. Instead of relying only on visual recognition, the system uses touch, position, and habit. That is why one raised dot in the right place can outperform a large printed label in the wrong place.
Key takeaway
A good marking system survives real use: tired eyes, one hand full, dim lighting, porch glare, and no caregiver standing nearby.
FAQ: Door Lock Marking for Seniors
What is the best color to mark a door lock for seniors?
The best color is the one with the strongest contrast against that specific door and lock. On a dark door, light matte markers often work well. On a light door, dark matte markers may be easier to see. Avoid choosing color by preference alone. Test it under the actual lighting.
Should I use glow-in-the-dark tape on door locks?
Glow-in-the-dark tape can help in some interior situations, but it is not a complete plan. It may need enough light exposure to charge, and it may not solve glare, placement, or touch problems. For exterior doors, use it cautiously and avoid making the lock too obvious from a distance.
Is it safe to mark an exterior door lock?
It can be safe if the marking is discreet, close to the lock, and designed for the senior rather than visible to strangers. Avoid large labels, written instructions, or marks that identify hidden keys, access codes, or vulnerability.
How do I make a deadbolt easier to see at night?
Start with lighting, then add a matte contrast cue near the thumb turn or locked position. A small raised dot can help the senior confirm the position by touch. Test in full dark and under porch or hallway lighting before adding more labels.
Can tactile stickers help seniors find the keyhole?
Yes, tactile stickers can help when placed beside the keyhole or near the thumb turn. They are especially useful in low light. Keep them away from moving parts and test whether the senior can actually feel them comfortably.
What should I avoid putting near a smart lock?
Avoid covering sensors, cameras, fingerprint readers, buttons, indicator lights, speakers, key slots, charging ports, sliding covers, and battery compartments. Check the lock’s instructions before applying adhesive material.
Are large labels better for seniors with low vision?
Sometimes, but not always. Large labels can help indoors, especially on private doors. On exterior doors, they may create privacy concerns. In many cases, a medium-sized high-contrast cue placed exactly where the hand goes works better than a large label placed too far away.
When should I replace the lock instead of marking it?
Consider replacing or repairing the lock if it sticks, requires force, has a worn key, confuses the senior repeatedly, or does not match the person’s hand strength and vision. Marking helps visibility. It does not fix bad hardware.
Next Step: Do a 10-Minute Lock Visibility Walkthrough
Start with one door. Not every door. Not the whole house. Choose the door the senior uses most often, because that is where a small improvement can pay rent immediately.
Stand where the senior actually stands. Look at the lock in daylight, dusk, and night lighting. Ask the senior to use it without coaching. Then add one contrast cue and one tactile cue. Retest before marking anything else.
15-minute action plan
- Pick the most-used door.
- Ask the senior to find and use the lock without help.
- Notice the exact hesitation point.
- Add one matte contrast cue near the keyhole or thumb turn.
- Add one subtle tactile cue if touch guidance is needed.
- Test again tonight with normal lighting and glasses habits.
When the system works, it should feel almost boring. The senior walks up, finds the lock, turns the key or thumb turn, and moves on with the evening. That quiet little success is the point. Not more labels. Not more gadgets. Just a door that stops arguing with aging eyes.
Last reviewed: 2026-06